TL;DR
- Shields provide damage mitigation rather than bonus health, absorbing partial damage based on weapon type
- Three shield tiers offer progressive protection with corresponding mobility trade-offs and augment requirements
- Strategic shield selection depends on playstyle, mission objectives, and available resources
- Mid-raid shield recharging requires specific items or crafting with limited resources
- Proper weight management and augment progression are essential for effective shield utilization
In the hostile environment of Speranza, defensive capabilities prove equally crucial as offensive firepower for survival. While multiple recovery systems exist within Arc Raiders, shields establish your primary defensive mechanism during combat engagements. This comprehensive analysis examines every available shield variant, detailing their statistical attributes, operational principles, and optimal acquisition and utilization methods.
Basic shield models become accessible immediately, though advanced protective gear necessitates Raiders Augment progression. Additionally, shields feature repairable durability through medical crafting stations. Acquisition pathways include trader purchases or fabrication across various crafting interfaces. Below you’ll discover the complete inventory of protective shields within the game ecosystem.
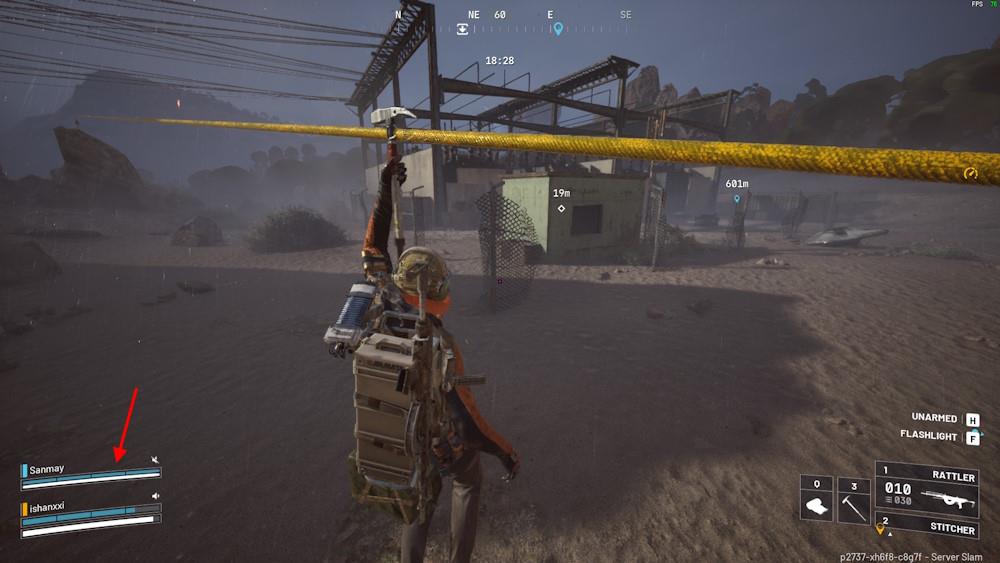
The blue indicator bar positioned above your Raider’s health meter represents active shield integrity. Each individual segment within this display corresponds to 10 shield units. Contrary to conventional gaming mechanics, shields don’t function as supplementary health pools. Instead, they operate as damage mitigation systems, absorbing calculated portions of incoming damage when enemies strike you with their weaponry.
Shield damage absorption varies according to the specific weapon employed and the anatomical region targeted. This sophisticated system enables enemy incapacitation without complete shield failure. Furthermore, despite shields contributing to your overall encumbrance, appropriate Arc Raiders skill selections can mitigate weight penalties. However, complete weight elimination remains impossible even with maximum investment in the “Used to the weight” proficiency.
| Shield Type | Description | Stats | Crafting Recipe | Lance Trader Price |
|---|---|---|---|---|
| Light Shield | A lightweight shield that offers limited protection without severely impacting mobility.
Requires no Raider Augment |
Shield Charge: 50 Damage Mitigation: 23% Movement Impact: None |
1x ARC Alloy 8x Fabric |
$2000 |
| Medium Shield | A standard shield that offers fair protection at a moderate cost to mobility.
Requires Raider Augments II+ |
Shield Charge: 80 Damage Mitigation: 45% Movement Impact: -5% Weight: 7kg |
4x ARC Alloy 2x Voltage Converter |
$6000 |
| Heavy Shield | A heavy shield that offers strong protection at a significant cost to mobility.
Requires Raider Augments III+ |
Shield Charge: 120 Damage Mitigation: 65% Movement Impact: -15% Weight: 10kg |
10x ARC Alloy 5x Voltage Converter |
$15000 |
Strategic Shield Selection Analysis: Your shield choice should align with both mission parameters and personal combat methodology. Light shields suit reconnaissance and hit-and-run tactics, medium shields provide balanced protection for general engagements, while heavy shields excel in defensive positions and prolonged firefights. Consider that higher-tier shields demand substantial resource investment and specific augment progression, making early-game acquisition challenging for new players.
Common Mistakes to Avoid: Many players incorrectly assume shields function as temporary health buffers, leading to tactical miscalculations. Remember that shield effectiveness diminishes against high-caliber weaponry and coordinated enemy attacks. Always maintain situational awareness regarding your shield integrity during combat sequences.
Following shield fabrication or acquisition from Lance’s trading post, integration into your loadout becomes possible. Execute this by dragging the shield item from your inventory to the designated shield equipment slot. However, medium and heavy shield deployment in Arc Raiders requires elevated Raider Augment levels. Shield configuration remains exclusively possible during pre-raid preparation phases. This limitation introduces strategic considerations regarding mid-combat shield management, transitioning us to the subsequent section covering shield recharging methodologies.
Advanced Weight Management: While the “Used to the weight” skill provides partial mitigation, optimal load planning remains essential. Consider pairing heavy shields with lightweight secondary equipment to counterbalance mobility restrictions. Experienced players often develop specialized movement techniques to compensate for shield-induced encumbrance during critical engagements.
Loadout Optimization Tips: Successful raiders synchronize their shield selection with complementary gear and abilities. For instance, medium shields pair effectively with assault rifles and tactical positioning, while heavy shields complement stationary defensive setups and area denial strategies.
To restore shield functionality during missions, specific consumable items must be utilized. These specialized tools instantly regenerate designated shield quantities following activation channeling. Below appears the comprehensive inventory of shield restoration items accessible within Arc Raiders:
| Item | Shield Point | Use Time | Crafting Recipe | Buy Price |
|---|---|---|---|---|
| ARC Powercell | 20 | 3s | N/A | N/A |
| Shield Recharger | 4/s | 2s | – 5x Rubber Parts – 1x ARC Powercell (Med Station I Basic Bench) |
$1560 (Lance) |
| Surge Shield Recharger | 50 | 5s | – 1x Electrical Components – 1x Advanced ARC Powercell (Med Staton II) |
$3600 (Lance) |
Critical Note: Operators can additionally fabricate shield rechargers during active missions utilizing 2x Battery components and 10x Metal Parts.
Economic Efficiency Analysis: For budget-conscious players, crafting typically proves more cost-effective than direct purchases from Lance. However, this requires advance resource collection and appropriate bench access. The Surge Shield Recharger offers superior value for extended operations despite its higher initial cost.
Advanced Recharging Strategies: Seasoned raiders strategically time shield recharges during combat lulls or while utilizing cover. The ARC Powercell provides rapid emergency restoration, while the Shield Recharger delivers sustained regeneration ideal for prolonged engagements.
This concludes our exhaustive examination of Arc Raiders shield systems and their operational principles. Which protective model will you construct for your forthcoming expedition? Share your selections in the commentary section below.
Action Checklist
- Analyze mission requirements and select appropriate shield tier (light for mobility, heavy for defense)
- Acquire necessary Raiders Augments for medium/heavy shield access
- Gather crafting materials for preferred shield model during exploration
- Configure loadout with complementary equipment to offset shield weight penalties
- Stockpile shield recharging components for mid-mission emergencies
- Practice movement techniques with equipped shields to maintain combat effectiveness
No reproduction without permission:Tsp Game Club » All Arc Raiders Shields Complete guide to Arc Raiders shields: types, mechanics, and strategic deployment for survival