TL;DR
- Complete the Breaking New Ground community event by donating materials to unlock Stella Montis access
- Master the Matriarch’s three-phase attack pattern and target its exposed core during vulnerability windows
- Counter the Shredder ARC’s mobility with area denial weapons and coordinated team positioning
- Utilize the tunnel network’s verticality for strategic advantages and safe extraction routes
- Optimize Merit spending on exclusive weapons and cosmetics before event conclusion
Conquer the new Stella Montis research facility in Arc Raiders with our comprehensive guide covering access requirements, advanced combat tactics, and premium loot acquisition strategies.
The frozen mountain installation of Stella Montis has now become accessible to dedicated Raiders, introducing the game’s most demanding content to date. This immaculate alpine complex provides exceptional rewards for players courageous enough to confront the lethal Matriarch and agile Shredder ARCs patrolling its clinical hallways.
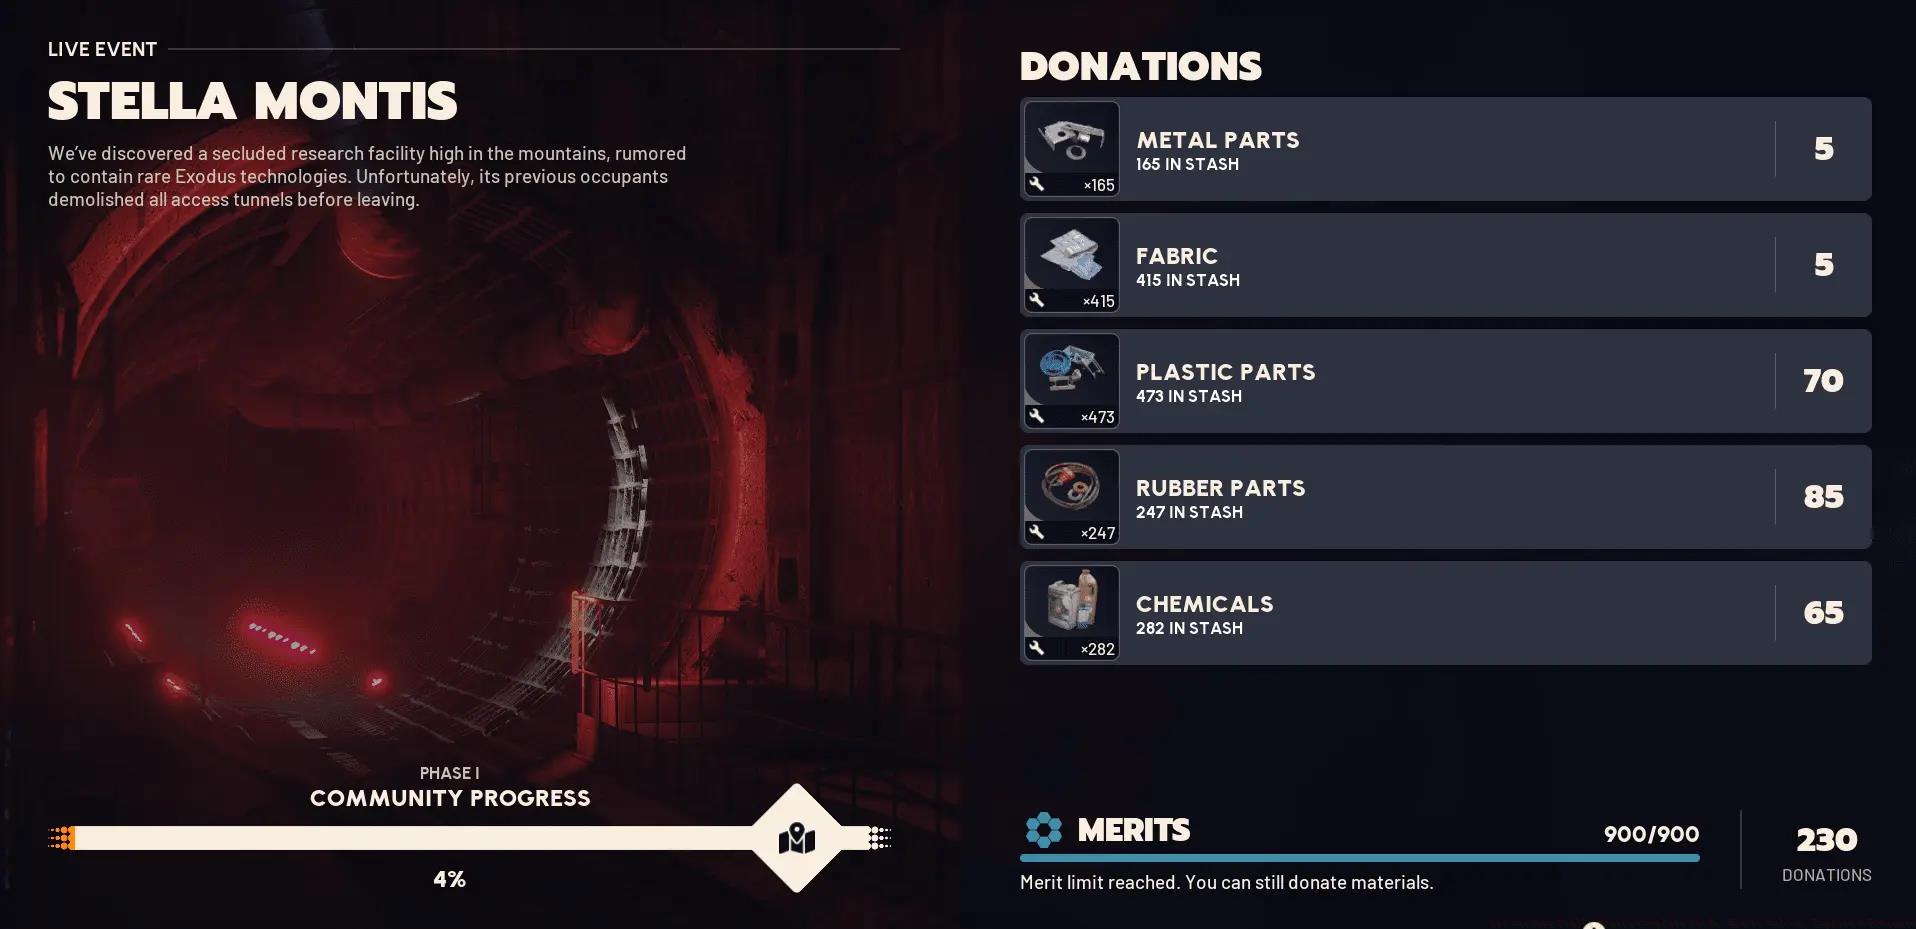
Gaining entry to Stella Montis mandates completion of the Breaking New Ground collaborative event. Participants must supply fundamental crafting components to rehabilitate the subterranean passage system linking Speranza with northern regions. Here are the precise contribution requirements:
These resources automatically appear following raid completions, enabling participation after finishing minimum five sessions. Donating materials grants Merits, the fresh event currency utilized for obtaining exclusive items.
You may continue contributing resources beyond individual Merit limitations to accelerate community progress toward unlock benchmarks.
After worldwide community finishes Phase 1, the event advances to Staking Our Claim, presenting personal advancement pathways and time-restricted trials continuing through December.
Stella Montis occupies an extensively excavated position within northern mountain ranges, significantly distant from known Rust Belt zones. Contrasting other maps, this contained research center remains remarkably preserved, presenting a frigid, aseptic setting suggesting humanity’s abandoned aspirations.
The terrain incorporates two separate tiers featuring numerous entry locations:
Environmental Mastery Tips: The sterile white corridors create visibility challenges during snowstorms. Use the facility’s lighting systems to track ARC movements, and prioritize high ground positions overlooking central courtyards. The metallic surfaces amplify sound cues, enabling experienced players to detect approaching threats through audio awareness.
Common Navigation Errors: Many newcomers underestimate the verticality of Stella Montis. The multi-level design requires constant awareness of elevation changes. Avoid getting trapped in dead-end laboratories by memorizing emergency exit routes and maintaining mobility equipment for rapid repositioning.
The Matriarch represents Stella Montis’s primary boss encounter, requiring coordinated team tactics and precise execution. This massive ARC employs three distinct combat phases that test raid groups’ adaptability and damage output consistency.
Phase 1 – Containment Breach: The Matriarch begins with area denial attacks, creating hazardous zones that limit movement. Teams should spread horizontally to avoid grouped damage while assigning one member to track attack patterns. Its armor plating remains nearly impenetrable during this stage, so focus on survival and positioning.
Phase 2 – Core Exposure: After sufficient damage, the Matriarch’s central core becomes vulnerable. This 45-second window demands maximum damage deployment. Use ultimate abilities and high-damage weapons during this critical period. The core takes 300% additional damage, making this the fight’s pivotal moment.
Phase 3 – Enraged State: Below 25% health, the Matriarch enters its final enraged mode, gaining new attacks and increased speed. Teams must now balance aggressive damage with heightened survival awareness. The arena develops additional environmental hazards, requiring constant movement and communication.
Advanced Tactics: Designate specific roles within your squad – one player should focus solely on monitoring attack telegraphs while others concentrate on damage rotation. The Matriarch’s leg joints represent secondary weak points when the core isn’t exposed, providing consistent damage opportunities between vulnerability phases.
The Shredder ARC presents a completely different combat challenge compared to the Matriarch. This highly mobile opponent specializes in rapid strikes and flanking maneuvers, punishing static positioning and uncoordinated teams.
Mobility Countermeasures: The Shredder utilizes wall-running and ceiling traversal to approach from unexpected angles. Deploy area denial tools like tesla traps and incendiary devices to limit its movement options. Teams should maintain 360-degree awareness and assign specific directional responsibilities to prevent surprise attacks.
Attack Pattern Recognition: The Shredder telegraphs its assaults through distinct audio cues and preparation animations. Its blade whirlwind attack features a 2-second windup accompanied by rising engine pitch. The pounce attack begins with crouching hind legs and targeting lasers. Learning these signals reduces incoming damage significantly.
Optimal Engagement Range: Mid-range combat proves most effective against Shredders. Close quarters limit reaction time against its rapid strikes, while long distance enables its evasion capabilities. Shotgun users should time their approaches carefully, engaging only after crowd control effects land successfully.
Loadout Recommendations: Automatic rifles with high magazine capacity outperform precision weapons against Shredders. The constant movement makes sustained fire more valuable than burst damage. Equip mobility enhancements like grapple hooks or jump packs to match its vertical combat style and create counter-attack opportunities.
Stella Montis introduces several exclusive weapons and gear pieces that significantly enhance combat capabilities. Understanding acquisition methods and optimal usage scenarios maximizes their effectiveness.
New Weapon Archetypes: The facility’s armory includes energy-based firearms that bypass conventional armor mechanics. The Voltaic Caster chains lightning between nearby targets, while the Cryo Launcher creates terrain-altering ice fields that slow ARC movements. These tools enable new tactical approaches previously unavailable.
Equipment Synergies: Combine the Graviton Pulser with area damage weapons for devastating combos. The gravity well groups enemies together, allowing explosives and chaining weapons to achieve maximum efficiency. Similarly, the Optical Camouflage system pairs excellently with sniper rifles, enabling repositioning without breaking stealth.
Upgrade Priority: Focus enhancement materials on weapons that complement your preferred playstyle. Support players should prioritize tools that enable team survival, while damage specialists should maximize weapons with high boss damage potential. Avoid spreading upgrade resources too thinly across multiple weapon categories.
Acquisition Methods: Most Stella Montis exclusive gear requires Merit purchases or challenge completion. The Voltaic Caster demands 15,000 Merits, while the Cryo Launcher unlocks after defeating both major ARCs on hard difficulty. Plan your farming routes accordingly to minimize time investment while maximizing reward acquisition.
Stella Montis offers a comprehensive reward ecosystem that rewards both individual skill and community participation. Understanding the tiered progression system ensures optimal time investment and reward acquisition.
Merit Economy: The event currency system provides access to exclusive cosmetics, weapons, and crafting blueprints. Premium items require significant investment, with top-tier weapons costing 15,000-25,000 Merits. Daily challenges provide bonus Merits, while community contributions offer additional earning opportunities.
Exclusive Cosmetics: The research facility’s unique aesthetic translates into distinctive visual items. The Arctic Camouflage series provides white-and-blue patterns ideal for snowy environments, while the Technician armor set offers both visual appeal and minor stat enhancements.
Progression Optimization: Focus on completing personal progression tracks before the event concludes in December. These time-limited rewards include exclusive emotes, weapon skins, and profile customizations unavailable through other means. The Weapons Unlock guide provides additional context for evaluating new equipment viability.
Long-term Value: Stella Montis rewards maintain relevance beyond the current event. The weapons and blueprints remain usable in future content updates, while cosmetics demonstrate veteran status. Prioritize functional items over purely cosmetic ones if facing time constraints.
Stella Montis features an elaborate quest system that guides players through the facility’s mysteries while providing substantial rewards. Efficient quest completion requires understanding mission types and optimal routing strategies.
Mission Varieties: The quest catalog includes collection tasks, elimination challenges, exploration objectives, and timed trials. Collection quests typically demand specific components from defeated ARCs, while exploration missions require locating hidden data terminals throughout the complex.
Time Management: Group compatible quest types to minimize completion time. Elimination and collection objectives often overlap, enabling simultaneous progress. Exploration quests benefit from dedicated sessions focused solely on navigation and discovery without combat distractions.
Challenge Difficulty Scaling: Hard difficulty quests provide substantially better rewards but demand optimized loadouts and team coordination. Attempt these challenges only after mastering the relevant ARC encounters on standard difficulty. The Class Guide offers insights into optimal specialization choices for different mission types.
Hidden Objectives: Several quests contain unlisted secondary goals that provide bonus rewards. Thorough exploration and experimental interactions often reveal these additional challenges. Documenting these discoveries benefits the entire community and accelerates collective progression.
The extensive tunnel systems beneath Stella Montis present unique navigation challenges and combat scenarios. Mastering these subterranean passages is essential for efficient extraction and resource gathering.
Route Optimization: The tunnel network contains multiple pathways between major locations. Memorizing the most direct routes between extraction points and resource zones significantly reduces mission completion times. Central junctions often contain valuable loot but attract concentrated ARC patrols.
Ambush Prevention: Narrow corridors create ideal ambush scenarios for lurking ARCs. Deploy motion sensors at corridor intersections to detect approaching threats. Use grenades to clear blind corners before advancing, and maintain constant audio awareness for approaching footsteps.
Extraction Planning: Successful extraction requires careful timing and positioning. Activate extraction points only after securing the immediate area, and maintain defensive formations during countdown sequences. The Complete Guide provides additional extraction strategies applicable to Stella Montis’s unique environment.
Environmental Hazards: Some tunnel sections contain structural weaknesses that can be exploited during combat. Collapsing ceilings can eliminate pursuing ARCs but may block progress routes. Use these environmental interactions strategically rather than indiscriminately to avoid trapping your squad.
Stella Montis represents merely the beginning of Arc Raiders’ northern expansion narrative. Understanding the development roadmap enables strategic preparation for upcoming challenges and content releases.
Development Timeline: The current event structure suggests additional phases will follow the December conclusion of Staking Our Claim. Datamined information indicates potential boss variants and expanded map sections currently inaccessible. These developments would align with the game’s seasonal content model.
Community Speculation: Player analysis suggests the sealed sectors of Stella Montis may contain additional ARC types or advanced puzzle mechanics. The facility’s architectural layout implies unexplored sections that could introduce vertical platforming challenges or cooperative puzzle scenarios.
Preparation Strategies: Current weapon acquisitions and skill development will likely remain relevant in future updates. Focus on mastering movement mechanics and team coordination, as these fundamental skills transfer effectively to new content. Stockpile versatile resources rather than overspecializing in current meta strategies.
Long-term Investment: The time invested in Stella Montis mastery provides lasting benefits beyond immediate rewards. The knowledge gained regarding ARC behavior patterns and map navigation applies to future content, creating a compounding advantage for dedicated players.
Action Checklist
- Complete 5 initial raids to unlock material donation capability
- Donate required materials to Breaking New Ground event daily
- Master Matriarch ARC attack patterns in training mode
- Practice Shredder ARC engagement in controlled environments
- Optimize loadout for Stella Montis environmental challenges
- Complete all time-limited quests before December deadline
- Acquire and upgrade at least one Stella Montis exclusive weapon
No reproduction without permission:Tsp Game Club » Arc Raiders Stella Montis Complete Guide: How to Unlock, Explore & Dominate Master Stella Montis with advanced strategies for unlocking, defeating ARCs, and securing exclusive rewards in Arc Raiders