TL;DR
- The Peacekeeper MK1 boasts the fastest fire rate among ARs but requires attachments for range and stability
- Our 8-attachment setup transforms the weapon into a laser-accurate powerhouse with minimal recoil
- Use Gunfighter Wildcard to maximize attachment slots for optimal performance
- Flak Jacket, Fast Hands, and Dexterity create the perfect aggressive playstyle foundation
- Master movement mechanics to leverage the weapon’s superior handling and mobility
The Peacekeeper MK1 stands as the undisputed speed king among assault rifles in Call of Duty Black Ops 7, delivering blistering firepower that can overwhelm opponents in close to mid-range engagements. This weapon combines exceptional handling characteristics with remarkable mobility, allowing players to maintain fluid movement while dishing out rapid damage. However, its lightning-fast rate of fire comes with significant trade-offs in damage range and stability beyond 30 meters, creating distinct engagement limitations that strategic loadout building must address.
Understanding the weapon’s core characteristics is crucial for maximizing its potential. The Peacekeeper excels in aggressive playstyles where quick target acquisition and rapid elimination are paramount. Its inherent strengths make it ideal for players who favor constant movement and close-quarters dominance, though it requires careful attachment selection to mitigate its range deficiencies.
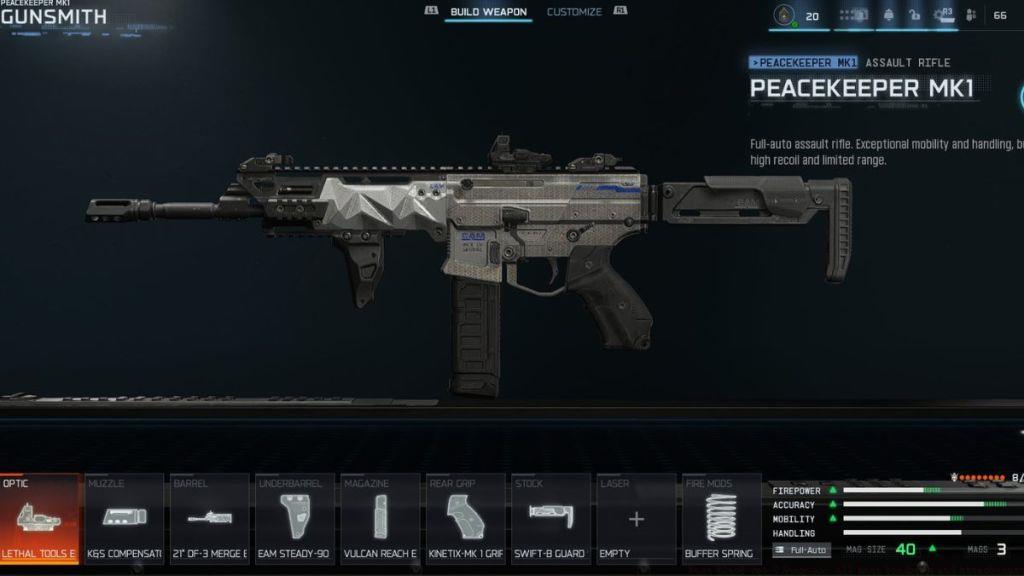
Optimized Peacekeeper MK1 Loadout Setup
- Optic: Lethal Tools ELO
- Muzzle: K&S Brake-2B
- Barrel: 21” DF-3 Merge Barrel
- Underbarrel: EAM Steady-90 Grip
- Magazine: Vulcan Reach Extension
- Rear Grip: Kinetic-Mk1 Grip
- Stock: Swift-B Guard Stock
- Fire Mods: Buffer Spring
This meticulously crafted attachment combination transforms the Peacekeeper MK1 from a close-range specialist into a versatile threat capable of engaging targets at extended distances. The Lethal Tools ELO optic provides clean sight picture with minimal distraction, while the K&S Brake-2B muzzle attachment dramatically reduces vertical recoil patterns, making sustained fire much more manageable.
The 21” DF-3 Merge Barrel extends the weapon’s effective damage range significantly, allowing you to challenge opponents who would otherwise be outside your optimal engagement zone. The extended barrel synergizes perfectly with the recoil-control attachments to create a stable firing platform.
Magazine management becomes critical with the Peacekeeper’s rapid consumption of ammunition. The Vulcan Reach Extension addresses this concern directly, though players should still practice disciplined trigger control to avoid unnecessary reloads during critical moments.
Strategic Class Configuration
When fully equipped with our recommended attachments, the Peacekeeper MK1 ascends to top-tier status in Black Ops 7’s weapon hierarchy. The cumulative recoil reduction effects create near laser-like precision, transforming the weapon into a reliable option for engagements extending beyond 35 meters. Achieving this full setup requires the Gunfighter Wildcard to accommodate all eight attachments, representing a strategic choice that prioritizes weapon performance over additional perk slots.
Perks & Equipment Selection
- Perk 1: Flak Jacket
- Perk 2: Fast Hands
- Perk 3: Dexterity
- Wildcard: Gunfighter
- Lethal: Semtex
- Tactical: Stim Shot
- Field Upgrade: Drone Pod/Echo Unit
The perk selections form a cohesive foundation for aggressive gameplay, enhancing your ability to capitalize on Black Ops 7’s advanced movement system. Flak Jacket provides essential protection against explosive damage, particularly valuable in objective-based modes like Hardpoint and Domination where grenade spam is prevalent.
Fast Hands delivers crucial improvements to reload speed and weapon swapping, addressing the Peacekeeper’s ammunition consumption rate. Dexterity completes the trio by enabling aim-down-sights functionality during advanced movement actions including sliding, diving, and wall jumping.
The classic Semtex and Stim Shot combination offers reliable tactical options, though experienced players might experiment with Combat Axes for high-skill playmaking opportunities. Field Upgrade selection between Drone Pod and Echo Unit depends on your preferred disruption style – the former creates map-wide annoyance while the latter provides surprisingly effective tactical intelligence.
Mastering the Peacekeeper MK1 requires more than just the right attachments – it demands strategic positioning and movement mastery. The weapon truly shines when you leverage its mobility advantages through constant repositioning and flanking maneuvers. Avoid prolonged engagements at extreme ranges where the weapon’s damage fall-off becomes significant.
Common mistakes include overestimating the weapon’s effective range and failing to manage ammunition properly. Advanced players should focus on pre-aiming common sightlines and utilizing the weapon’s quick ADS time to gain the first-shot advantage in most encounters.
Movement techniques like slide-canceling and jump-shotting become particularly effective with the Peacekeeper, as its handling characteristics allow for accurate fire during complex movement sequences. Practice these techniques in private matches to build muscle memory for competitive scenarios.
For players looking to expand their tactical knowledge, our Class Guide provides deeper insights into perk combinations and playstyle optimization. Understanding when to push aggressively versus when to hold angles is crucial for maximizing your effectiveness with this high-skill weapon.
Action Checklist
- Unlock all recommended attachments through weapon progression
- Practice recoil control in firing range for 15 minutes daily
- Master slide-cancel and jump-shot techniques in custom matches
- Experiment with both Field Upgrade options across different map types
- Review our Weapons Unlock guide for additional armory options
No reproduction without permission:Tsp Game Club » Best Call of Duty Black Ops 7 Peacekeeper MK1 Meta Loadout Master the fastest-firing AR in Black Ops 7 with this optimized Peacekeeper MK1 loadout and class setup guide