TL;DR
- Knuckle Duckle is located in a cave south of Clink-Clank Krumkake Craftshop in Nod-Krai
- The boss uses purple radar indicators for splash attacks and straight-line charge patterns
- Lunar-charged and Electro-charged teams provide the fastest clear times
- Breaking the boss’s armor after minion summons is crucial for efficient farming
- Drops include Vajrada Amethyst materials, Precision Kuuvahki Stamping Die, and artifact sets
Knuckle Duckle represents one of the newest field boss additions introduced in Genshin Impact’s Luna I expansion. This formidable opponent guards valuable character ascension resources essential for progressing through the latest content updates. Understanding its mechanics and optimal farming strategies can significantly accelerate your character development progression.

As a field boss encounter, Knuckle Duckle offers respawn-based farming opportunities, making it an excellent resource for players seeking to maximize their resin efficiency. The boss’s attack patterns follow predictable visual cues, allowing skilled players to minimize damage taken while maximizing damage output.
Common mistake to avoid: Many players underestimate the importance of breaking the armor phase quickly, resulting in prolonged fights and unnecessary resource consumption. Prioritize area-of-effect abilities when minions appear to strip the protective barrier efficiently.
Navigating to Knuckle Duckle requires precise map knowledge of the Nod-Krai region. The boss resides within an expansive cave system positioned directly south of the Clink-Clank Krumkake Craftshop landmark. While a teleport waypoint exists in proximity to the encounter area, initial access demands manual traversal from designated starting points.
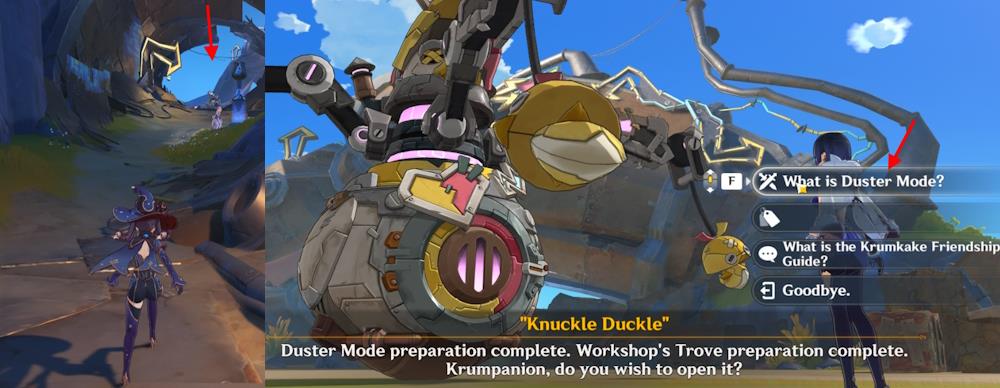
Optimal route strategy: Begin your journey from Nasha Town’s central waypoint, following the northwestern road leading toward the craftshop district. Upon reaching the Clink-Clank Craftshop, navigate opposite the main pier area and scan for the distinctive cave entrance markings. Interior navigation typically requires 15-20 seconds of traversal before encountering the boss arena.
For repeated farming sessions, prioritize unlocking the nearby teleporter to reduce travel time significantly. Advanced players can complete the round trip in under 90 seconds using optimized movement techniques and stamina management.
Mastering Knuckle Duckle’s combat mechanics requires acute visual awareness and precise reaction timing. The boss employs a dual-phase attack system combining telegraphed area assaults with rapid directional charges. Recognizing these patterns early provides crucial windows for counter-attacks and positioning adjustments.

Primary attack recognition: Knuckle Duckle generates distinctive purple radar circles indicating imminent splash damage zones. These areas expand gradually, providing approximately 2.5 seconds for evasion. Successful dodging requires moving completely outside the marked radius before the animation completes.
The boss’s secondary charge attack manifests as rapid purple arrow projections moving in linear paths. This assault demands quicker reflexes with only 1.2 seconds between visual cue and impact. Position your character perpendicular to the charge direction for optimal evasion efficiency.
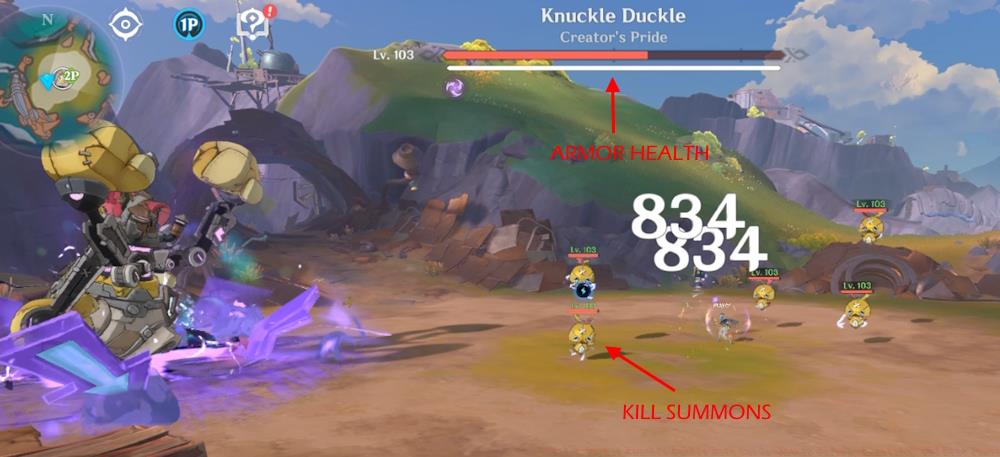
Advanced mechanic: Upon summoning minion reinforcements, Knuckle Duckle activates a comprehensive armor barrier. This protective layer renders conventional attacks largely ineffective until the summoned units are eliminated. Prioritize area-of-effect abilities to clear minions rapidly and resume primary target damage.
Team optimization against Knuckle Duckle centers around elemental reaction efficiency and crowd control capabilities. The boss demonstrates particular vulnerability to Lunar-charged and Electro-charged team configurations, which exploit its elemental weaknesses while providing necessary area coverage.
Lunar-charged composition: This setup focuses on sustained damage output through elemental application consistency. Characters with persistent off-field abilities synergize exceptionally well, allowing main damage dealers to focus on evasion while maintaining pressure.
Electro-charged alternative: Teams built around Electro reactions provide excellent crowd control while dealing substantial damage over time. The electro-charged reaction chain effectively handles minion waves while damaging the primary target simultaneously.
Strategic insight: Successful teams typically incorporate at least one character with strong area-of-effect capabilities to address the minion summoning phase efficiently. For comprehensive team building strategies, consult our Class Guide for optimal role distribution.
Rotation optimization: Advanced players can achieve clear times under 45 seconds by perfecting ability sequencing and energy management. Proper rotation ensures crucial abilities remain available during armor break phases.
Victory against Knuckle Duckle yields substantial rewards essential for character progression and resource accumulation. The drop table encompasses multiple rarity tiers across ascension materials, artifacts, and standard progression resources.
| Reward Image | Reward Name | Use |
|---|---|---|
 |
Adventure EXP | Improves Adventure Rank |
 |
Mora | Common Currency |
 |
Companionship EXP | Increases Friendship level |
 |
Precision Kuuvahki Stamping Die | Character level-up material |
 |
Vajrada Amethyst Gemstone | Character ascension material |
 |
Vajrada Amethyst Chunk | Character ascension material |
 |
Vajrada Amethyst Fragment | Character ascension material |
 |
Vajrada Amethyst Sliver | Character ascension material |
 |
5-star Gladiator’s Finale 4-star Gladiator’s Finale |
Part of Artifact Set |
 |
5-star Wanderer’s Troupe 4-star Wanderer’s Troupe |
Part of Artifact Set |
 |
4-star Instructor 3-star Instructor |
Part of Artifact Set |
 |
4-star Prayers of Wisdom 3-star Prayers of Wisdom |
Part of Artifact Set |
 |
4-star The Exile 3-star The Exile |
Part of Artifact Set |
 |
3-star Traveling Doctor | Part of Artifact Set |
Farming efficiency: For optimal material acquisition, coordinate your boss runs with daily resin refresh cycles. The Complete Guide provides additional strategies for maximizing resource yield across multiple gaming sessions.
Action Checklist
- Navigate from Nasha Town to the cave south of Clink-Clank Craftshop
- Unlock the nearby teleporter for future farming efficiency
- Study attack patterns: purple circles for splash, arrows for charges
- Assemble Lunar-charged or Electro-charged team composition
- Practice minion clearance to break armor phase quickly
- Execute optimized ability rotations for sub-45 second clears
No reproduction without permission:Tsp Game Club » Genshin Impact Knuckle Duckle Boss Guide: How to Defeat, Location, and Best Teams Complete guide to locating, defeating, and farming the Knuckle Duckle boss for rare ascension materials