TL;DR
- Five specialized armor sets available early that dramatically alter combat, stealth, and survival mechanics
- Each set provides unique gameplay modifications that remain viable throughout your entire playthrough
- Strategic acquisition planning saves hours of gameplay and optimizes your character development
- Armor sets transform basic combat into specialized tactical approaches with distinct advantages
- Early investment in these sets provides compounding benefits as you progress through the game
Mastering Ghost of Yotei requires strategic gear selection from the very beginning, and these five armor sets represent the most impactful early-game acquisitions for any serious player. As you embark on your journey as Atsu, the gear choices you make during the initial hours will fundamentally shape your combat effectiveness, stealth capabilities, and overall survival rate throughout the entire campaign.
While basic equipment might suffice for casual exploration, these specialized armor sets transform you from a vulnerable ronin into a formidable warrior with distinct tactical advantages. Unlike cosmetic upgrades that merely change appearance, these sets introduce mechanical modifications that alter how you engage with core gameplay systems. The strategic depth they provide means your investment in acquiring them early pays continuous dividends as you progress.
Each armor configuration caters to specific combat philosophies and playstyles, allowing you to specialize according to your preferred approach. The Spider Lily Armor rewards aggressive tactics, while the Bounty Master set enhances stealth operations. What makes these pieces exceptionally valuable is their scalability—they remain relevant even during end-game content, making them wise long-term investments.
Ghost of Yotei: 35 New Things We Just Discovered
All five transformative armor sets can be secured within your first 3-5 hours of gameplay, regardless of your narrative progression pace or chosen difficulty setting.
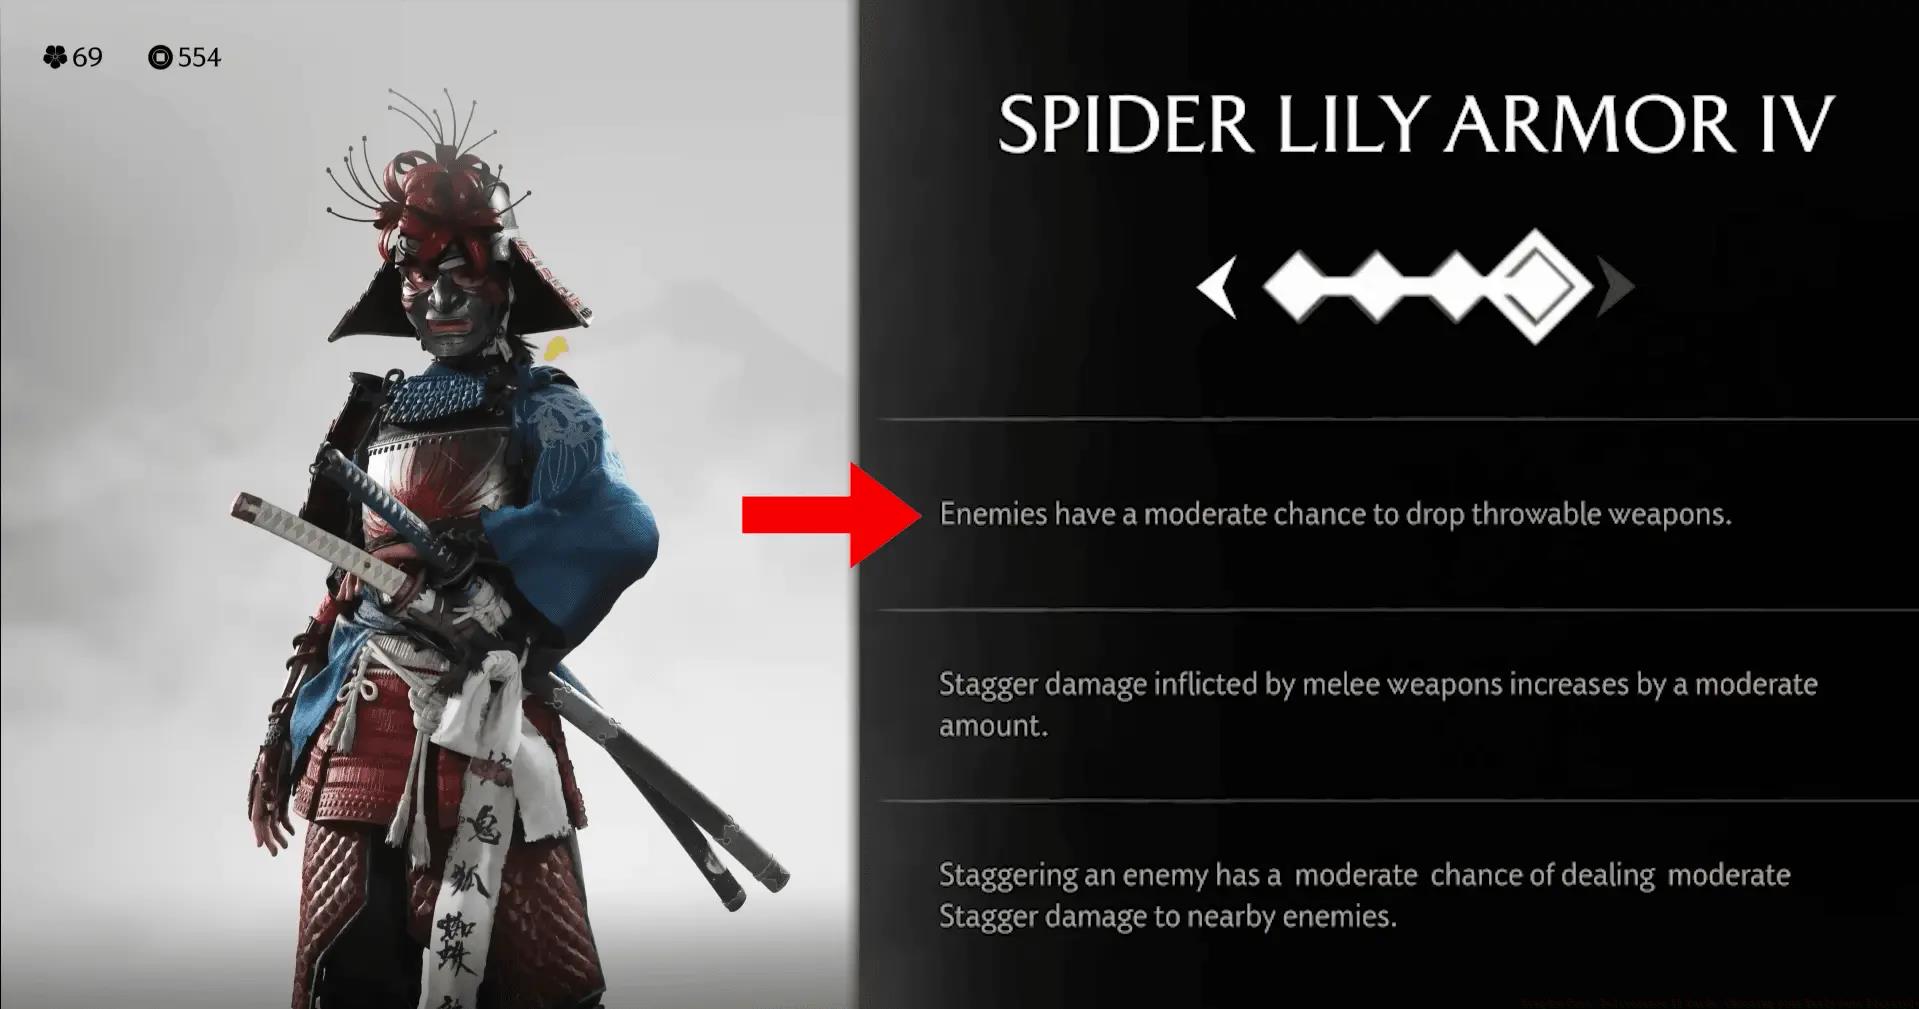
The Spider Lily Armor revolutionizes offensive playstyles by emphasizing stagger mechanics and multi-target engagement capabilities. This visually distinctive set, recognized by its intricate floral helmet motif, excels in confrontational scenarios where you face numerous adversaries simultaneously.
Its most transformative mechanic involves weapon retrieval from defeated enemies. When eliminating foes while wearing this armor, there’s a substantial probability they’ll relinquish their weapons as retrievable projectiles. These impromptu throwing weapons inflict exceptional damage, bypass enemy blocking attempts, and frequently secure immediate takedowns against standard opponents.
Retrieved enemy weapons prove particularly effective against heavily armored adversaries who typically withstand multiple conventional attacks before falling.
To acquire this powerful set, journey to the enigmatic gate located in the initial region where you’ll encounter Ugettsu, the narrative initiator. This begins an elaborate quest through a spectral estate requiring location of four distinct keys:
Pro Tip: Combine the Spider Lily Armor with aggressive stance skills for maximum effectiveness. The staggering power synergizes exceptionally well with breakable enemy defenses, creating opportunities for devastating counterattacks.
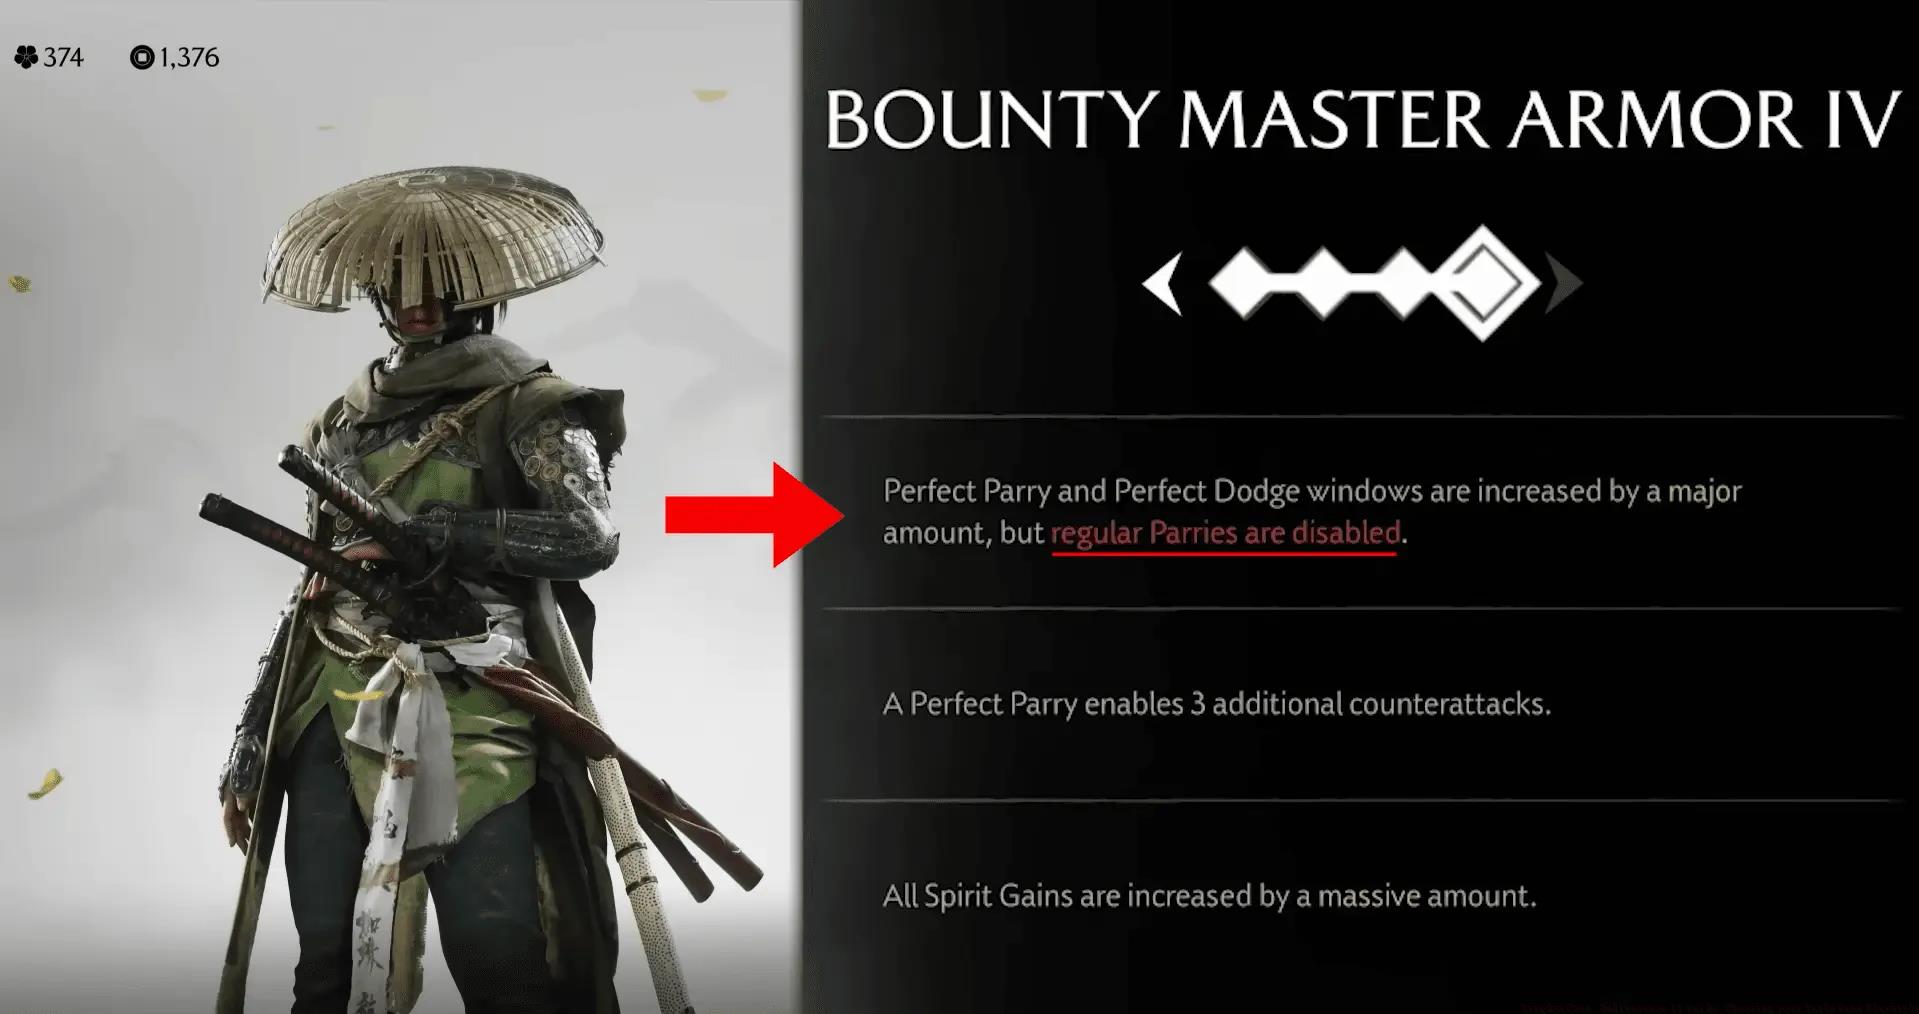
The Bounty Master Armor specializes in covert operations and economic advantages, making it indispensable for players who prefer subtle approaches over direct confrontation. This sleek, dark-toned set enhances your stealth capabilities while simultaneously improving your resource acquisition throughout the game world.
Its primary benefit involves increased currency and item drops from stealth takedowns and completed contracts. Enemies dispatched quietly yield 40% more resources, while bounty targets provide additional rare materials that accelerate your gear enhancement progress. The armor also reduces enemy detection speed by approximately 30%, giving you crucial extra seconds to reposition or escape when spotted.
Acquisition involves completing the “Shadow Broker” questline available after reaching reputation level 2 with the merchant guild. You’ll need to successfully execute three covert retrieval missions without triggering alarms before the armor schematic becomes available for purchase.
Advanced Strategy: Combine this armor with smoke bomb tools and silent movement skills for near-invisible infiltration capabilities. The economic benefits compound significantly if acquired early, funding better weapons and upgrades much sooner than typical progression allows.
Common Mistake: Many players underestimate the economic value and focus solely on combat sets. The resource acceleration from Bounty Master Armor often translates to earlier access to high-tier weapons that outweigh raw combat stat improvements.
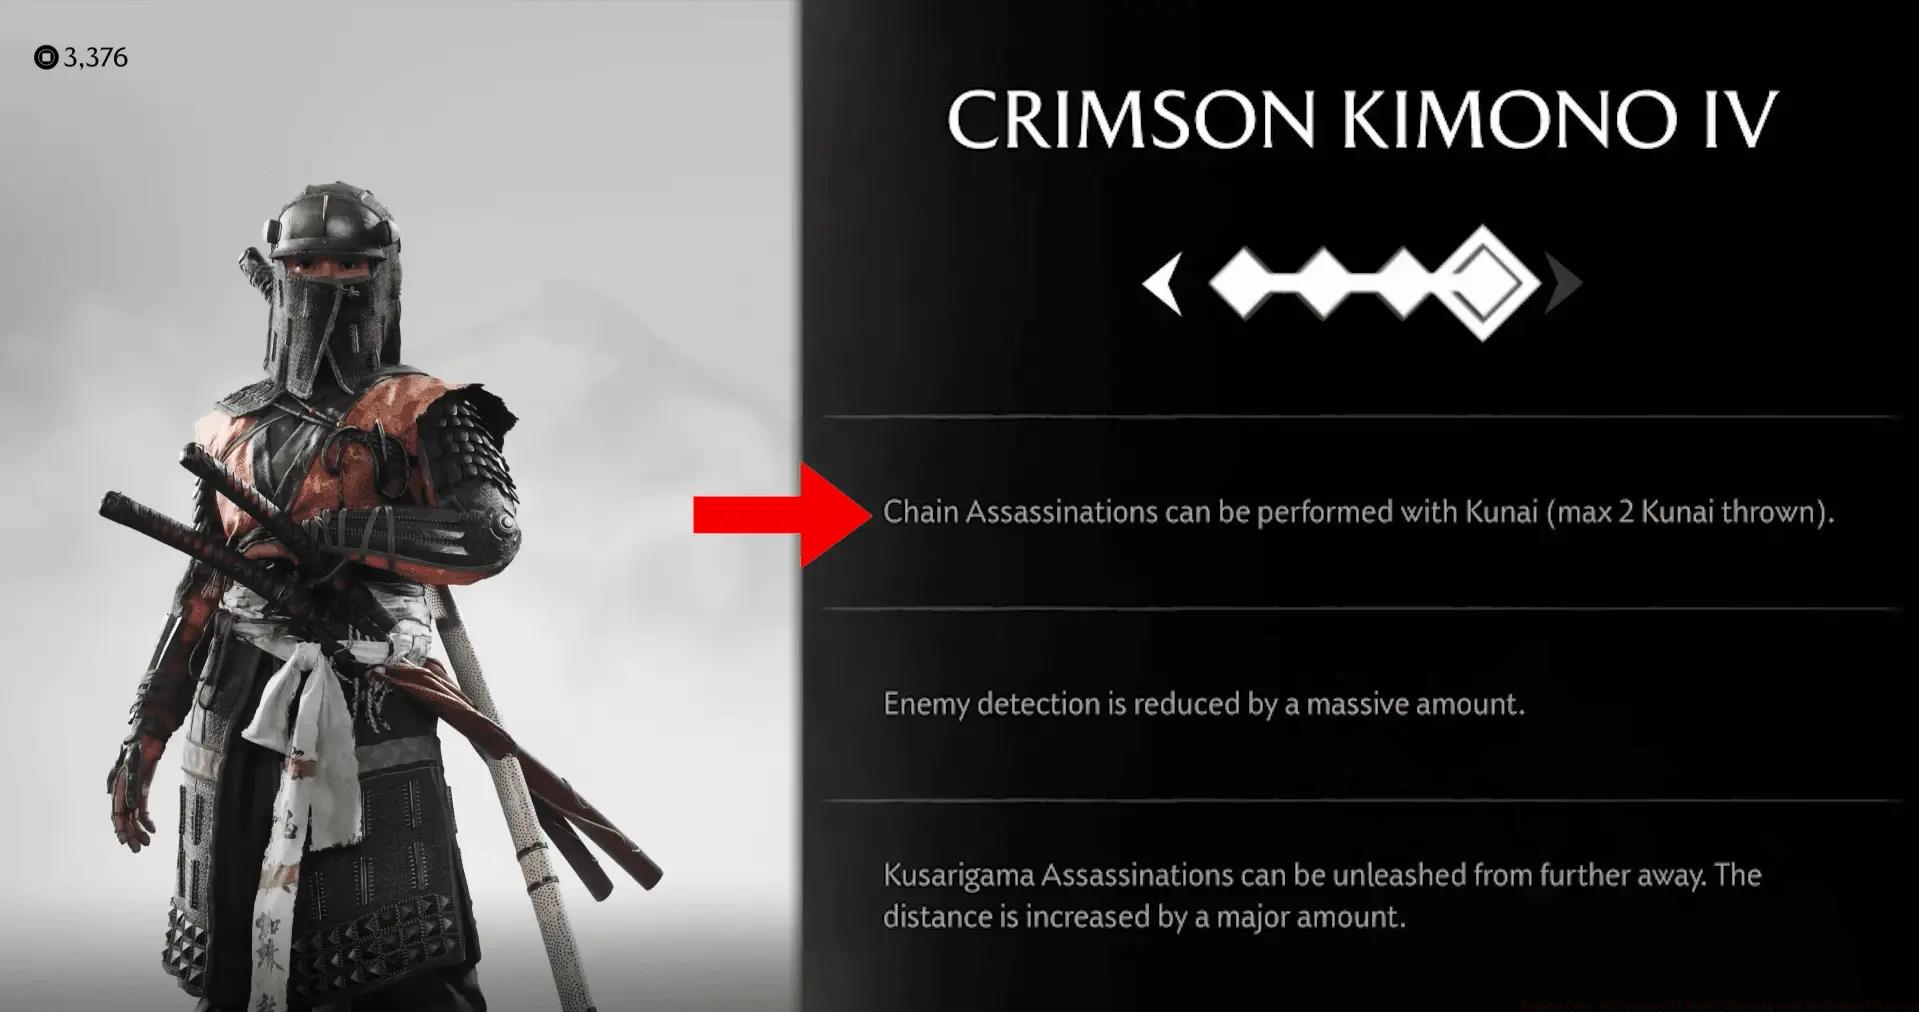
The Crimson Kimono provides exceptional defensive capabilities for players who prefer enduring attacks and countering strategically rather than avoiding damage entirely. This vibrant red ensemble significantly reduces incoming damage while enhancing your blocking and parrying effectiveness against formidable opponents.
This set’s standout feature is its ability to convert successfully blocked attacks into temporary health regeneration. Each perfect parry restores a small portion of your health while simultaneously building a defensive meter that, when full, creates a protective aura reducing all incoming damage by 50% for 10 seconds. This transforms defensive play from mere survival into an active combat strategy.
Locate the Crimson Kimono by assisting the wounded monk at Sunrise Temple after defending it from bandit attacks. Your reward includes both the armor schematic and unique defensive technique scrolls that complement its capabilities.
Optimization Tip: Pair this armor with the counter-attack specialization skills from our Class Guide to create an nearly unbreakable defensive build. The health regeneration allows more aggressive positioning while maintaining survivability.
Timing Advice: Acquire this set before challenging any major boss encounters, as the defensive benefits dramatically reduce the difficulty of prolonged battles where survival matters more than burst damage.
The Armor of the Undying specializes in survival mechanics and recovery capabilities, making it ideal for players who frequently find themselves in near-death situations or who prefer high-risk, high-reward combat approaches. This ancient-looking set appears weathered but provides unparalleled resilience when properly utilized.
Its signature ability triggers automatically when your health drops below 25%, providing a burst of healing and temporary invulnerability. This “second chance” mechanic can completely reverse losing battles, and its cooldown resets upon resting at shrines. Additionally, all healing items and effects are 35% more effective while wearing this armor, significantly improving your sustainability during extended exploration or multi-wave encounters.
To obtain this life-saving set, you must complete the “Trials of Perseverance” hidden within the Forgotten Catacombs. These challenges test your endurance against continuous enemy waves with limited healing resources, but success grants immediate access to the armor.
Strategic Application: This armor excels in situations where you’re learning boss patterns or exploring dangerous unknown territories. The safety net it provides allows more experimental approaches without the frustration of repeated long treks back from shrines.
Advanced Technique: Intentionally triggering the low-health effect can be strategically valuable against bosses with predictable high-damage attacks, effectively granting you a free damage window during their most dangerous phases.

The Dragonfly Armor prioritizes movement and evasion above all else, catering to players who prefer hit-and-run tactics and superior positioning over brute force. This lightweight set features distinctive wing-like shoulder pieces that reflect its focus on aerial mobility and rapid repositioning.
This armor enhances your dodge effectiveness by increasing invincibility frames and reducing stamina consumption for evasion maneuvers by 40%. Additionally, successful dodges through attacks generate a speed boost that stacks up to three times, dramatically improving your mobility during intense combat sequences. The set also completely eliminates fall damage, revolutionizing your exploration capabilities and opening up previously inaccessible vertical routes.
Acquire the Dragonfly Armor by winning the seasonal tournament at the Floating Pavilion after reaching character level 15. The competition requires defeating five increasingly difficult opponents without using healing items, testing your evasion skills directly.
Exploration Advantage: The fall damage immunity alone makes this set worth acquiring early, as it allows sequence-breaking exploration and access to hidden areas containing valuable resources and secret techniques.
Combo Potential: Combine this mobility with high-burst weapons from our Weapons Unlock guide to create a devastating hit-and-run build that can dismantle even the most durable enemies through attrition and superior positioning.

Choosing which armor sets to pursue first depends entirely on your preferred playstyle and current progression challenges. While all five sets provide substantial benefits, strategic prioritization can dramatically improve your early-game experience and resource efficiency.
Aggressive Players: Prioritize Spider Lily Armor first, followed by Armor of the Undying. This combination provides maximum offensive pressure while ensuring survival during all-out assaults. The weapon drop mechanics synergize perfectly with high-risk playstyles.
Stealth Specialists: Begin with Bounty Master Armor, then acquire Dragonfly Armor for enhanced mobility during infiltration and escape scenarios. The economic benefits will fund other acquisitions while the mobility ensures successful mission completions.
Defensive Strategists: Focus on Crimson Kimono initially, supplementing with Armor of the Undying for ultimate survivability. This combination creates an incredibly resilient foundation that allows methodical approach to all combat encounters.
Resource Planning: Each armor set requires approximately 45-90 minutes to acquire once you begin their respective quests. Plan your route efficiently by grouping geographically proximate acquisitions and aligning them with main story progression to minimize backtracking.
Remember that these sets work exceptionally well together, allowing you to switch between specialized loadouts for different challenges. Consult our comprehensive Complete Guide for additional progression strategies and advanced build combinations that maximize these armor sets’ potential throughout your entire Ghost of Yotei experience.
Action Checklist
- Assess your preferred playstyle (aggressive, stealth, defensive, or mobile)
- Prioritize your first armor set based on playstyle assessment
- Begin the acquisition quest for your chosen armor set
- Practice with the new armor mechanics in safe combat scenarios
- Plan your second armor acquisition based on current progression needs
- Create specialized loadouts for different encounter types
No reproduction without permission:Tsp Game Club » Ghost of Yotei: Best Early Armor Sets Essential early-game armor sets that transform combat, stealth, and survival strategies in Ghost of Yotei