TL;DR
- Matriarch spawns exclusively in diamond-link marked events with difficulty scaling 3-5
- Target joint weak points and Head Core while dodging rocket barrages and summoned ARCs
- Use Tactical Mk. 3 (Defensive) augment with heavy shields and Raider Hatch Key for extraction
- Coordinate team roles, manage phase transitions, and control adds during critical damage windows
- Rewards include Magnetic Accelerator, Advanced Powercells, and rare Matriarch Reactor for endgame crafting
When preparing to confront the Matriarch in Arc Raiders, understanding its exclusive spawn mechanics is crucial for successful engagement planning. Unlike standard enemy encounters, this formidable boss only appears when specific map conditions are met, requiring strategic preparation before even entering combat.
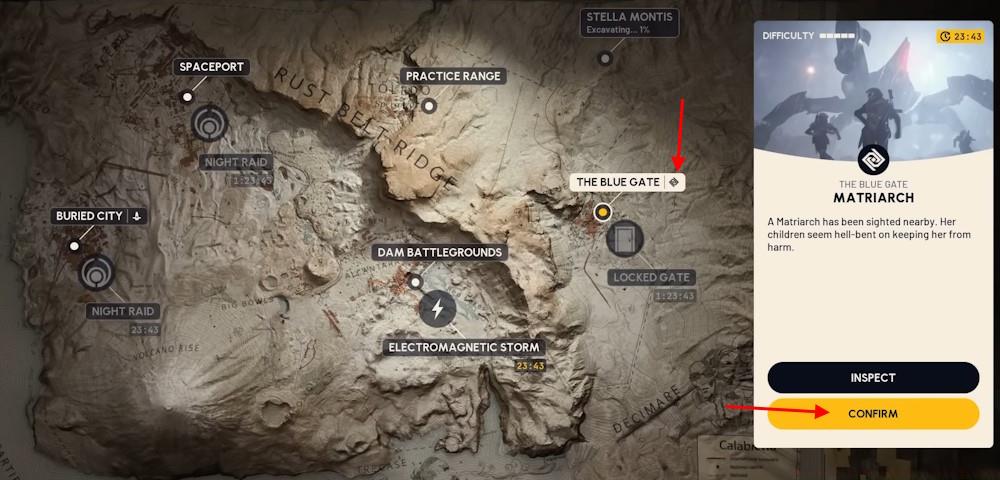
The Matriarch Event functions as a special map modifier that temporarily alters standard gameplay parameters. You’ll identify these opportunities by scanning available maps for the distinctive diamond link icon displayed beside qualifying locations. This visual indicator signals temporary availability windows where the boss can be encountered, typically lasting for limited durations before rotating to other zones.
Difficulty scaling presents another critical consideration, with Matriarch encounters ranging from level 3 to 5 based on the selected map. Higher difficulty tiers not only increase the boss’s combat effectiveness but also enhance reward quality, creating risk-reward decisions for squads of varying experience levels.
Upon spawning into a Matriarch Event, visual identification becomes straightforward due to the enemy’s immense scale and distinctive features. As one of the largest ARC combatants in the game, the Matriarch stands out prominently with its massive frame and glowing red head core that pulses with energy, making target acquisition simple even at considerable distances.
Engaging the Matriarch demands comprehensive understanding of its capabilities and vulnerabilities. This heavily armored adversary represents one of the most challenging encounters in Arc Raiders, requiring coordinated team tactics and precise execution to overcome.
| Category | Details |
|---|---|
| Threat Level | Extreme |
| Armor Plate | Full Plated |
| Primary Attack | Rocket Fire |
| Special Abilities | Gas Mortars Energy Shield Flashbangs Summon ARC |
| Weakness | Joints Heads Core |
| Health | 35,000 HP |
Strategic targeting proves essential against the Matriarch’s substantial 35,000 health pool. Focus fire on exposed joints and the illuminated Head Core delivers significantly increased damage, often dealing 2-3 times normal weapon effectiveness when striking these vulnerable areas.
The boss employs diverse combat abilities that require specific countermeasures. Rocket barrages demand constant lateral movement and cover utilization, while gas mortars create area denial zones that must be evacuated immediately. Energy shields periodically activate, creating temporary damage immunity windows that teams should use for repositioning and add clearance.
Flashbang deployments can disorient entire teams if not properly managed, while ARC summoning capabilities introduce additional combatants that must be prioritized based on current phase progression and team positioning.
Success against the Matriarch heavily depends on proper equipment selection and loadout optimization. While individual weapon preference plays a role, certain gear combinations demonstrate consistently superior performance in this specific encounter.
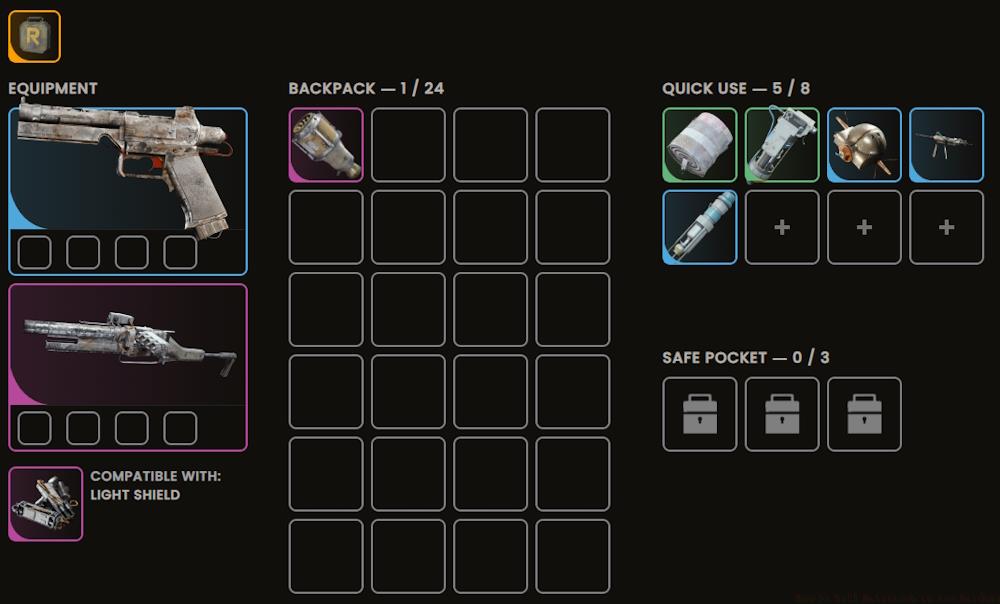
The Tactical Mk. 3 (Defensive) augment stands as the premier choice for Matriarch engagements, providing essential defensive capabilities alongside practical inventory management. Crafting requires 2x Advanced Electrical Components and 3x Processor, delivering 20 backpack slots, 1 safe pocket, and 5 quick-use slots.
Beyond basic storage, this augment’s true value emerges through shield compatibility features and passive regeneration benefits. These attributes enable utilization of heavy-grade shields while permitting recharge during mobility, dramatically improving survivability during intense combat phases.
Weapon selection should prioritize the Hullcracker for its exceptional performance against armored targets and weak point penetration. Secondary weapons should offer reliable add clearance capabilities with ammunition efficiency for extended engagements.
Extraction planning proves equally critical, with the Raider Hatch Key representing non-negotiable equipment for successful mission conclusion. This item ensures alternative evacuation routes remain available when standard extraction points become compromised by enemy concentrations.
Mastering Matriarch elimination requires moving beyond basic mechanics into sophisticated team coordination and phase recognition. Successful squads implement role specialization and communication protocols that maximize damage output while minimizing unnecessary risk.

Team composition should include designated roles: primary weak point specialists, add control personnel, and support players managing team sustainability and situational awareness.
Movement tactics must emphasize constant positional adjustment to avoid rocket barrages and area denial effects. Utilize environmental cover during ability wind-ups, then reposition to maintain optimal firing angles on vulnerable areas as they become exposed during attack animations.
Phase transitions typically occur at specific health thresholds, often around 75%, 50%, and 25% remaining. Each transition introduces new ability combinations and spawn patterns that require adaptive response strategies from the entire team.
Add management represents one of the most common failure points. Prioritize summoned ARCs based on their threat level and positioning, with proximity threats demanding immediate attention while ranged units can be temporarily ignored during critical damage windows.
Overcoming the Matriarch’s formidable challenges delivers substantial rewards that significantly accelerate player progression and equipment development. Understanding the value and applications of these materials informs strategic decision-making regarding engagement frequency and difficulty selection.
Standard rewards include Magnetic Accelerator components and Advanced Powercells, both essential for upgrading various high-tier weapons and equipment modifications.
The pinnacle reward, the Matriarch Reactor, represents an exceptionally rare component with limited acquisition opportunities. This item serves as a prerequisite for crafting some of the game’s most powerful gear, making multiple successful engagements worthwhile for dedicated players.
Material drop rates appear influenced by performance metrics including completion time, damage taken, and accuracy percentages. Squads that minimize unnecessary damage and maintain consistent weak point targeting often receive enhanced reward quantities.
For teams seeking to optimize their combat effectiveness, our BF6 Weapons Unlock Guide provides complementary strategies for weapon optimization that translate effectively to Matriarch encounters.
Action Checklist
- Identify Matriarch Event via diamond-link map icons and assess difficulty level (3-5)
- Equip Tactical Mk. 3 (Defensive) augment with heavy shield and Raider Hatch Key
- Coordinate team roles: designate weak point specialists, add control, and support players
- Engage Matriarch, focusing fire on joints and Head Core while maintaining constant movement
- Manage phase transitions at 75%, 50%, and 25% health thresholds
No reproduction without permission:Tsp Game Club » How to Kill Matriarch in Arc Raiders Master the Matriarch boss fight in Arc Raiders with expert strategies, optimal loadouts, and proven tactics for maximum rewards