TL;DR
- The Queen exclusively spawns during Harvester Events and requires coordinated team tactics to defeat
- Target weak points at joints and Head Core while mastering dodge timing for mortar and laser attacks
- Optimize loadouts with Raider Augment IV and Heavy shields for maximum combat efficiency
- Use environmental cover and phase-based strategies to manage the Queen’s devastating special abilities
- Success rewards high-tier materials including ARC Alloy, Advanced Powercells, and rare Queen Reactor
Confronting the Queen represents the pinnacle challenge in Arc Raiders, demanding exceptional coordination and strategic execution from your entire squad. This colossal ARC entity serves as the ultimate end-game encounter, requiring precise timing and specialized equipment to overcome.
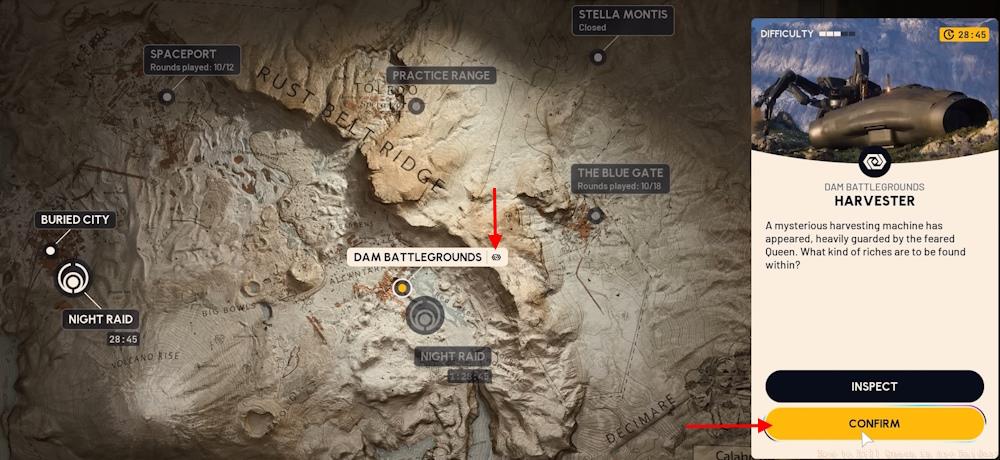
Locating the Queen requires participation in specific Harvester Events, identifiable by the distinctive link icon displayed beside available maps. These events function as dedicated combat zones where the Queen actively guards valuable harvesting equipment, making her impossible to miss due to her immense size and distinctive mechanical profile.
Common Mistake: Many players waste time searching random locations instead of immediately heading to the marked Harvester position. The Queen always spawns within visual range of the central harvesting machinery.
Before engaging, conduct a quick environmental assessment. Identify potential cover positions, escape routes, and elevated vantage points that provide clear lines of sight to her weak points while offering protection from her area-denial attacks.
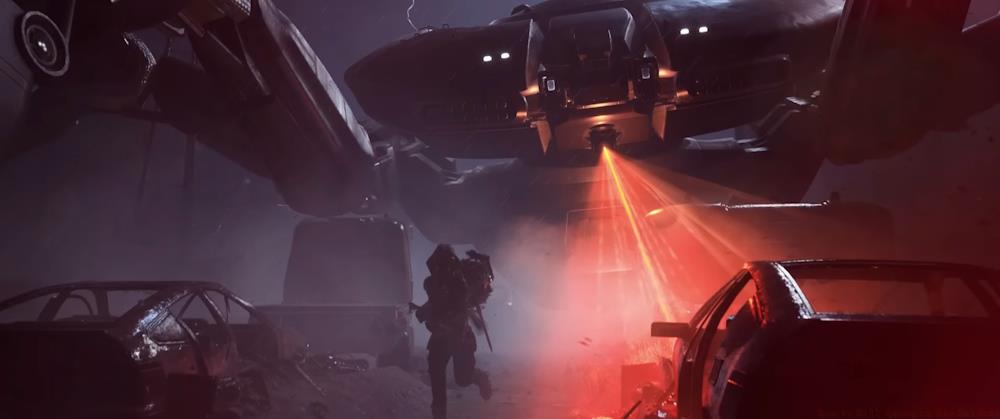
Understanding the Queen’s capabilities is crucial for developing effective engagement strategies. This mechanical behemoth possesses devastating firepower and exceptional durability, requiring methodical approach rather than brute force.
| Category | Details |
|---|---|
| Threat Level | Extreme |
| Armor Plate | Full Plated |
| Primary Attack | Mortar fire |
| Special Abilities | Laser beam EMP Pulse Ground slam |
| Weakness | Joints Heads Core |
| Health | 22,000 HP |
The Queen’s 22,000 health pool makes her one of the most durable enemies in Arc Raiders. Her full-plated armor provides comprehensive protection, requiring targeted attacks on specific vulnerable areas rather than general body shots.
Advanced Targeting Strategy: Focus fire on joint connections between armor plates and the prominent Head Core. These areas take significantly increased damage, with the Head Core potentially triggering stagger effects when sufficiently damaged.
Her mortar attacks create expanding damage zones that require constant positional awareness. The laser beam telegraphs with distinctive charging sounds and visual effects, providing brief windows for evasion.
Critical Error to Avoid: Never cluster together during EMP Pulse preparation phases. This ability disables electronic equipment across a wide radius, potentially crippling your entire squad’s combat capabilities simultaneously.
Building the perfect loadout for Queen engagements requires balancing damage output, survivability, and utility. Your equipment choices directly impact your squad’s ability to manage the fight’s extended duration and unpredictable phase transitions.
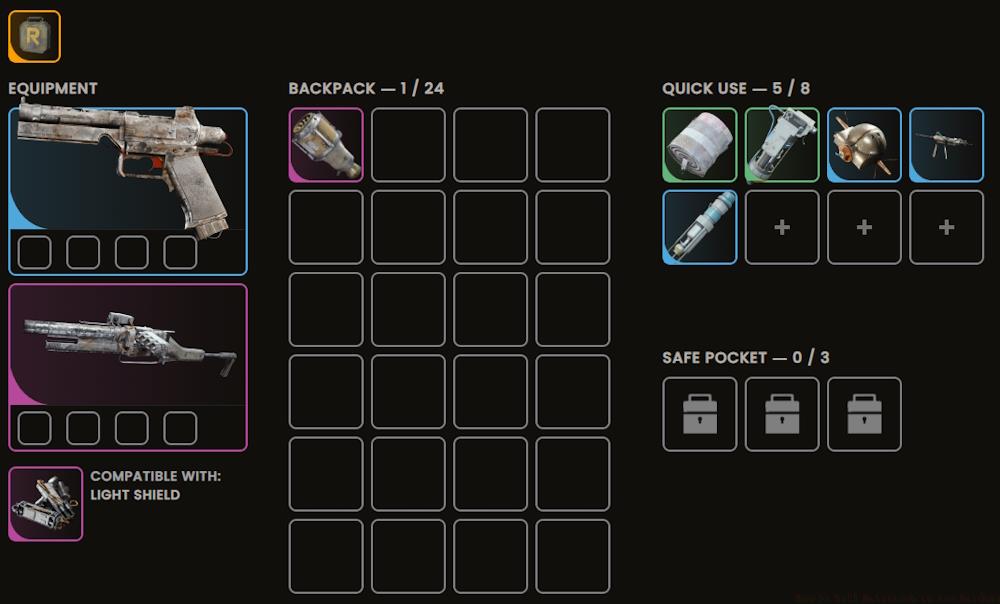
The Hullcracker weapon proves exceptionally effective against the Queen’s armored framework. Its specialized ammunition penetrates heavy plating and deals bonus damage to mechanical targets, making it ideal for targeting her weak points.
Essential Gear Priority: Always carry a Raider Hatch Key in your safe pocket. This ensures extraction remains possible even when standard evacuation points become compromised by enemy concentrations.
For augment selection, the Raider Augment IV stands as the optimal choice. Craft this enhancement using 1x Power Rod and 4x Processor components. Beyond providing substantial inventory capacity, its shield compatibility enables deployment of advanced protective systems.
Shield Strategy: Equip the Heavy shield variant to withstand the Queen’s most devastating attacks. The additional protection proves invaluable during critical phases where positioning becomes restricted.
The Showstopper equipment serves as a crucial combat tool, capable of temporarily stunning the Queen when timed correctly. Coordinate its use with your team to create extended damage windows during vulnerability phases.
Success against the Queen demands more than individual skill—it requires seamless team synchronization and adaptive strategy execution. Each squad member must understand their specific role and how it contributes to the collective effort.
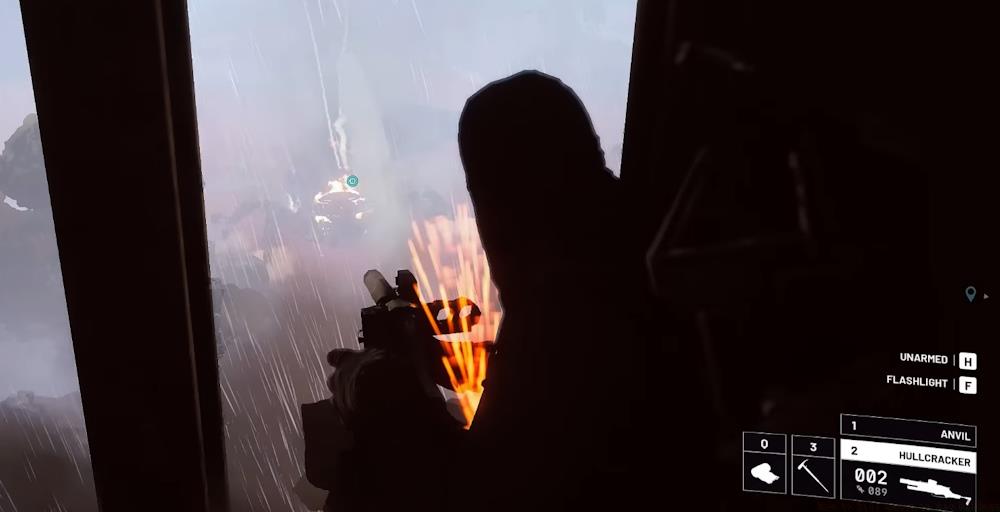
Phase Management Protocol: The Queen’s behavior follows distinct combat phases. During mortar bombardment, spread out and utilize terrain features for cover. When she prepares her laser beam, identify safe zones outside the attack trajectory.
Environmental Utilization: The battlefield contains numerous structural elements that provide protection. Use these strategically to avoid damage while maintaining offensive pressure.
Communication Framework: Establish clear callouts for ability telegraphs, target prioritization, and emergency repositioning. Designate specific players to focus on weak point damage while others handle add control and support functions.
Advanced Technique: Implement a “bait and switch” rotation where one player draws aggression while others maximize damage output from flanking positions.
Common Coordination Failure: Teams often collapse when multiple members simultaneously attempt to revive fallen comrades during active combat phases. Designate a dedicated medic who operates from protected positions while others provide covering fire.
For comprehensive team strategy development, consult our BF6 Class Selection Guide to optimize role distribution.
Victory against the Queen yields substantial rewards that justify the considerable investment required to defeat her. Understanding the loot distribution system helps prioritize extraction and resource allocation.
The primary rewards include high-tier crafting materials like ARC Alloy and Advanced Powercells, essential for end-game equipment progression. The rare Queen Reactor represents the most valuable drop, enabling creation of exclusive high-performance gear.
Loot Prioritization: The Queen Reactor takes extraction priority due to its scarcity and crafting applications. Secondary materials should fill remaining inventory capacity based on their relative value and utility.
Extraction Contingency Planning: Always identify multiple extraction points before engaging. The Raider Hatch Key provides insurance against primary evacuation routes becoming overrun.
Risk Assessment: The post-combat extraction phase often proves more dangerous than the boss encounter itself. Remaining enemy ARCs and potential player ambushes create additional challenges.
Successful extraction not only secures your hard-earned rewards but contributes to overall faction progression. For broader strategic context, reference our Battlefield 6 Complete Guide to understand how Queen rewards integrate with the game’s advancement systems.
Remember that the Harvester itself provides additional loot containers once the Queen is defeated, offering bonus rewards beyond the boss loot pool.
Action Checklist
- Locate Harvester Event via map link icon and assemble 3-4 player squad
- Equip Raider Augment IV with Heavy shield and Hullcracker primary weapon
- Conduct environmental assessment identifying cover positions and extraction routes
- Coordinate initial engagement with designated roles for damage, support, and crowd control
- Execute phase-based strategy focusing weak points and managing special ability cooldowns
- Secure Queen Reactor and high-tier materials, then execute controlled extraction
No reproduction without permission:Tsp Game Club » How to Kill Queen in Arc Raiders Master the ultimate Arc Raiders boss fight with expert strategies, loadout optimization, and advanced combat tactics