TL;DR
- Craft armor stands using 6 sticks and 1 smooth stone slab in specific crafting grid pattern
- Find naturally generating armor stands in Taiga villages for immediate use
- Display full armor sets and customize poses using interaction techniques
- Utilize armor stands for decorative displays, storage organization, and redstone contraptions
- Advanced techniques include invisible armor stands and armor trim showcase platforms
Minecraft offers extensive armor customization through armor trims, creating the need for effective display solutions at your base. Armor stands provide the perfect answer for both storage and exhibition of your prized armor collections. This comprehensive guide covers everything from basic crafting to advanced display techniques.
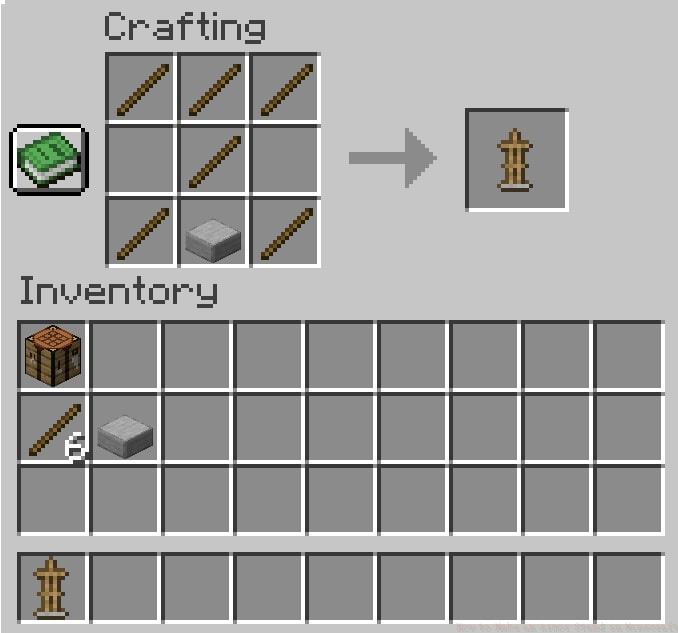
The essential armor stand crafting formula requires precise resource combination:
Primary Components:
Sticks represent fundamental crafting components that can be manufactured using two wooden planks from any tree variety. For optimal efficiency, consider using oak or birch wood as these trees grow rapidly and are widely available.
Smooth stone slab creation involves a multi-step process: first smelt cobblestone into regular stone using any furnace, then smelt the stone again to create smooth stone, finally crafting the smooth stone into slabs using the crafting table. Many players overlook that smooth stone requires double smelting, which is a common crafting mistake.
You’ll need either a crafting table or the newer crafter block. The crafting table provides manual 3×3 grid access, while the crafter enables automated production through Redstone activation – perfect for mass production setups.
Follow this detailed crafting sequence to ensure successful armor stand creation every time:
Pro Tip: New players often misplace the smooth stone slab or use the wrong stone variant. Ensure you’re using smooth stone slabs specifically, not regular stone slabs or other variants.
The crafting table remains the most reliable method for beginners, while advanced players may prefer crafter blocks for automated production lines. Crafters excel when integrated with bamboo farms for stick automation and stone generator systems for smooth stone production.
Estimated crafting time for experienced players is approximately 2-3 minutes from resource gathering to final product, while beginners may require 5-7 minutes depending on their familiarity with the smelting process.
Beyond crafting, several alternative methods exist for obtaining armor stands, each with unique advantages:
Village Exploration: Taiga villages naturally generate with armor stands in various buildings, primarily armor smith shops. These pre-placed stands require no resources and provide immediate display capabilities.
Trading Opportunities: Expert-level armorers occasionally offer armor stands in exchange for emeralds, though this method proves less reliable than direct crafting.
Loot Chest Locations: End cities and woodland mansions sometimes contain armor stands in their treasure rooms, offering bonus items for explorers.
For players early in their Minecraft journey who haven’t established stone smelting operations, village acquisition provides the fastest path to armor display capabilities.
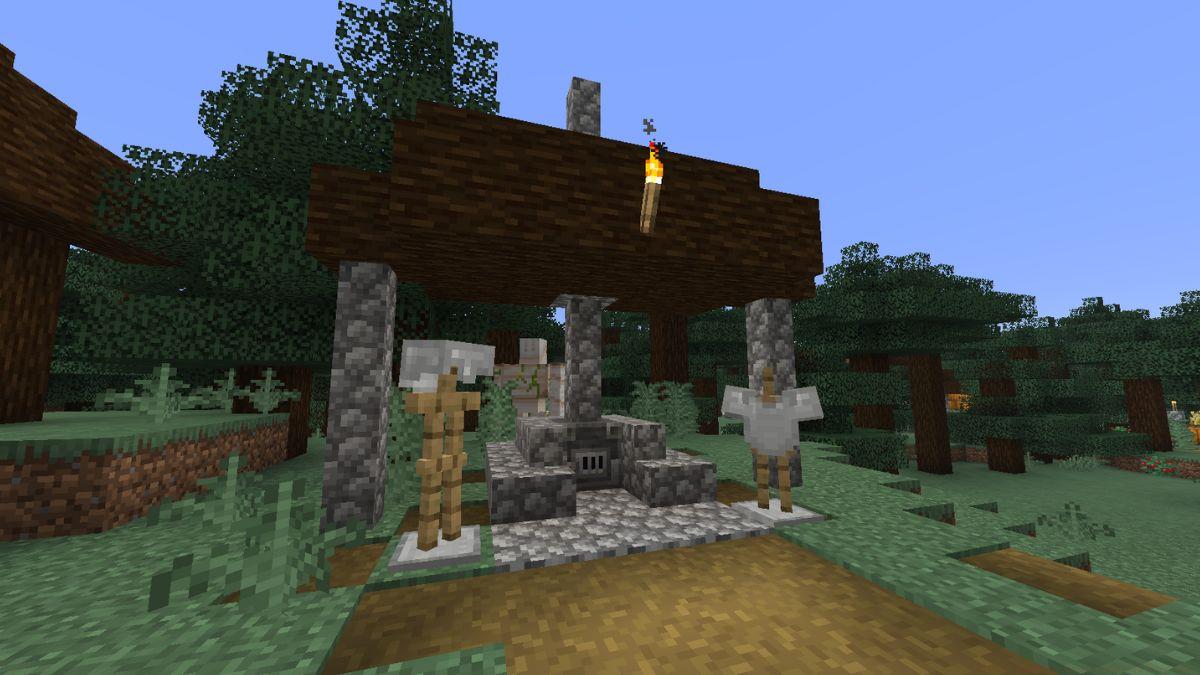
Armor stands transcend basic functionality, offering extensive creative possibilities for base decoration and organization:

Basic Armor Display: Simply interact with the armor stand while holding armor pieces to equip them. Full sets can be displayed together or mixed creatively for custom looks.
Pose Customization: Using commands or specific interactions, armor stands can be positioned in various poses, from battle stances to casual positions, enhancing your display areas.
Redstone Integration: Advanced players utilize armor stands in complex redstone contraptions, including automated display rotations, hidden door mechanisms, and interactive museum exhibits.
Advanced Techniques: Through command blocks, players can create invisible armor stands for floating armor effects or design elaborate armor trim showcase platforms that highlight the latest customization options.
Consider creating dedicated armor halls to display your complete collection or use stands as organizational tools in storage rooms. The versatility of armor stands makes them invaluable for both practical storage and aesthetic base enhancement.
For comprehensive gameplay strategies beyond armor management, explore our Complete Guide for expert tips.
Action Checklist
- Gather 6 sticks (craft from 12 planks) and create smooth stone slab through double smelting
- Set up crafting table and arrange materials in precise T-formation pattern
- Explore Taiga villages for naturally generated armor stands as alternative acquisition
- Customize armor stand poses and create display areas at your base
- Implement advanced techniques like redstone-activated displays or invisible armor stands
No reproduction without permission:Tsp Game Club » How to Make an Armor Stand in Minecraft Master Minecraft armor stand crafting, usage, and advanced display techniques for your base