TL;DR
- Lightning rods require only 3 copper ingots arranged vertically in crafting table
- Proper placement protects structures from fire damage during thunderstorms
- Advanced Redstone applications include automated systems and signal generation
- Oxidation mechanics affect appearance but not functionality over time
- Strategic placement maximizes protection radius and aesthetic integration
The Copper Age update revolutionized Minecraft’s metallurgy system, introducing comprehensive copper mechanics that include the highly functional lightning rod. This essential block serves dual purposes in both safety systems and Redstone engineering projects.
To craft a lightning rod, you’ll need exactly three copper ingots arranged in a specific pattern. These ingots are obtained through a multi-step process beginning with mining copper ore found between Y-levels -16 and 112 in the overworld. The most abundant copper deposits typically generate around Y-level 48, making mid-level mining expeditions particularly productive.
Beyond the copper requirements, you’ll need access to a crafting table, which can be created from four wooden planks of any type. For optimal efficiency, establish your crafting station near your primary storage area to streamline the manufacturing process.
Pro Tip: Consider creating multiple lightning rods simultaneously by gathering nine copper ingots, allowing you to protect several structures or experiment with different Redstone configurations without repeated crafting sessions.
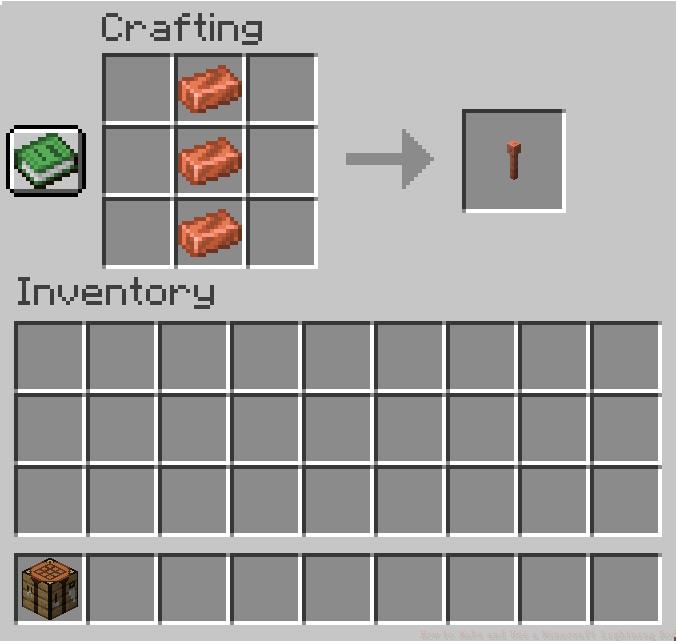
Once you’ve gathered the necessary materials, follow this precise sequence to create your lightning rod. The crafting process requires careful attention to ingredient placement within the 3×3 grid.
Begin by positioning and right-clicking your crafting table to access the manufacturing interface. The crafting grid provides nine available slots where you’ll strategically place your copper resources.
The critical step involves filling the entire center column with your three copper ingots. Place one ingot in the top-center slot, another in the middle-center position, and the final ingot in the bottom-center cell. This vertical alignment mimics the rod’s eventual physical form and function.
Upon correct placement, the lightning rod will immediately appear in the result box on the right side of the interface. Simply drag it into your inventory to complete the crafting process.
Common Mistake to Avoid: Many players incorrectly place copper ingots horizontally across the middle row, which creates different copper-based items. Always verify the vertical alignment before finalizing your craft.
Time Optimization: Expert crafters can produce a lightning rod in approximately 15-20 seconds once materials are prepared, making it one of the quicker advanced items to manufacture in Minecraft.
Lightning rods serve multiple sophisticated functions beyond their obvious protective capabilities. When strategically implemented, they become invaluable components in advanced Minecraft engineering projects.
The primary function involves redirecting lightning strikes during thunderstorms, protecting flammable structures within a 32-block radius. This protective bubble prevents wooden buildings, trees, and other combustible materials from igniting during electrical storms, potentially saving hours of reconstruction work.
As a Redstone component, lightning rods emit a strong redstone signal when struck by lightning, enabling the creation of weather-detection systems, automated lighting, and other complex mechanisms. The signal strength reaches maximum capacity (15) for approximately 8 seconds post-strike, providing ample time for circuit activation.
Advanced applications include integrating lightning rods with observers and note blocks to create storm warning systems, or combining them with dispensers for automated firework displays triggered by natural weather events.
Oxidation Mechanics: Like other copper items, lightning rods undergo oxidation over time, progressing through four visual stages from pristine to fully weathered. While oxidation doesn’t affect functionality, applying an axe to the rod reverses the process, restoring its original appearance.
Strategic Placement: For maximum effectiveness, position lightning rods on the highest points of your structures. Multiple rods can be spaced 64 blocks apart to create comprehensive protection networks across large builds or entire villages.
Understanding these advanced applications will significantly enhance your Complete Guide to Minecraft engineering and protection systems.
Action Checklist
- Mine copper ore between Y-levels -16 and 112
- Smelt raw copper into ingots using furnace
- Craft lightning rod using vertical copper ingot placement
- Position rod on highest structure point for maximum coverage
- Integrate with Redstone circuits for advanced automation
No reproduction without permission:Tsp Game Club » How to Make and Use a Minecraft Lightning Rod Master lightning rod crafting and advanced Redstone applications in Minecraft with expert tips