TL;DR
- Use Bandages or Medkits for basic teammate revival – Medkits provide superior health restoration
- Craft Respawn Capsules at Crafting Bench Level 5 using 40 logs, 40 scraps, and one Gem of the Forest
- Select Berserker class for auto-revive or Medic/Support for enhanced revival capabilities
- Spend 45 Robux for instant self-revive or entire squad recovery when all members fall
- Always prioritize safe revival locations and coordinate with teammates to avoid repeated deaths
Surviving the treacherous nights in 99 Nights in the Forest demands strategic planning and quick thinking when things go wrong. The revival mechanic serves as your safety net, allowing you to recover from fatal mistakes and continue your survival journey. Mastering these revival techniques can mean the difference between losing hours of progress and emerging victorious against the forest’s dangers.
New players often underestimate the complexity of the revival system, leading to unnecessary game overs. This comprehensive guide breaks down every available method, from basic item usage to advanced class abilities, ensuring you’re prepared for any survival scenario.
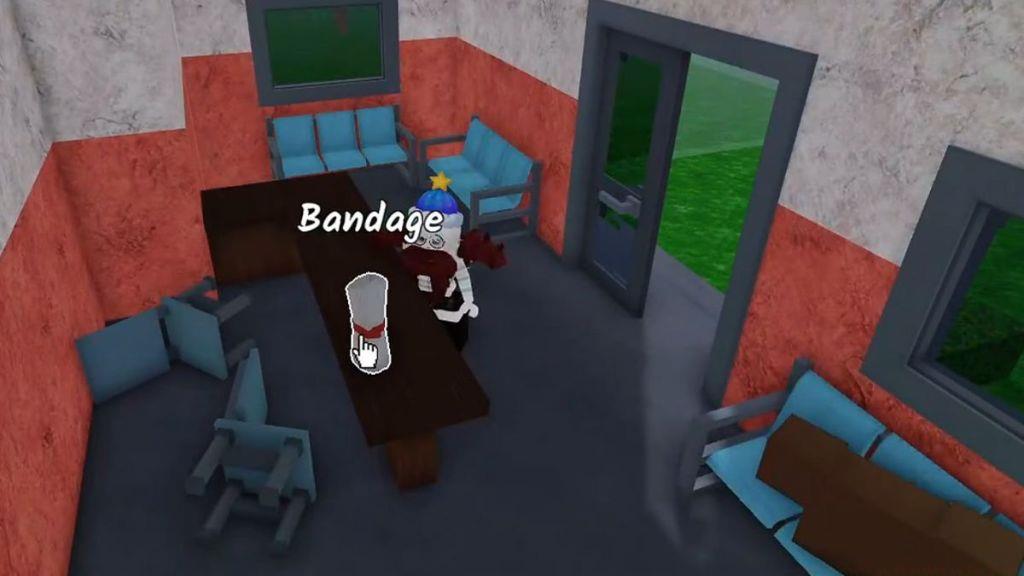
Bandages and Medkits represent the fundamental revival tools in your survival arsenal. While both items can heal your own injuries, their true value emerges when teammates fall in combat. These medical supplies can be acquired through multiple channels: loot chests scattered throughout the map, crafting stations, or specific class starting inventories.
The revival process requires careful execution. First, locate your teammate’s body using the minimap display in the top-right corner. Approach the corpse and hold the E key continuously to initiate the revival sequence. However, performing this action in exposed areas invites additional danger.
For optimal safety, consider corpse transportation. Press E to store the body in your sack, then return to your secured camp base. Unequip the corpse, arm yourself with either Bandage or Medkit, target the body, and maintain E key pressure until revival completes. Critical distinction: Medkits restore significantly more health points post-revival compared to basic Bandages.
Pro Tip: Always carry at least one revival item when exploring high-risk zones. The time investment to retrieve a body often exceeds the few seconds needed for proper preparation.

The Respawn Capsule stands as the pinnacle of survival crafting, offering both self-revival and teammate revival capabilities. This powerful item provides the only free self-revive method outside of class abilities, though obtaining it presents considerable challenges.
Access to this game-changing item requires reaching Crafting Bench proficiency level 5, the maximum tier available. The crafting formula demands substantial resource investment: 40 logs, 40 scraps, and one Gem of the Forest. This combination makes the capsule a late-game objective for dedicated survivors.
Activation mechanics involve using Cultist Gems to power the device. Once charged, the capsule can resurrect any fallen player within its activation radius. However, each use depletes the charge, requiring additional Cultist Gems for subsequent activations. Both Cultist Gems and Gems of the Forest are obtained by defeating cultist enemies throughout the wilderness.
Strategic Insight: Focus on upgrading your Crafting Bench as a primary objective. The Respawn Capsule’s versatility justifies the significant resource allocation, especially for teams frequently engaging in dangerous expeditions.
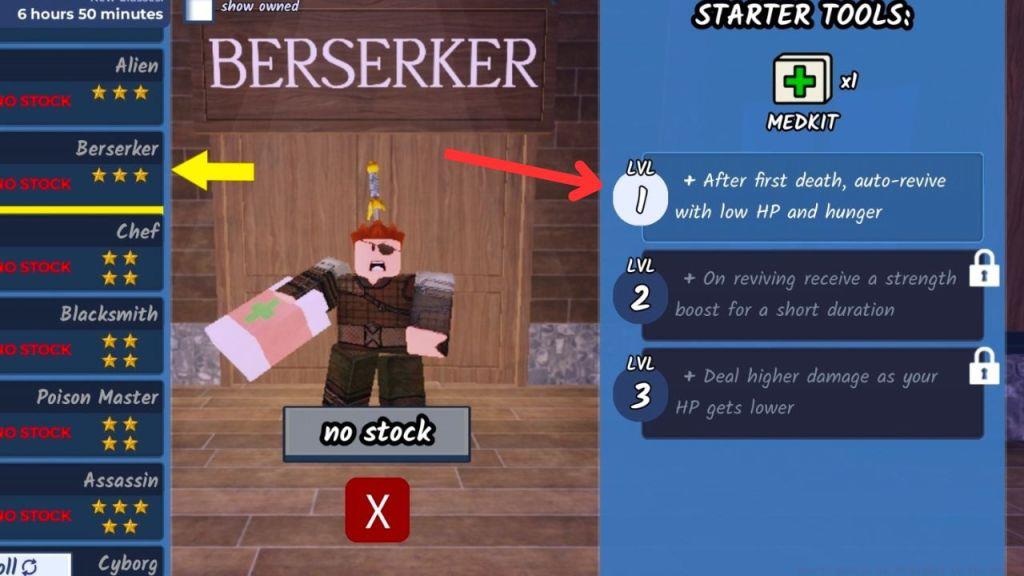
Class selection dramatically impacts your revival capabilities and survival strategies. The Berserker class offers unique self-revival through its auto-revive perk available at level 1. Acquisition requires a one-time purchase from the Class Shop using 100 diamonds. This class begins equipped with a Medkit and can automatically recover from first death each round.
For team-focused revival, the Medic and Support classes provide specialized advantages. Medic practitioners receive two Bandages at game start and execute revival actions twice as fast as other classes. This specialization costs 40 Gems and proves invaluable during intense combat situations.
Support class operators spawn with a single Bandage and establish protective bonds with teammates. While not primarily revival-focused, this class absorbs incoming damage for bonded players, potentially preventing deaths before they occur. Purchase requires 45 Gems investment.
Also Read: BF6 Class Selection Guide for understanding how different roles complement each other in survival scenarios.
Advanced Tactic: Coordinate class selection within your team to ensure balanced revival capabilities. A Berserker can handle self-recovery while Medics focus on team support, creating a resilient survival unit.
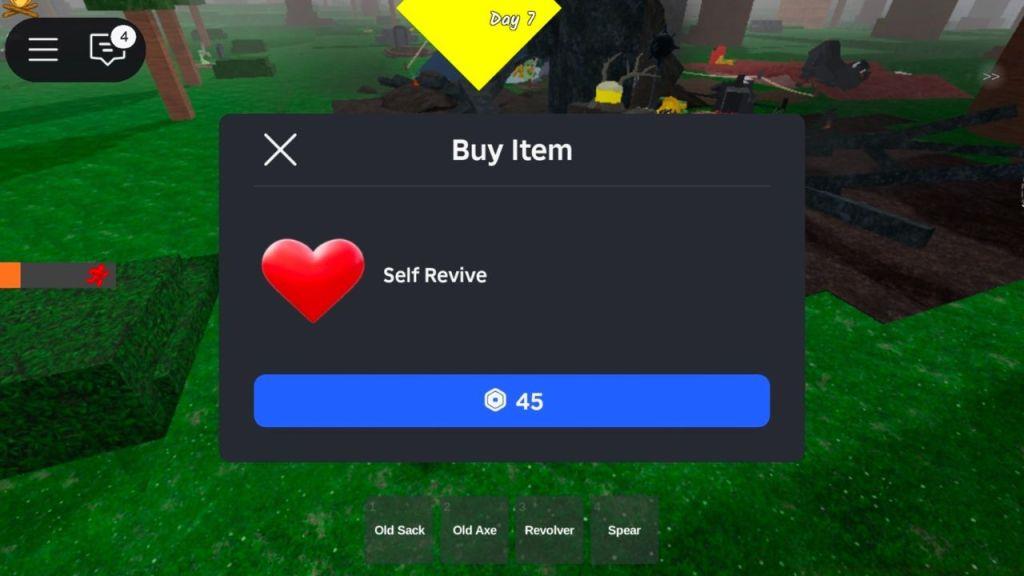
When standard revival methods fail or prove impractical, premium options provide guaranteed recovery. The Self-Revive function appears as a green interface button upon death, offering instant resurrection at the cost of 45 Robux. This immediate return to action occurs precisely at your death location, preserving progression momentum.
This premium feature extends to squad-wide recovery when all team members perish simultaneously. The option activates only when complete team wipe occurs but the game session continues. Timing proves critical – you must activate self-revive before the game transitions back to the lobby screen.
Critical Timing: The squad revival window is brief. Monitor the game state carefully and execute the payment promptly to avoid mission failure.
Also Read: BF6 Weapons Unlock Guide to maximize your combat effectiveness alongside revival strategies.
Seasoned survivors understand that revival represents more than just emergency recovery – it’s an integral component of strategic gameplay. Common mistakes include attempting revives in high-traffic areas without proper cover, leading to chain deaths where the reviver becomes the next casualty.
Optimization Strategy: Establish designated safe zones for revival operations before engaging dangerous activities. These prepared locations should offer environmental protection and escape routes.
Resource management proves equally crucial. Balance your inventory between healing items, revival tools, and combat resources. Advanced players typically maintain at least one revival item per team member when exploring unknown territories.
Communication protocols dramatically improve revival success rates. Designate primary medics, establish fallback points, and coordinate revival priorities based on team composition and current objectives.
Also Read: Battlefield 6 Complete Guide for comprehensive survival techniques beyond revival mechanics.
Pro Insight: The most successful teams pre-plan their revival strategies, discussing contingency plans before emergencies arise. This proactive approach separates consistent survivors from occasional players.
Action Checklist
- Always carry Bandages or Medkits when exploring – prioritize Medkits for superior post-revival health
- Practice corpse retrieval and safe zone revival in low-risk areas
- Focus on upgrading Crafting Bench to Level 5 for Respawn Capsule access
- Coordinate class selection with teammates to ensure balanced revival capabilities
- Establish communication protocols for revival priorities and safe locations
- Farm cultist enemies systematically to stockpile Gems for Respawn Capsule crafting
No reproduction without permission:Tsp Game Club » How to Revive in 99 Nights in the Forest Master survival with comprehensive revival methods, strategic tips, and class-specific abilities in 99 Nights in the Forest