TL;DR
- S-tier characters like Dice Head and CL4 NK dominate late-game with crit-focused builds and exponential scaling
- A-tier heroes offer reliable performance with gold-snowballing and aura-based strategies for consistent results
- B-tier specialists require precise execution but reward skilled players with high mobility and damage potential
- C-tier characters serve niche roles and challenge runs, demanding advanced game knowledge for success
- Strategic character selection should align with playstyle, team composition, and specific game mode objectives
Dominate Megabonk’s chaotic battlefield by mastering the current character meta with our comprehensive tier analysis. Understanding hero strengths and weaknesses transforms average runs into leaderboard-topping performances.
Megabonk delivers intense, fast-paced combat where strategic character selection directly impacts victory chances. Each hero features distinct ability sets, scaling mechanics, and optimal playstyles that determine their competitive viability. The right character choice can elevate your gameplay experience from frustrating to phenomenal, making tier knowledge essential for progression.
Ultimate Megabonk Character Tier List: Best Heroes for Dominating Runs
Our ranking methodology evaluates characters across multiple dimensions: early-game viability, late-game scaling potential, skill ceiling, item dependency, and team synergy. This holistic approach ensures practical recommendations for both solo queue and coordinated team play, helping you maximize win rates regardless of playstyle preferences.
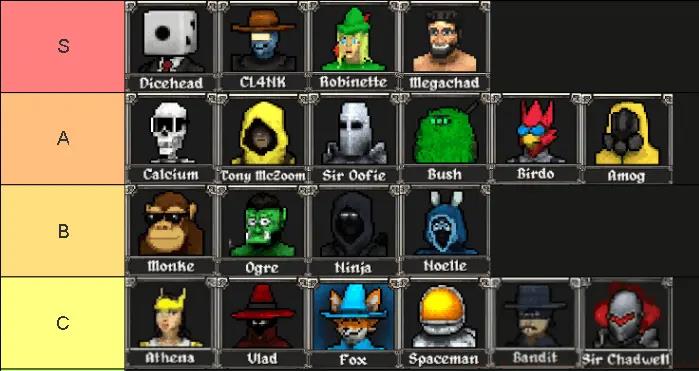
S-tier heroes represent the current meta pinnacle, offering unparalleled scaling and dominant late-game performance that consistently secures victory in skilled hands.
Dice Head operates as a critical-hit specialist who transforms from cautious early-game survivor into unstoppable late-game force. His exponential scaling with curse-heavy or pure critical builds creates snowball effects that overwhelm enemies. Strategic patience during initial waves proves crucial—focus on stacking critical chance through careful positioning and ability timing. Advanced technique: combine his passive with damage-over-time effects for multiplicative damage scaling that shreds even the tankiest opponents.
CL4 NK masters precision revolver combat with crit-based passive enhancements that demand meticulous resource management. His god-tier late-game damage output requires balancing damage, critical chance, and attack speed statistics while strategically utilizing shrine buffs at optimal moments. Early gameplay demands defensive positioning and target prioritization to overcome initial fragility. Pro tip: synchronize his ability activations with enemy spawn patterns for maximum area denial and wave clear efficiency.

A-tier characters deliver reliable performance across all game phases with versatile kits that adapt to various playstyles and team compositions.
Robinette excels as an economic archer who transforms gold advantage into combat dominance through snowballing mechanics. Pair her with area-of-effect support characters and critical-focused equipment to maximize her scaling potential. Early game requires meticulous shrine control and item management to overcome initial sluggishness. Critical mistake to avoid: neglecting gold generation items during the first five waves, as this severely hampers her mid-game power spike timing.
Megachad dominates through aura-based area control, providing consistent damage, crowd control, and temporary damage immunity. His limited mobility during early stages demands strategic positioning and choke point utilization. Late-game explosive potential unlocks through proper ability sequencing and cooldown management. Advanced tactic: layer his stun effects with area damage abilities during enemy density peaks for massive team fight advantages.
B-tier heroes offer specialized toolkits that reward technical proficiency and game knowledge with impressive performance in specific scenarios.
Calcium operates as a high-skill-ceiling speedster who delivers exceptional damage per second when maintaining perfect execution. His snowballing mechanics allow rapid enemy elimination but punish even minor positioning errors with complete momentum reset. Master movement patterns and attack cancel techniques to maximize his potential while minimizing risk exposure. Common pitfall: overextending during speed stacks leads to preventable deaths that nullify accumulated advantages.
Tony McZoom provides mobility-focused parkour combat that rivals Calcium’s movement capabilities. His projectile-based attacks and agile maneuvering create hit-and-run opportunities when mastered. Success demands precise movement timing and attack animation understanding to maintain optimal positioning. Advanced strategy: utilize environmental geometry for attack angle optimization and unexpected engagement initiations that catch opponents off-guard.
C-tier selections serve specialized roles that demand advanced game knowledge and specific team compositions to achieve competitive performance levels.
Sir Oofie functions as a durable tank with armor scaling and life steal mechanics that provide forgiving early-game experiences. His survivability allows mistake recovery during initial waves but suffers from late-game damage deficiencies without proper area-of-effect itemization. Optimal play requires strategic item timing and team role understanding. Situational strength: excels in coordinated team environments where his durability enables damage-focused allies to operate safely. For comprehensive team strategy insights, consult our Class Guide covering optimal role distribution.
While C-tier characters generally require more effort for similar results, they offer unique challenge runs and specialized team compositions that can surprise unprepared opponents. Understanding their niche applications separates advanced players from beginners.
Strategic character selection balances personal preference, team needs, and current meta considerations for optimal performance across various game modes.
New players should prioritize forgiving characters with straightforward mechanics and consistent performance curves. Begin with A-tier selections that offer balanced risk-reward ratios and gradual skill development pathways. Avoid high-skill-ceiling specialists until mastering fundamental game mechanics and enemy behavior patterns. For weapon-specific guidance, our Weapons Unlock guide provides essential equipment recommendations.
Advanced players should consider team composition synergy and counter-picking strategies against anticipated enemy selections. Coordinate character choices to cover multiple roles and create complementary ability interactions. Meta-awareness involves understanding patch changes and community-discovered optimizations that influence tier placements. Comprehensive game knowledge available in our Complete Guide enhances strategic decision-making.
Optimization tips include practicing multiple characters within your preferred tier range to maintain flexibility, analyzing replay data to identify personal performance patterns, and staying updated with community tier lists that reflect evolving meta developments.
Action Checklist
- Practice 2-3 S-tier characters in training mode to master their core mechanics and ability rotations
- Analyze your playstyle preferences and match them with appropriate tier characters for optimal performance alignment
- Master early-game survival techniques for your main characters to ensure consistent late-game scaling opportunities
- Experiment with different item builds and ability sequences to discover optimal combinations for your preferred characters
- Review match replays to identify character-specific mistakes and develop targeted improvement strategies
No reproduction without permission:Tsp Game Club » Ultimate Megabonk Character Tier List Ranked Master Megabonk's character meta with expert tier rankings, strategic builds, and advanced gameplay optimization techniques