TL;DR
- Supply Drops provide rare attachments via Call Station towers across two main maps
- Complete ‘A Better Use’ quest by activating stations and collecting nearby crates
- Strategic positioning and weapon preparation essential for surviving enemy encounters
- Dam Battlegrounds offers 4 key locations while Buried City contains strategic jungle outposts
- Rewards include Extended Light Mag I, Compensator I, and Stable Stock I attachments
Mastering Arc Raiders’ Supply Drop system transforms early-game progression by providing access to premium weapon enhancements. These strategic resources operate through specialized Call Stations – distinctive towers featuring interactive control panels that summon valuable cargo containers to nearby landing zones.
The core mechanic involves locating these stations, activating their interface, then rapidly securing the descending supply crate before hostile forces can intervene. Each successful retrieval contributes toward completing Tian Wen’s ‘A Better Use’ mission assignment, which many players initially underestimate until encountering the challenging navigation requirements across expansive battle zones.
Supply Drops contain exceptionally rare equipment that dramatically improves combat effectiveness, making them high-value targets for both human competitors and AI adversaries. This scarcity necessitates carrying optimized weapon loadouts and defensive gear to withstand ambushes during extraction operations. Understanding the risk-reward balance is crucial for efficient farming.
Strategic preparation should include reviewing our comprehensive Weapons Unlock guide to ensure you’re equipped with appropriate firepower for these dangerous retrieval missions.
Dam Battlegrounds contains four strategically positioned Supply Call Stations that form a circuit around the map’s central infrastructure. Learning this layout saves substantial navigation time and reduces exposure to enemy patrols.
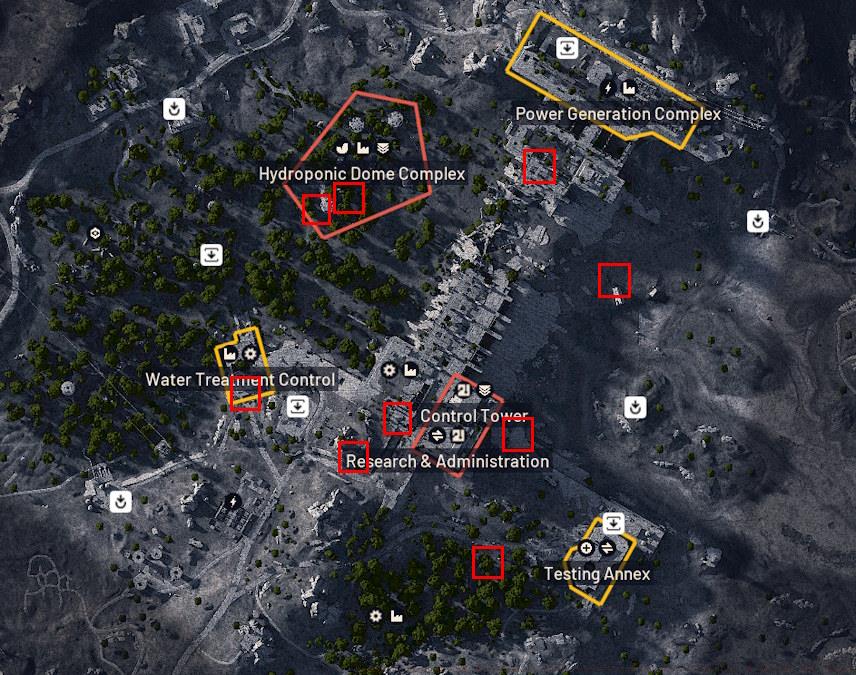
Navigation between these points benefits from using elevated pathways and avoiding central choke points where ambushes frequently occur. The Eastern Control Tower location specifically requires dealing with Leaper patrols, making silenced weapons or distraction tactics particularly valuable for stealthy operations.
Buried City’s jungle environment presents unique challenges for Supply Drop retrieval, with concealed approaches and limited visibility increasing the difficulty of safe extraction. The primary station network connects key points across the overgrown urban landscape.
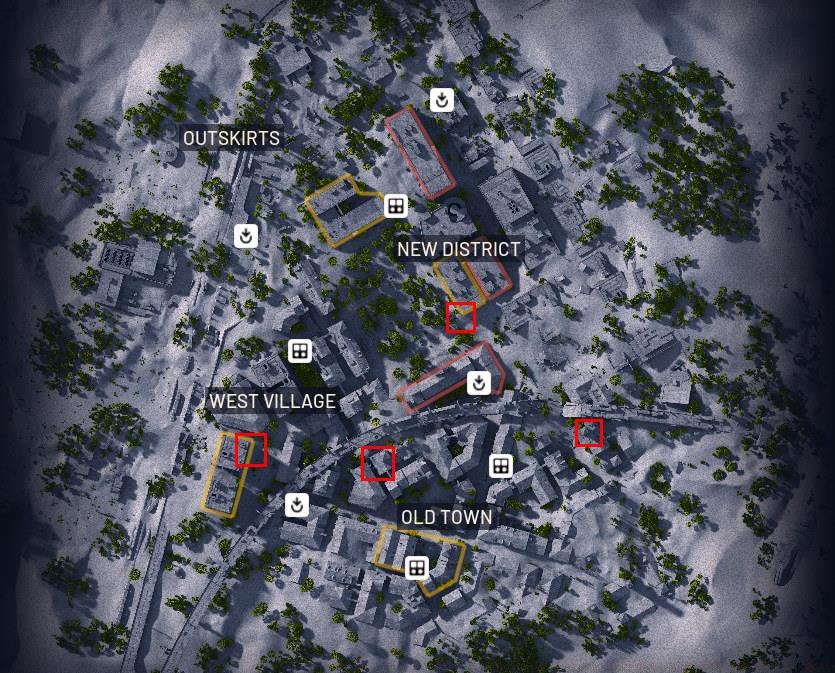
The dense vegetation around Buried City stations provides excellent concealment but also creates perfect ambush opportunities for enemy forces. Advanced players should approach from high ground when possible, using the canopy for cover while scanning for movement below before descending to activate the Call Station interface.
Understanding these environmental dynamics complements broader strategic knowledge from our Complete Guide to battlefield navigation and resource management.
Efficient Supply Drop completion requires more than simple location knowledge – it demands strategic execution and risk mitigation. Many players fail their initial attempts by underestimating the enemy response time or overestimating their extraction speed.
Common Strategic Errors: Attempting to activate multiple stations consecutively without re-equipping, neglecting to clear the area before interaction, and prioritizing speed over situational awareness often lead to mission failure. Successful operators establish perimeter security before engaging the control panel.
Advanced Optimization: Seasoned players complete the entire Supply Drop circuit in under 15 minutes by using grapple hooks for rapid vertical movement and employing sound distraction devices to misdirect enemy patrols. The optimal route begins at Water Treatment, progresses to Loading Bay, then concludes at the Control Tower for maximum efficiency.
Reward analysis reveals that the Extended Light Mag I provides the most significant early-game advantage, followed by the Compensator I for recoil management. These attachments create foundation builds explored in our Class Guide for specialized loadout configurations.
Team coordination dramatically improves success rates, with dedicated roles for station activation, perimeter security, and loot retrieval. Solo players should consider stealth approaches and escape routes before committing to any retrieval operation.
Action Checklist
- Review both map layouts and plan your route before deploying
- Equip primary weapon with suppressor and carry adequate ammunition
- Clear immediate area of enemies before approaching Call Station
- Activate station and immediately position for crate landing zone coverage
- Retrieve contents quickly and extract using pre-planned escape route
No reproduction without permission:Tsp Game Club » Where to Find Arc Raiders Supply Drops and Call Station to Complete ‘A Better Use’ Quest Master Arc Raiders Supply Drops: Complete location guide and expert strategies for efficient quest completion