Master Hornet takedown strategies with advanced tactics, weapon selection, and survival techniques in Arc Raiders
Understanding the Hornet Threat
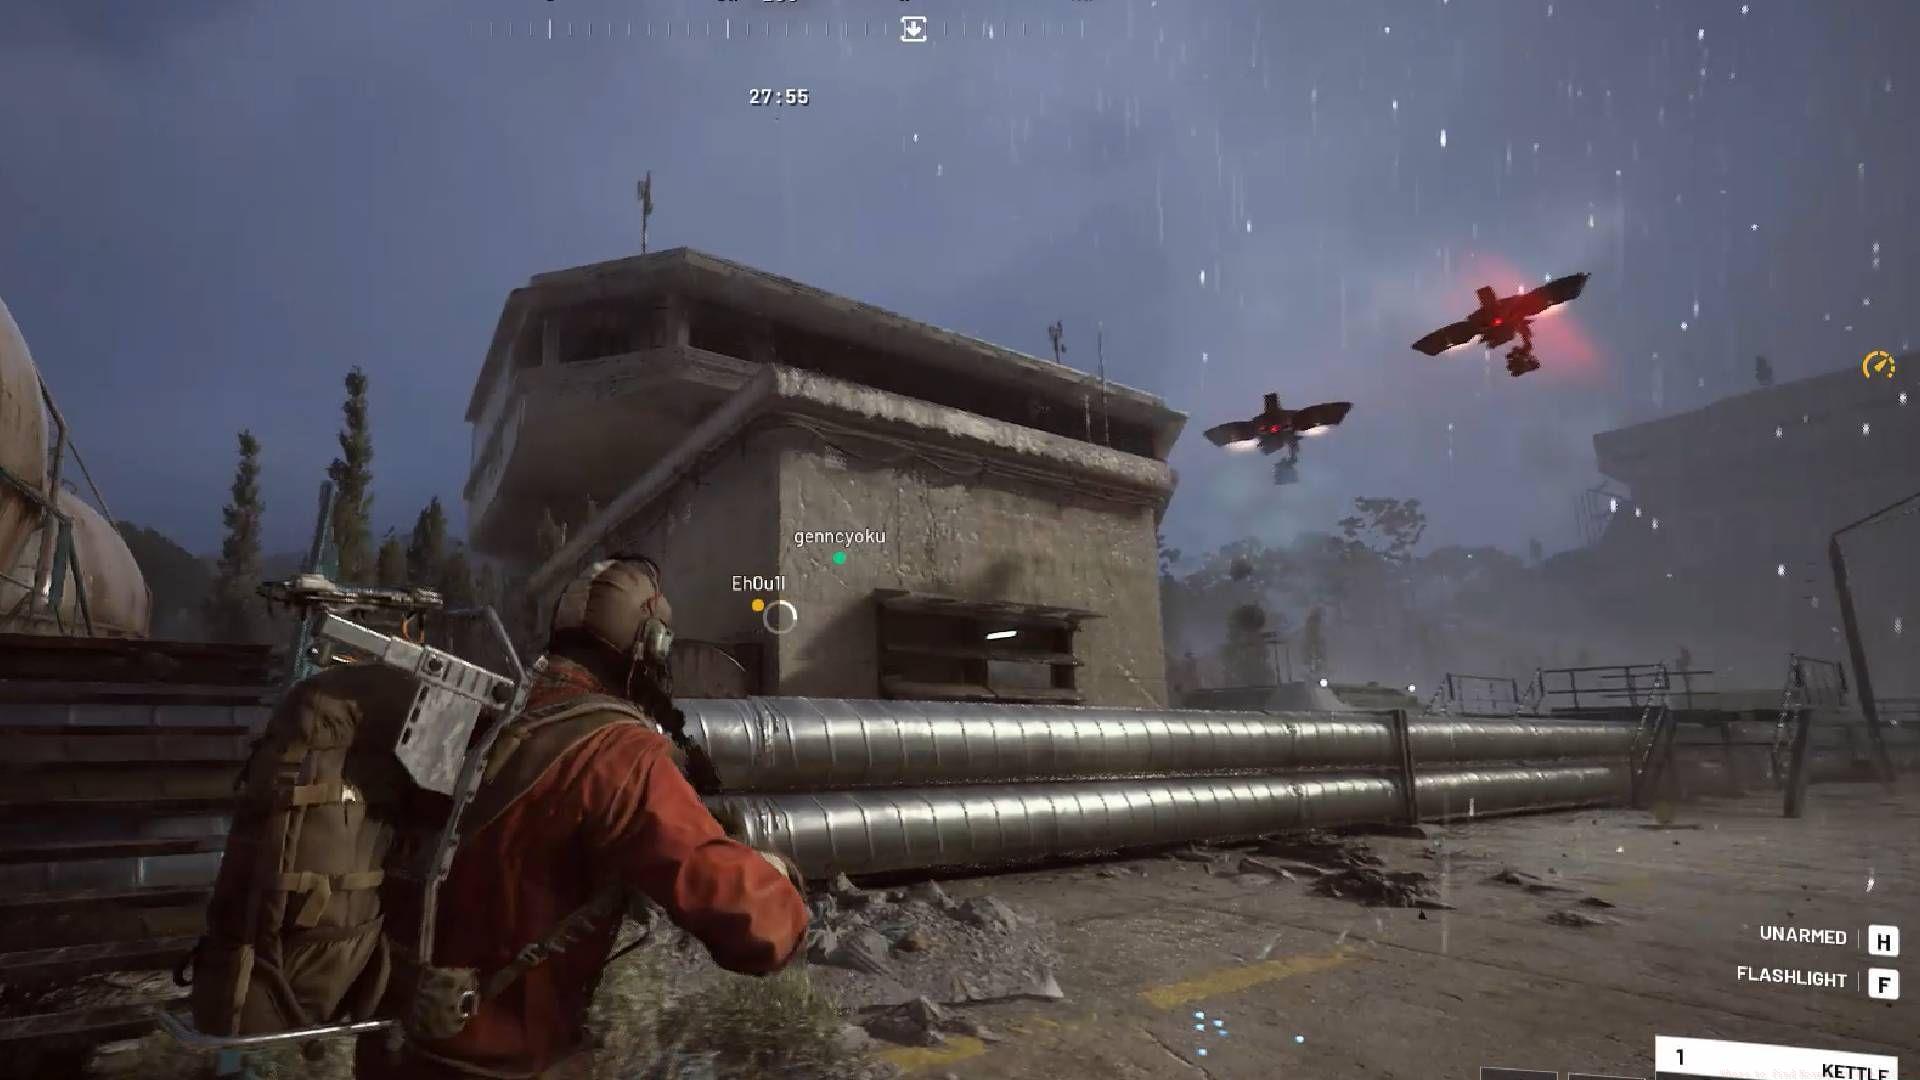
Among the most challenging adversaries in Arc Raiders emerges the Hornet, an autonomous drone equipped with energy shielding capabilities. This mechanical opponent deploys devastating electrical discharge projectiles designed to neutralize targets efficiently. Identification markers include quadruple propulsion systems and ground-scanning illumination beams while hunting. Eliminating these units presents significant difficulty, though multiple countermeasures exist for prepared combatants.
Read more: Best graphics settings for Arc Raiders
The autonomous drone features heavily reinforced frontal armor plating. Visual identification includes crimson laser emissions that administer incapacitating electrical surges upon targets. Any raider struck by these shock projectiles experiences immediate paralysis, preventing movement or counterattack capabilities. These electrical discharges inflict substantial damage to both shield integrity and health points simultaneously.
Combat Strategies and Tactics
Multiple engagement methodologies exist for countering Arc mechanized units in Arc Raiders. Below are strategic recommendations when encountering these aerial threats:
- Execute rapid positional changes when Arc units initiate firing sequences. The stun projectiles have travel time, making evasion possible with quick lateral movement.
- Consistently utilize environmental coverage. When confronting multiple Hornets simultaneously, tactical withdrawal to nearby vegetative concealment or structural barriers represents the optimal survival approach.
- Concentrate fire on propulsion systems using armor-piercing ammunition variants. The thrusters represent critical weak points that disable flight capabilities when destroyed.
- Maintain obscured visibility lines during Hornet alert phases. The drones become exponentially more accurate and aggressive when they’ve detected your position.
Check out: How to access Practice Range in Arc Raiders
Common Mistakes to Avoid: Many players underestimate the Hornet’s turning radius and tracking capability. Never assume you’ve broken line of sight until you’ve reached substantial cover. Additionally, avoid engaging multiple Hornets without team coordination – their combined stun locks can eliminate entire squads rapidly.
Weapon Selection and Progression
Beyond tactical considerations, appropriate armament selection before deployment proves crucial. The game provides extensive weapon inventories, though initial access typically limits players to three or four primary options.
For novice operatives, the optimal solution for Hornet elimination remains the Rattler platform. While not the most potent armament available – indeed ranking C-tier in our comprehensive Arc Raiders weapons assessment – during early operational phases it represents your sole dependable alternative and achieves objectives with proper implementation.
Upon advancing through campaign progression, operators acquire the Ferro system or can fabricate implements like the Kettle from workshop facilities. Both demonstrate exceptional effectiveness against Hornet targets. Successful destruction of both enemy propulsion units causes immediate aerial destabilization and ground impact. Exercise extreme caution regarding impact trajectories, as collision events generate substantial explosive detonations and conflagration zones capable of inflicting massive operator damage.
Weapon Optimization Tips: The Rattler performs best with controlled burst fire at medium range. For the Ferro, aim for sustained fire on a single thruster rather than spreading damage. The Kettle’s explosive rounds can damage multiple components simultaneously if you angle your shots correctly.
Advanced Combat Techniques
Team Coordination Strategies: When fighting Hornets in squad scenarios, designate specific roles. Have one player draw aggro while others focus on thruster destruction. Communication about reload cycles and cooldowns ensures continuous pressure on the drone.
Environmental Exploitation: Hornets struggle in tight spaces with vertical obstacles. Urban environments with multiple building levels can disrupt their tracking algorithms. Use underground passages or indoor areas to force them into unfavorable engagement angles.
Advanced Movement Techniques: Master the slide-and-jump maneuver to avoid shock projectiles while maintaining offensive capability. Time your dodges to coincide with the Hornet’s weapon charge-up sequence – visible as a bright glow around its cannon.
Risk Assessment Protocol: Evaluate each Hornet engagement based on your current equipment, health status, and mission objectives. Sometimes evasion represents the strategically superior option, particularly when operating solo or with limited resources.
Check out the links below for more such Arc Raiders guides:
- How to get all gadgets
- Queue explained: How long do you need to wait?
- Preload details: Size for all platforms and more revealed
- All maps and their risk levels explained
No reproduction without permission:Tsp Game Club » Where to find Hornet in Arc Raiders Master Hornet takedown strategies with advanced tactics, weapon selection, and survival techniques in Arc Raiders