TL;DR
- The M4A1 excels at mid-range with 900 RPM fire rate but requires specific attachments to control recoil
- Engineer class with RPG-7V2 and AV Mines provides the best synergy for vehicle-heavy maps
- Tungsten Core ammunition significantly improves bullet penetration against cover and vehicles
- Proper burst firing technique is essential for maintaining accuracy beyond 50 meters
- Loadout flexibility allows adaptation between close-quarters and medium-range engagements
The M4A1 Carbine has established itself as the premier mid-range weapon in Battlefield 6, delivering exceptional handling characteristics combined with a blistering 900 rounds per minute fire rate. This performance consistency was evident during the Open Beta phase and has been maintained through the full release, making it a reliable choice for consistent performance across various combat scenarios in BF6.
To maximize the carbine’s potential while mitigating its inherent recoil patterns, strategic attachment selection becomes crucial. Understanding the weapon’s strengths and limitations allows players to build configurations that excel in the 25-75 meter engagement range where most infantry combat occurs.
Many players underestimate the importance of balancing fire rate control with mobility, leading to suboptimal performance. The key lies in creating a loadout that enhances the M4A1’s natural advantages while compensating for its vertical recoil tendencies.
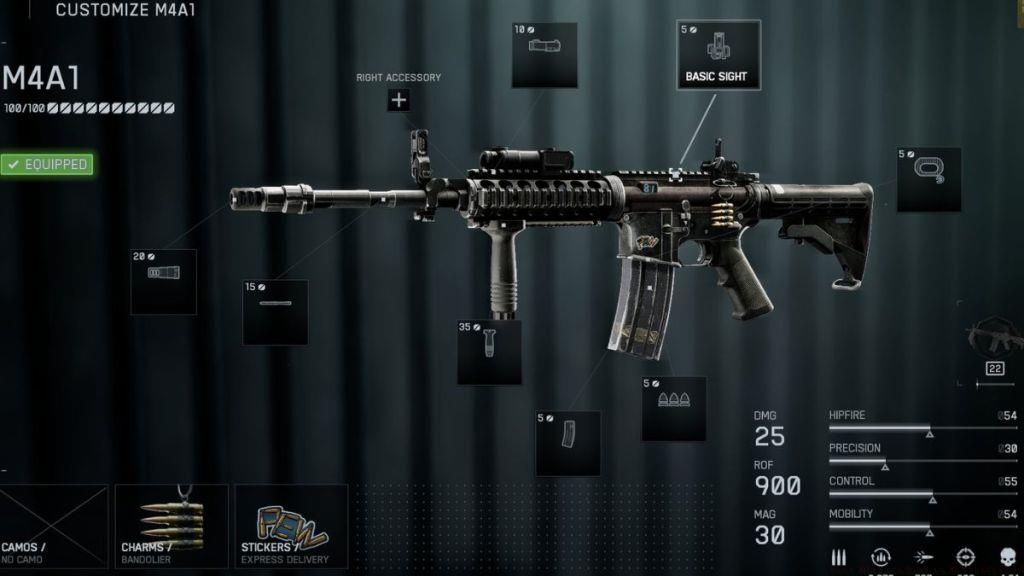
- Top Accessory: 5 MW Red
- Muzzle: Double-Port Brake
- Barrel: 14.5″ Extended
- Underbarrel: Ribbed Vertical
- Scope: Mini Flex 1.00X
- Magazine: 30 RND Fast Mag
- Ammunition: Tungsten Core
- Ergonomic: Improved Mag Catch
This carefully crafted M4A1 configuration transforms the carbine into one of the most versatile weapons available in Battlefield 6. The primary objective focuses on enabling the weapon’s high rate of fire to perform effectively at extended distances while minimizing the impact of weapon bloom mechanics.
The optic selection begins with the Mini Flex 1.0X, though players should experiment with alternatives like the 1.25X or 1.5X scopes depending on personal preference and map requirements. Interestingly, some experienced operators successfully utilize the standard iron sights for improved target acquisition speed in close-quarters situations.
To effectively extend the weapon’s effective range and enhance its long-range burst firing capability, the 14.5″ Extended barrel provides the necessary velocity improvements. The additional recoil generated by this barrel modification is effectively counteracted by combining the Double-Port Brake muzzle device with the Ribbed Vertical underbarrel grip. For players continuing to experience recoil management challenges, switching to the Classic Vertical grip offers superior control at the cost of slightly reduced mobility.
Given the prevalence of hipfire engagements in close-quarters combat, the accuracy enhancement from the 5 MW Red Laser proves invaluable for securing critical kills. The fast magazine system significantly improves reload efficiency, with the Improved Mag Catch further reducing weapon downtime. Completing the build, Tungsten Core Ammunition delivers superior penetration capabilities against cover and light vehicles.
While no specific Battlefield 6 class receives dedicated carbine proficiency bonuses, the optimal selection typically involves choosing between Assault and Engineer specializations based on your intended combat role and map objectives.
If your playstyle emphasizes aggressive infantry combat and rapid movement, the Assault class with its M87A1 underslung attachment provides superior close-quarters performance. Conversely, if your strategy involves anti-vehicle operations and defensive positioning, the Engineer class delivers comprehensive explosive capabilities.
- Class: Engineer
- Secondary: P18
- Gadget One: RPG-7V2
- Gadget Two: AV Mine
- Throwable: Frag
- Melee: Combat Knife
For players seeking maximum anti-vehicle effectiveness with minimal deployment delay, the RPG-7V2 represents the optimal choice for the primary gadget slot. We’ve selected the Anti-Vehicle Mine for its straightforward deployment mechanics in the secondary slot, though tactical flexibility allows experimentation with alternatives like the repair tool or anti-air missiles depending on situational requirements.
The P18 sidearm provides reliable backup firepower when caught during reload cycles, while the fragmentation grenade offers area denial and room clearing capabilities. This comprehensive class setup ensures you’re prepared for multiple combat scenarios while maximizing the M4A1’s strengths.
Advanced M4A1 operators employ specific techniques to maximize their combat effectiveness. The most critical skill involves mastering controlled burst firing—typically 3-5 round bursts at ranges beyond 50 meters—to maintain accuracy while leveraging the high fire rate. Many intermediate players make the mistake of attempting sustained automatic fire at medium range, resulting in excessive bloom and missed shots.
Another common error involves improper engagement distance selection. The M4A1 performs optimally between 25-75 meters; attempting to engage targets at extreme ranges or in point-blank CQB against shotguns or SMGs often leads to disadvantageous exchanges.
For optimal performance in Conquest game modes, position yourself to control capture points with sightlines that favor your optimized engagement distance. The weapon’s versatility allows rapid adaptation between defensive positioning and aggressive pushes when supported by proper team coordination.
When progressing through Assignments or specific weapon challenges, this loadout provides the consistency needed to complete objectives efficiently. The combination of range extension attachments with recoil mitigation components creates a balanced weapon system capable of handling multiple combat scenarios effectively.
Remember that loadout customization should reflect both personal preference and map-specific requirements. Don’t hesitate to modify individual components based on the combat environment—urban maps may benefit from different optic choices or underbarrel selections compared to open terrain engagements.
Action Checklist
- Unlock all recommended attachments through weapon progression
- Practice burst firing control in the practice range for 15 minutes
- Test loadout in Team Deathmatch to refine close-quarters performance
- Adjust optic selection based on primary engagement distances in your preferred game modes
- Master class gadget usage for maximum tactical flexibility
No reproduction without permission:Tsp Game Club » Best M4A1 Loadout in Battlefield 6 Master the M4A1 in Battlefield 6 with this optimized loadout and class setup for maximum performance