TL;DR
- Locate the boss in Kuuvahki Experimental Design Bureau underground on Paha Isle
- Use Pyro attacks to fill the Pyro bar and trigger the Cryo shield phase
- Break the Cryo shield with continued Pyro application to stun the boss
- Build teams with strong Pyro appliers like Arlecchino, Durin, or Mavuika
- Farm Cyclic Military Kuuvahki Core for Durin ascension materials
The Super Heavy Landrover Mechanized Fortress represents one of the most challenging automaton field bosses introduced during Genshin Impact’s Luna III expansion. This formidable mechanical construct originates from the Nod-Krai region and presents unique combat mechanics that demand strategic team composition and precise execution. Understanding its location and attack patterns is crucial for efficient farming.
Unlike previous field bosses such as the Knuckle Duckle, this heavily armored automaton resides within the Kuuvahki Experimental Design Bureau complex situated on Paha Isle. The underground facility housing this boss requires careful navigation through the island’s terrain.
To efficiently reach the Super Heavy Landrover Mechanized Fortress, follow this optimized route:
- Begin at the teleport waypoint adjacent to the boss marker on your Paha Isle map
- Move approximately 150 meters southward from the waypoint and scan the cliffside for a concealed underground entrance
- Identify the opening positioned near several smaller automatons patrolling the area
- Descend into the cavern opening to discover an interior teleport waypoint
- Proceed directly forward from the underground waypoint to encounter the boss arena
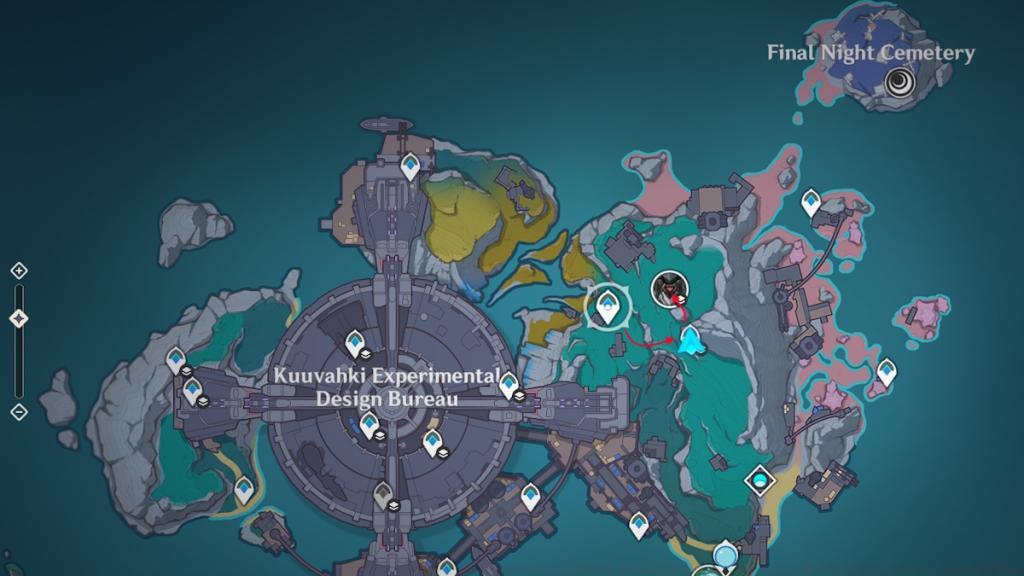

Pro Tip: Unlocking the interior waypoint during your initial visit saves significant travel time for subsequent farming sessions, typically reducing round-trip duration by 60-70% compared to navigating from surface waypoints.
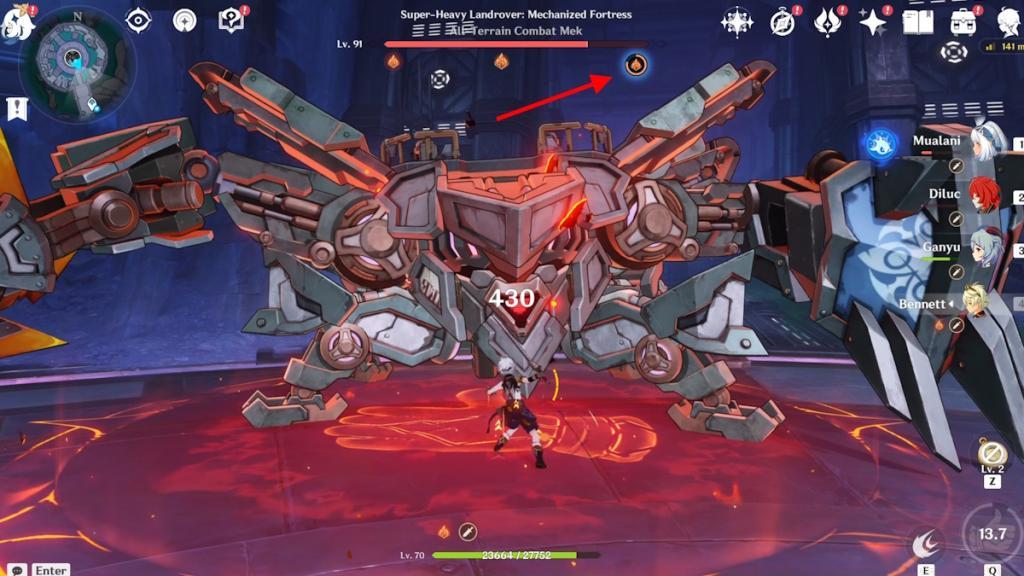
The Super Heavy Landrover Mechanized Fortress employs a sophisticated Pyro Overload System that dictates the entire combat encounter. Success hinges on understanding this mechanic rather than relying solely on raw damage output.
The combat sequence follows a predictable pattern that skilled players can exploit:
- Phase 1: Apply Pyro attacks consistently to fill the Pyro gauge displayed in the top-right interface
- Phase 2: Upon reaching full Pyro accumulation, the boss immediately deploys a substantial Cryo shield while charging a powerful area-of-effect Cryo attack
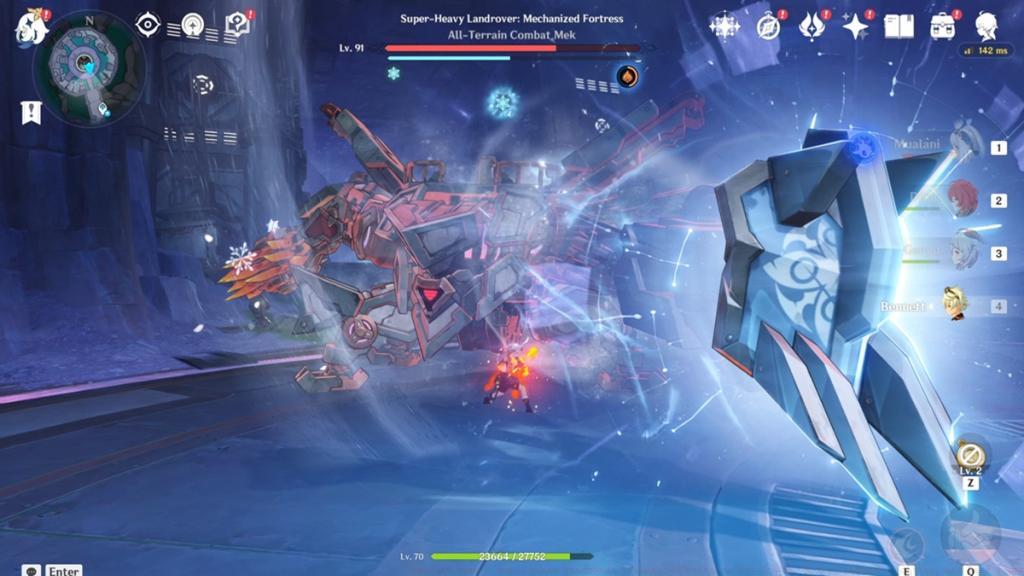
- Phase 3: Continue Pyro application to rapidly dismantle the Cryo shield
- Phase 4: Shield destruction stuns the automaton for 8-10 seconds, creating your primary damage window
- Phase 5: Repeat the cycle until the boss is defeated
Critical Mistake to Avoid: Many players mistakenly switch to non-Pyro damage dealers during the shield phase, significantly prolonging the encounter. The shield possesses extreme resistance to all elements except Pyro, making alternative elements virtually ineffective.
For optimal performance, maintain continuous Pyro application throughout all phases. The shield breaking mechanic deals substantial HP percentage damage independent of your character’s attack stats, making consistent shield breaks more valuable than maximizing damage during stun windows.
Advanced Strategy: Time your elemental bursts to coincide with the stun phase while using skill-based Pyro application during the buildup and shield breaking phases. This approach typically reduces clear times by 25-30% compared to standard strategies.
Team construction for the Super Heavy Landrover Mechanized Fortress prioritizes consistent Pyro application above all other considerations. The boss’s mechanics render traditional damage-focused teams ineffective without proper elemental coverage.
1. Durin Teams: Pyro Application Specialists
Durin teams excel at maintaining relentless Pyro pressure through skill and burst combinations. The optimal Durin-Venti Pyro swirl configuration leverages elemental reactions to accelerate Pyro buildup significantly.
- Main DPS: Venti
- Sub DPS/Support: Durin (Primary Pyro applier)
- Support: Faruzan
- Support/Sustain: Bennet
Team Synergy: Venti’s crowd control groups enemies while Durin applies Pyro, with Faruzan providing resistance shred and Bennet offering healing and attack buffs. This composition typically achieves 2-3 full shield breaks per encounter.
2. Arlecchino Teams: High Damage Output
Arlecchino teams deliver exceptional damage while maintaining Pyro application. However, her immense damage potential can prematurely eliminate the boss before achieving multiple shield breaks, potentially missing the “Breaking Point” achievement.
- Main DPS: Arlecchino
- Sub DPS/Support: Durin or Xiangling (Secondary Pyro applier)
- Support: Xilonen or Kazuha, or Sucrose
- Support/Sustain: Bennet or Thoma
Performance Note: While Arlecchino teams deliver faster clear times (typically 45-60 seconds), players seeking achievements should moderate damage during initial phases to ensure multiple shield breaks.
3. Mavuika Teams: Balanced Approach
Mavuika configurations offer a middle ground between damage and mechanical execution. These teams reliably achieve combat objectives while maintaining efficient clear speeds.
- Main DPS: Mavuika (Primary Pyro applier)
- Sub DPS/Support: Citlali
- Support: Xilonen
- Support/Sustain: Bennet
Alternative Options: For players lacking specific 5-star characters, a budget team featuring Xiangling, Bennet, Sucrose, and a flex slot can complete encounters in 90-120 seconds with proper execution.
Victory against the Super Heavy Landrover Mechanized Fortress yields valuable resources essential for character progression. The most significant reward is the Cyclic Military Kuuvahki Core, a mandatory ascension material for Durin’s development.
The complete reward pool includes:
- Cyclic Military Kuuvahki Core (Durin ascension material)
- Agnidus Agate Gemstone series (Pyro character ascension)
- Shivada Jade Gemstone series (Cryo character ascension)
- 5-star artifact sets: Gladiator’s Finale and Wanderer’s Troupe
- 4-star artifact sets: Gladiator’s Finale, Wanderer’s Troupe, Berserker, Instructor, and Prayers for Illumination
- 3-star artifact sets: Berserker, Instructor, Prayers for Illumination, and Adventure
- Companionship EXP
- Mora
- 200x Adventure EXP
Farming Efficiency Tips:
- Utilize condensed resin to double reward acquisition per run
- Farm during periods when you need both Pyro and Cryo ascension materials
- Prioritize this boss if building Durin or other Pyro characters
- Average clear time with optimized teams: 60-90 seconds
- Recommended daily farming: 3-5 runs for optimal resource time investment
The Super Heavy Landrover Mechanized Fortress presents a mechanically engaging encounter that rewards strategic team building and precise execution. Mastering its patterns ensures efficient farming for essential character development materials.
For comprehensive strategies on character development and team optimization, consult our Class Guide to maximize your combat effectiveness across all content.
Action Checklist
- Navigate to Kuuvahki Experimental Design Bureau underground on Paha Isle
- Unlock the interior teleport waypoint for future access
- Build team with strong Pyro application capabilities
- Execute Pyro buildup → shield break → stun damage cycle
- Farm 3-5 runs daily for optimal material acquisition
No reproduction without permission:Tsp Game Club » Genshin Impact Super Heavy Landrover Mechanized Fortress Boss Guide: How to Defeat, Location, and Best Teams Complete guide to locating, defeating, and farming the Super Heavy Landrover Mechanized Fortress boss in Genshin Impact Luna III