TL;DR
- Complete ‘Through the Petals in the Land of Repose’ to unlock the mission in Dragonbone City Styxia
- Master the time-stopping mechanic by activating modules at precise moments for ball placement
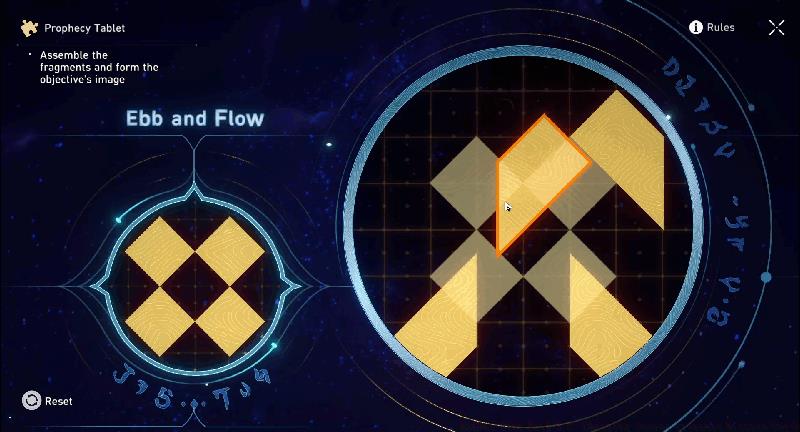
- Solve the Prophecy tablet puzzle in Room 2 to access the elevator system
- Coordinate multiple balls simultaneously in Room 3 using strategic timing
- Use Space bar precision controls for final positioning on marked areas
The Chirping Secret Treasure represents one of the more intricate world missions available within the ‘Dragonbone City’ Styxia region of Amphoreus. This engaging challenge presents players with three distinct puzzle chambers that progressively test your understanding of temporal manipulation mechanics. Each room introduces increasingly complex applications of the time-stopping feature, requiring strategic placement of rolling spheres onto designated floor markers to claim valuable rewards. Many adventurers find themselves perplexed by the precise timing requirements, making this comprehensive walkthrough essential for success.
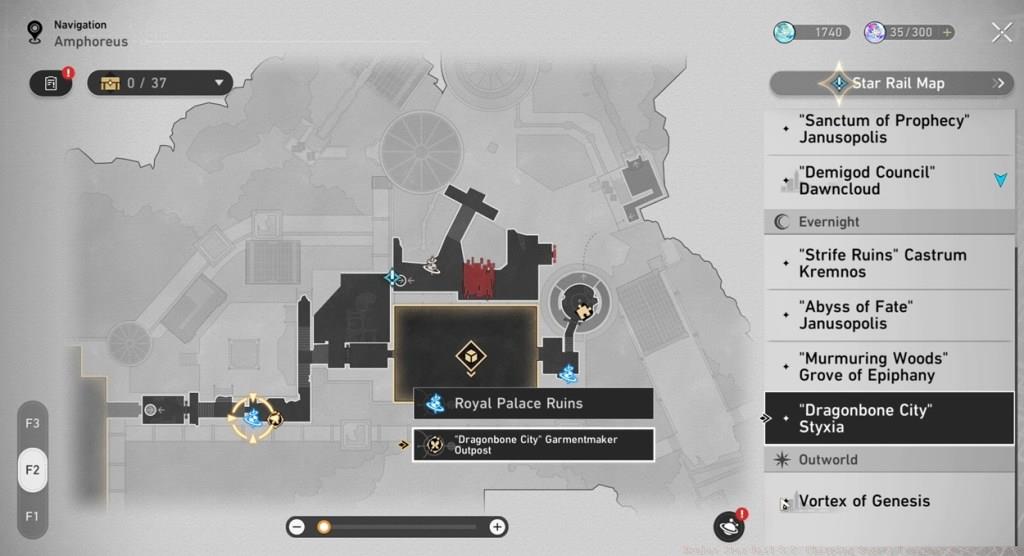
To initiate the Chirping Secret Treasure Mission, you must first journey to the ‘Dragonbone City’ Styxia after successfully completing the critical Trailblaze mission titled ‘Through the Petals in the Land of Repose.’ This prerequisite completion unlocks access to the quest zone. Once you’ve fulfilled this requirement, navigate to the Dragonbone City Styxia map interface and identify the distinctive exclamation point indicator that marks the precise starting coordinates for this adventure.
Utilize the fast travel system to transport directly to the Royal Palace Ruins waypoint, then proceed along the path toward the marked location. As you approach the designated area, be prepared for a rolling sphere that will unexpectedly approach your character. This interaction triggers a conversation with Joyworm, the mission NPC. Engage thoroughly with all dialogue options presented to officially commence your treasure hunting expedition.
The initial chamber serves as an introductory tutorial for the time-stopping mechanics you’ll employ throughout this mission. Begin by activating Oronyx’s enhanced prayer ability, then systematically strike all spherical receptacles distributed throughout the room. This action will release multiple balls with different behavioral patterns.

You’ll observe that one sphere immediately settles into its designated marked area, while another will rapidly roll away from the target zone. This is where the temporal mechanics become crucial. Employ Oronyx’s prayer to redirect the escaping ball backward, but exercise precise timing as it approaches the target area.
The critical maneuver involves striking the chrono-suspension module positioned at the chamber’s center exactly when the ball nears the marked section. This action temporarily halts the ball’s momentum, allowing for careful repositioning. Now, guide the sphere back toward the target and utilize repeated Space bar inputs for micro-adjustments until perfect alignment with the floor marker is achieved, thus solving the first puzzle.
Pro Tip: Position your character at an angle that provides clear visibility of both the ball’s trajectory and the time-stopping module, enabling quicker reaction times. Many players fail by activating the temporal field too early or too late – the optimal timing is when the ball’s leading edge crosses the outer boundary of the marked area.
The second chamber introduces additional environmental puzzles that must be solved before accessing the main spherical challenge. Your initial objective involves deciphering the Prophecy tablet conundrum located adjacent to this area. Solving this prerequisite puzzle activates the vertical transport system necessary for progression.
Once the tablet puzzle is resolved, reactivate Oronyx’s enhanced prayer capability and board the now-operational elevator situated at the rear of the chamber to ascend to the upper level.

At the elevated platform, employ Oronyx’s prayer to repair the fractured bridge structure. Cross to the opposite side and strike the ball holder mechanism there. The released sphere will follow an unusual path, rolling along the wall surface and passing above the target zone without making contact.
Advanced Technique: For this room, the key is understanding that the ball must be intercepted during its wall traversal. Position yourself to activate the time-stopping module when the ball is directly above the marked area, then use careful Space bar adjustments to lower it precisely onto the target. This represents a significant departure from the floor-based mechanics of the first room.
Common Pitfall: Many players attempt to stop the ball too early in its wall journey, resulting in misalignment. Wait until it’s centered over the marker for optimal results. If you’re struggling with character builds for puzzle-solving, our Class Guide offers insights on optimal ability combinations.
The final chamber presents the most demanding challenge, requiring simultaneous management of multiple spheres with coordinated temporal manipulation. This room tests your mastery of the mechanics introduced in previous sections while adding the complexity of multi-object management.
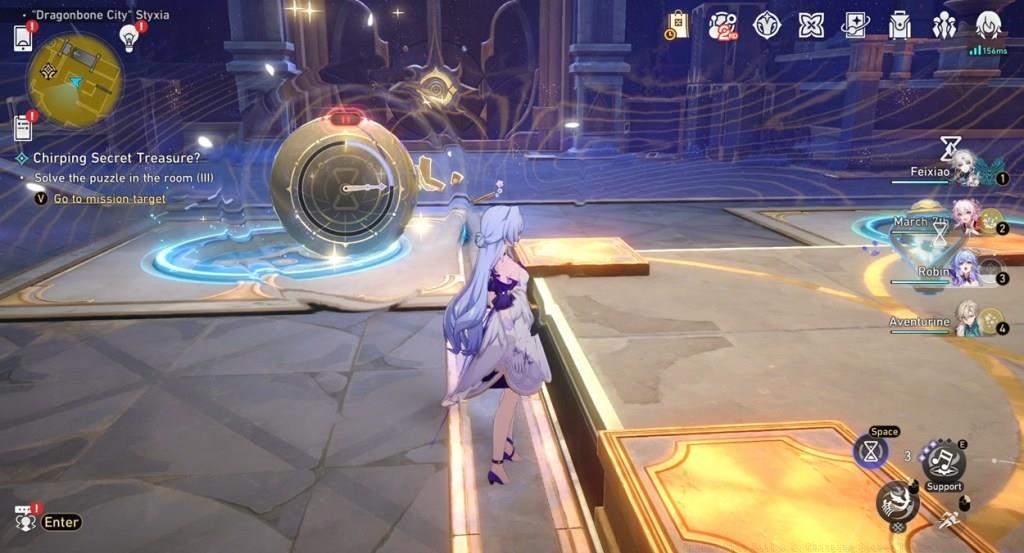
Begin by systematically activating all ball holders while maintaining awareness of their respective trajectories. You’ll need to prioritize which spheres to address first based on their movement patterns and proximity to targets.
Expert Strategy: The key to Room 3 success lies in understanding the interaction between multiple time-stopping modules. Unlike previous rooms, you can strategically sequence temporal activations to manage several balls concurrently. This approach significantly reduces completion time compared to sequential problem-solving.
Coordinate your movements to position yourself where you can monitor multiple spheres simultaneously. Activate chrono-suspension fields for balls that are approaching their targets while simultaneously redirecting others that have strayed. The complexity here mirrors advanced gameplay mechanics found in other challenging missions – for comprehensive strategies, consult our Complete Guide to similar multi-object coordination challenges.
Finalize each puzzle by employing precise Space bar adjustments to achieve perfect alignment on all marked areas. The satisfaction of solving this intricate multi-ball coordination puzzle makes the entire mission worthwhile. For players who enjoy optimizing their gameplay approach, our Weapons Unlock guide provides additional context on ability-based puzzle solving.
Time Optimization: Experienced players can complete all three rooms in approximately 15-20 minutes once they’ve mastered the timing mechanics. New players should allocate 30-45 minutes for their initial attempt, accounting for learning curve and experimentation.
Action Checklist
- Complete ‘Through the Petals in the Land of Repose’ Trailblaze mission
- Travel to Dragonbone City Styxia and locate exclamation mark
- Solve Room 1 using basic time-stopping mechanics
- Decipher Prophecy tablet and activate elevator in Room 2
- Execute multi-ball coordination strategy in Room 3
No reproduction without permission:Tsp Game Club » Honkai Star Rail 3.2: Chirping Secret Treasure Mission Guide Master the time-stopping puzzles in Honkai Star Rail's Chirping Secret Treasure mission with expert strategies