TL;DR
- The Herta’s true 5-star form released January 15, 2025, featuring Ice Erudition path with unique Interpretation stacking mechanics
- Her kit scales dramatically with Interpretation stacks, making proper rotation timing crucial for maximizing damage output
- With 99 base Speed and 220 Max Energy, she requires careful team composition and energy management strategies
- Signature Light Cone ‘Into the Unreachable Veil’ provides 20% Crit Rate and massive damage boosts with energy conditions
- Eidolon investment significantly enhances her performance, with E1 and E2 providing the most substantial power spikes

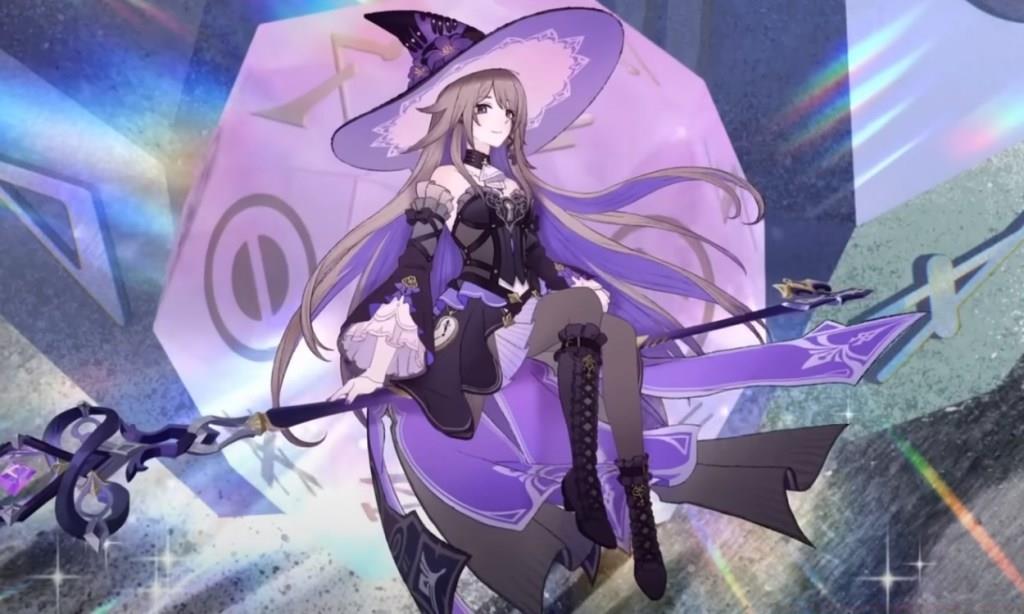
Herta stands as one of Honkai Star Rail’s most intriguing characters, transitioning from her familiar 4-star puppet form to a formidable 5-star powerhouse. As the Emanator of Erudition and member #83 of the Genius Society, she represents the pinnacle of intellectual combat prowess within the game’s universe.
The developers officially designated her true form as ‘The Herta’ following her own preference for a title that distinguishes her essence without creating artificial separation from her puppet manifestations. This naming convention reflects her philosophical stance on identity and consciousness.
Her combat specialization follows the Erudition path, focusing on multi-target damage capabilities, while her Ice element provides valuable crowd control through Freeze effects. This combination makes her exceptionally versatile in both simulated content and challenging end-game scenarios.
Many players first encounter Herta through the Simulated Universe, where her 4-star version serves as an introductory character. However, her true form represents a significant evolution in both power and gameplay complexity.

The Herta’s true form made her debut in Honkai Star Rail version 3.0 on January 15, 2025, marking a pivotal moment in the Amphoreus Trailblazing narrative arc. Her arrival coincides with significant story developments involving the Astral Express’s journey to new cosmic frontiers.
She headlines the first phase banner of version 3.0, accompanied by returning 5-star characters Lingsha, Feixiao, and Jade. This banner structure provides players with multiple high-value pulling opportunities while introducing the game’s latest powerhouse damage dealer.
For optimal resource planning, consider that banner phases typically last approximately three weeks, giving players adequate time to assess their Stellar Jade reserves and make informed pulling decisions.
Understanding The Herta’s statistical foundation is crucial for optimizing her performance in various combat scenarios. Her base stats establish her as a classic Erudition carry with specific strengths and considerations.
| Rarity | 5-star |
| Base HP | 1164 |
| Base Attack | 679 |
| Base Defense | 485 |
| Speed | 99 |
| Taunt | 75 |
| Max Energy | 220 |
| Path | Erudition |
| Element (Damage Type) | Ice |
Her 99 base Speed positions her as a moderately paced character, requiring strategic Speed tuning to optimize turn order in relation to support units. The 220 Max Energy threshold represents a critical breakpoint for her signature Light Cone’s additional effects.
With 679 base Attack, she possesses solid damage potential that scales effectively with her unique Interpretation stacking mechanic. Her defensive stats provide adequate survivability for most content, though she may require shielding or healing support in high-difficulty encounters.
For players struggling with Stellar Jade acquisition for banner pulls, strategic resource management becomes essential. Consider prioritizing characters that complement your existing roster rather than chasing every new release.
The Herta’s combat effectiveness revolves around her innovative Interpretation stacking system. She applies these stacks to enemies through specific abilities, with her Ultimate and Enhanced Skill dealing dramatically increased damage based on the accumulated stacks.
This mechanic creates distinct gameplay patterns where proper timing and rotation sequencing become paramount. Maximizing her damage output requires careful management of when to deploy her most powerful abilities relative to stack accumulation.
Common strategic error: Many players prematurely use her Ultimate before accumulating sufficient Interpretation stacks, resulting in significant damage loss. Optimal play involves delaying key abilities until reaching critical stack thresholds.
Her kit design emphasizes strategic decision-making over simple button-mashing. Learning to identify the ideal moments for ability usage separates average from exceptional Herta players.
Advanced players should focus on team compositions that enhance her stack generation or provide energy regeneration to facilitate more frequent Ultimate usage at optimal stack levels.

| Rarity | 5-star |
| Base HP | 953 |
| Base Attack | 635 |
| Base Defense | 463 |
| Path | Erudition |
| Effect | Increases the wearer’s Crit Rate by 20%. When the wearer uses their Ultimate, increases the Damage dealt by the wearer’s Skill and Ultimate by 96%, lasting for 3 turns. After the wearer uses their Ultimate, if this Ultimate consumes 140 or more Energy, recovers 1 Skill Point. This effect can trigger a maximum of 1 time every 2 turns. |
This signature Light Cone synergizes perfectly with The Herta’s kit mechanics. The substantial 20% Crit Rate boost significantly enhances her damage consistency, while the massive 96% damage increase on Ultimate usage amplifies her burst potential dramatically.
The Skill Point recovery mechanic activates when her Ultimate consumes 140 or more Energy, providing valuable resource management in extended combat scenarios.
For players unable to obtain her signature Light Cone, several strong alternatives exist. The ‘Before the Tutorial Mission Starts’ provides excellent utility, while ‘The Birth of the Self’ offers competitive damage alternatives for budget-conscious players.

The Herta’s Eidolon progression offers substantial power increases at key breakpoints. Understanding these thresholds helps players make informed investment decisions based on their available resources and gameplay goals.
Her E1 and E2 constellations provide the most significant performance improvements relative to investment cost. These early Eidolons enhance her core mechanics and damage scaling.
Investment recommendation: For free-to-play players, E0 provides excellent performance, while E2 represents the optimal stopping point for moderate spenders seeking noticeable power spikes.
Advanced players should prioritize Eidolons that complement their specific team compositions and combat requirements. Some constellations provide greater value in specific content types, making targeted investment more effective than blanket upgrading.
When planning your pulling strategy, consider that obtaining specific Eidolons may require significant Stellar Jade investment. Always prioritize character acquisition over constellation chasing unless you have surplus resources.
Action Checklist
- Master Interpretation stack timing – practice delaying Ultimate until reaching 4+ stacks for maximum damage
- Optimize team composition with energy-generating supports to reach 140 Energy thresholds
- Test alternative Light Cone options if unable to obtain signature weapon
- Analyze your Stellar Jade reserves and set realistic pulling goals for Eidolon investment
- Experiment with Speed tuning to optimize turn order relative to your support characters
No reproduction without permission:Tsp Game Club » Honkai Star Rail The Herta Kit, Signature Light Cone, and Drip Marketing Master The Herta's true form with comprehensive kit analysis, strategic builds, and optimization tips for Honkai Star Rail 3.0