TL;DR
- Brewing stands require cobblestone, blaze rods, and a crafting table for construction
- Blaze powder serves as essential fuel while glass bottles store completed potions
- Strategic Nether fortress exploration is crucial for reliable blaze rod acquisition
- Advanced potion brewing involves precise ingredient sequencing and timing
- Proper setup enables creation of over 20 different potion types for various gameplay scenarios
Mastering potion creation in Minecraft begins with understanding the fundamental components required for brewing stand construction. This essential workstation transforms basic ingredients into powerful consumables that can dramatically enhance your survival capabilities and combat effectiveness.
To assemble a functional brewing stand, you’ll need three primary components:
- Three cobblestone blocks – These form the sturdy base structure
- One blaze rod – The magical core component that enables brewing
- Crafting table – Required workstation for the assembly process
Cobblestone Acquisition Strategy: As one of Minecraft’s most abundant resources, cobblestone can be easily obtained by mining stone blocks with any pickaxe. For efficiency, consider establishing an automated cobblestone generator near your base for unlimited supply.
Blaze Rod Challenges: The most difficult component to acquire, blaze rods only drop from blazes found in Nether fortresses. These hostile mobs spawn from blaze spawners typically located in fortress corridors or open areas. Each blaze has a 50% chance to drop one blaze rod when defeated.
Fuel and Container Requirements: Beyond construction, you’ll need blaze powder (crafted from blaze rods) to power the brewing process and glass bottles to contain your finished potions. Plan to collect multiple blaze rods since each rod converts into two blaze powder portions, each fueling 20 brewing operations.
Constructing your brewing station follows a precise crafting recipe that must be executed correctly. The process requires access to a crafting table, which serves as the essential workstation for this and many other Minecraft creations.
Crafting Table Preparation: Begin by placing your crafting table in a well-lit, accessible location. Ensure you have adequate inventory space for the completed brewing stand.
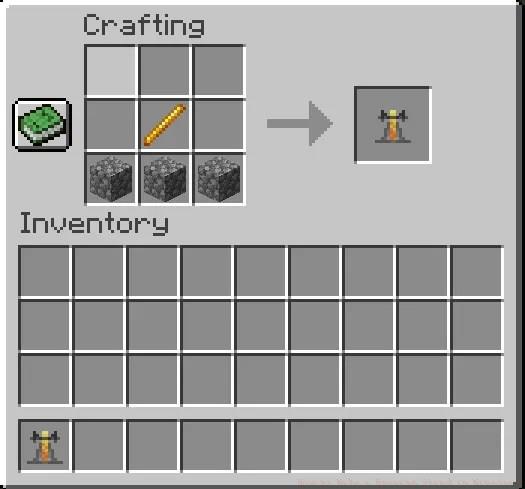
Recipe Placement Sequence:
- Open your crafting table interface to access the 3×3 grid
- Position three cobblestone blocks across the entire bottom row
- Place the single blaze rod in the center cell of the middle row
- Leave all other grid positions empty
Common Crafting Mistakes to Avoid:
- Don’t place cobblestone in non-bottom row positions
- Avoid using alternative stone types like regular stone or andesite
- Ensure the blaze rod occupies exactly the center position
Alternative Acquisition Methods: While crafting is the primary method, you might occasionally find brewing stands naturally generating in village churches, igloos with basements, or End cities. However, these occurrences are rare, making self-crafting the most reliable approach for most players.
Nether Portal Construction: Since blaze rods require Nether access, you’ll need to build a Nether portal using at least 10 obsidian blocks arranged in a 4×5 frame. Activate the portal using flint and steel, then prepare for the dangerous Nether environment with adequate armor and weapons.
Fuel Preparation: Convert one blaze rod into blaze powder by placing it in any crafting grid slot. This powder serves dual purposes – both as brewing fuel and as essential ingredient for certain potions.
Once constructed, your brewing stand becomes a versatile alchemical workstation capable of producing over twenty different potion types. Understanding the brewing interface and mechanics is crucial for efficient potion production.
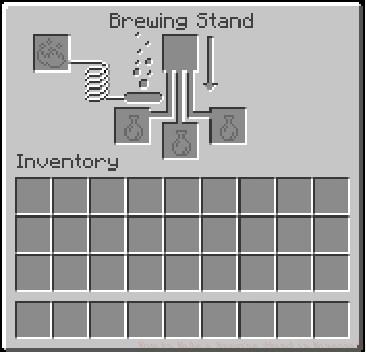
Brewing Interface Navigation: The brewing stand features three bottom slots for bottles and one top slot for ingredients. The fuel indicator shows remaining blaze powder capacity, with each powder portion enabling 20 brewing cycles.
Basic Brewing Process:
- Place blaze powder in the fuel slot (left side)
- Insert water bottles in the three bottom positions
- Add base ingredients (Nether wart, etc.) to the top slot
- Wait approximately 20 seconds for brewing completion
- Add secondary ingredients for effect modification
Advanced Potion Strategies: For maximum efficiency, establish an automated bottle-filling system using cauldrons and dispensers. Create potion production lines by organizing ingredients in chests adjacent to your brewing station.
Potion Duration Enhancement: Extend potion effects by adding redstone to the brew, while glowstone dust increases potency but reduces duration. Understanding these modifications allows you to tailor potions to specific gameplay situations, whether for extended exploration or intense combat encounters.
Strategic Brewing Tips:
- Always brew Nether wart first to create awkward potions as your base
- Organize ingredients by effect type to streamline production
- Create splash potions by adding gunpowder for throwable effects
- Transform potions into lingering varieties using dragon’s breath
For comprehensive gameplay strategies beyond potion brewing, consult our Complete Guide to master other essential Minecraft mechanics.
Action Checklist
- Gather 3 cobblestone blocks and craft a blaze rod from Nether exploration
- Construct crafting table and arrange ingredients in proper brewing stand recipe pattern
- Convert blaze rods to powder for fuel and prepare glass bottles
- Establish Nether wart farm and organize ingredient storage system
- Master advanced brewing techniques including splash potions and effect modifications
No reproduction without permission:Tsp Game Club » How to Make a Brewing Stand in Minecraft Master Minecraft potion brewing with essential crafting techniques and advanced usage strategies