TL;DR
- Copper gear bridges the gap between stone and iron equipment in early-game progression
- All copper items require copper ingots obtained by smelting copper ore in furnaces
- Armor pieces provide varying protection levels with helmets offering the highest armor points
- Tools feature unique damage profiles with axes delivering the highest single-hit damage
- Strategic copper usage saves iron for critical tools while maintaining decent performance
The Minecraft 1.21.9 ‘Copper Age’ update introduces a comprehensive suite of copper-based equipment that revolutionizes early-game progression. Copper tools and armor serve as the perfect intermediate tier for crafters who find themselves stuck between stone and iron equipment limitations. These new additions outperform their leather and stone counterparts significantly while remaining strategically positioned below iron gear in the overall equipment hierarchy. This detailed guide provides step-by-step crafting instructions, performance insights, and strategic recommendations to maximize your copper utilization.
Understanding the positioning of copper equipment is crucial for efficient resource management. While copper tools mine approximately 25% faster than stone variants, they maintain durability comparable to iron tools, making them excellent for extended mining sessions. The armor set, when worn completely, provides substantial protection against early-game threats without depleting your precious iron reserves for more critical applications.
Successfully crafting copper gear requires mastering three fundamental components: copper ingot production, stick creation, and proper workstation utilization. Unlike some resources that generate naturally in chests or villages, copper ingots must be manufactured through a systematic smelting process that transforms raw ore into usable metal.
Copper ore generates abundantly between Y-levels 0 and 96, with peak concentrations around Y=48. Once mined with a stone pickaxe or better, the raw copper must be smelted in any furnace using fuel sources like coal, charcoal, or wood. Each ore block yields one copper ingot, requiring strategic mining to accumulate sufficient quantities for full gear sets.
Stick production offers flexibility through multiple crafting paths. The traditional method involves arranging two wooden planks vertically in the crafting grid, while bamboo enthusiasts can utilize two bamboo pieces for identical results. This flexibility makes copper gear accessible regardless of your biome-specific resource availability.
The crafting table serves as your essential workstation for all copper gear construction. Without this 2×2 crafting grid expansion to 3×3, advanced tool and armor creation remains impossible, emphasizing its foundational role in the crafting progression system.
Copper armor provides balanced protection for early-game adventurers, with each piece offering distinct defensive capabilities and crafting requirements. The complete set delivers 5 armor points total, equivalent to iron armor but with reduced durability characteristics.
Copper Helmet Construction: This head protection requires 5 copper ingots arranged in a U-shaped pattern. Fill the entire top row with three ingots, then place one ingot in each end cell of the middle row, leaving the center empty. The helmet contributes 2 armor points to your total protection.
Chestplate Assembly: As your primary torso protection, the copper chestplate demands 8 ingots configured in a chest-shaped pattern. Occupying every crafting grid cell except the center position of the top row creates this vital defensive piece that provides 3 armor points.
Leggings Formation: Leg protection requires 7 copper ingots arranged to cover the outer perimeter of the crafting grid. This leaves only the center cells of the second and third rows vacant while delivering 2.5 armor points of protection.
Boots Creation: Foot protection represents the most economical armor piece, requiring only 4 copper ingots. Position two ingots in the left and right cells of both the middle and bottom rows to complete this 1.5 armor point item.
Copper tools offer superior performance to stone variants while conserving iron for critical end-game equipment. Each tool features unique damage profiles, durability ratings, and specialized applications that make them valuable additions to any crafter’s arsenal.
Agricultural Implementation: The copper hoe requires 2 copper ingots and 2 sticks arranged in a T-formation. Position the two sticks vertically in the center cells of the middle and bottom rows, then place one ingot in the center top cell and another to its immediate right. This farming tool significantly accelerates crop cultivation compared to stone hoes.
Excavation Tool: As the most economical copper tool, the shovel needs just 1 copper ingot and 2 sticks. Arrange the sticks vertically in the center cells of the middle and bottom rows, then place the single ingot in the center top position for efficient terrain modification.
Mining Advancement: The copper pickaxe represents a substantial upgrade from stone, requiring 3 copper ingots across the top row and 2 sticks in the center cells of the remaining rows, enabling faster ore extraction and expanded mining capabilities.
Combat and Woodcutting: The copper axe delivers impressive 2.5 hearts of damage while maintaining efficient wood harvesting capabilities. Craft it by placing 3 copper ingots in a diagonal pattern from top-left to bottom-right, with sticks in the center-left and bottom-center positions.
Weapon Specialization: For dedicated combat, the copper sword requires 2 copper ingots and 1 stick. Position the stick in the center bottom cell, then place one ingot above it and another to its right for optimal battle performance.
Understanding the statistical performance of copper gear enables strategic equipment decisions throughout your gameplay progression. The following tables provide comprehensive data comparisons for both armor and tool categories, highlighting where copper equipment excels and where strategic upgrades become necessary.
| Armor | Armor Points | Durability | Crafting Recipe |
|---|---|---|---|
| Copper Helmet | 1 | 121 | 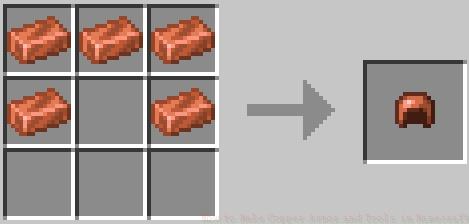 |
| Copper Chestplate | 2 | 176 | 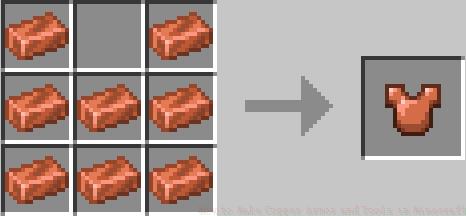 |
| Copper Leggings | 1.5 | 165 | 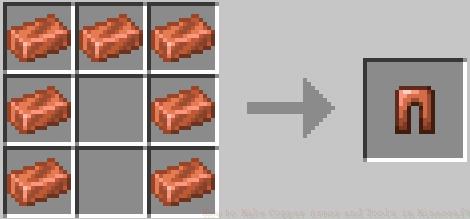 |
| Copper Boots | 0.5 | 143 | 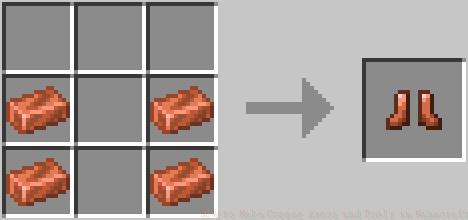 |
| Tools | Damage (in Hearts) | Durability | Crafting Recipe |
|---|---|---|---|
| Copper Hoe | 2/0.5 | 191 | 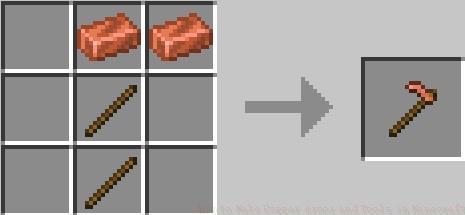 |
| Copper Shovel | 1.5/1 | 191 | 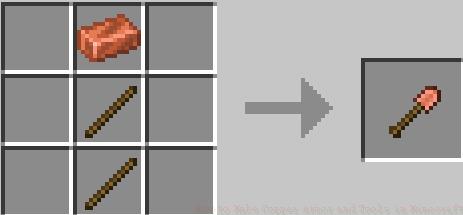 |
| Copper Pickaxe | 2/1.5 | 191 | 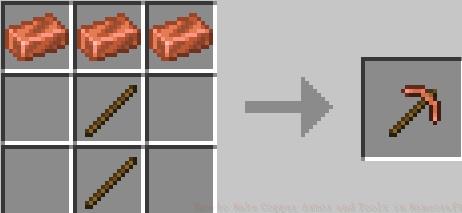 |
| Copper Axe | 2.5/4.5 | 191 | 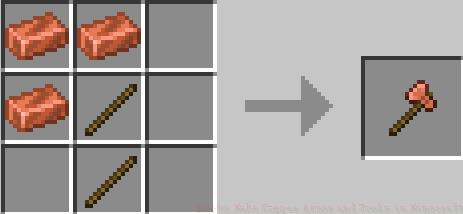 |
| Copper Sword | 3/2.5 | 191 | 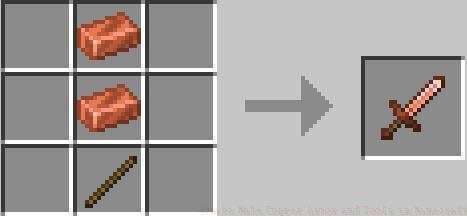 |
Strategic Implementation Recommendations: Prioritize crafting copper tools over armor initially, as the performance gains directly impact resource acquisition speed. The pickaxe and axe should be your initial copper investments, followed by the sword for combat effectiveness. Reserve iron for critical tools like the diamond-tier pickaxe while utilizing copper for secondary equipment to maximize resource efficiency throughout your gameplay progression.
Action Checklist
- Mine copper ore between Y-levels 0-96 using stone pickaxe
- Smelt copper ore in furnace using coal/charcoal fuel source
- Craft sticks using wooden planks or bamboo in 2×2 grid
- Prioritize copper pickaxe and axe for maximum resource efficiency
- Create copper sword for combat effectiveness against early-game mobs
- Complete armor set starting with helmet and chestplate for optimal protection
No reproduction without permission:Tsp Game Club » How to Make Copper Armor and Tools in Minecraft Master copper gear crafting in Minecraft 1.21.9 with essential tips, durability insights, and strategic progression advice