TL;DR
- Craft harnesses using leather, glass, and wool with specific crafting table patterns
- Customize harness colors by selecting different wool types during the crafting process
- Master happy ghast riding mechanics including mounting, flight controls, and multiplayer coordination
- Optimize material gathering with efficient farming and production strategies
- Avoid common mistakes in crafting placement and ghast handling for optimal results
The latest Minecraft Chase the Skies update introduces several fascinating ghast variations, including the remarkable happy ghast that enables aerial transportation across your world. This charming flying creature provides an exceptional method for exploring Minecraft’s skies alongside companions. However, accessing this unique mobility feature requires obtaining a specialized equipment piece called the harness. Developers have implemented this innovative item specifically for mounting and controlling happy ghasts during flight operations. A crucial question arises: can players discover harnesses through exploration, or must they be crafted through specific recipes? Our comprehensive harness guide delivers definitive answers and advanced techniques.
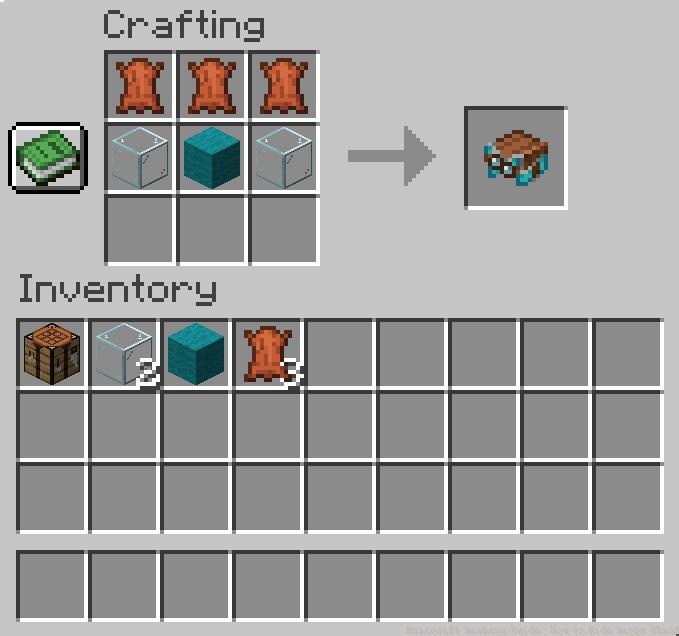
Creating harnesses in Minecraft demands minimal resources that become accessible during early gameplay progression. The recipe components include:
Beyond these core ingredients, establishing a functional crafting table remains essential for harness production. Leather acquisition proves straightforward through bovine husbandry or ovine harvesting techniques. Glass manufacturing involves smelting sand blocks within furnace structures, while wool collection occurs via sheep shearing or direct animal harvesting methods.
Pro Tip: Establish automated farms near water sources for efficient leather and wool production. For glass, create dedicated desert outposts with multiple furnaces to streamline manufacturing.
After securing all necessary components, deploy your crafting table and execute these precise fabrication steps:
The completed harness will materialize in the output slot, mirroring the selected wool’s color scheme. Transfer the finished product to your inventory through standard drag-and-drop procedures.
Common Mistake: Players often misplace materials in incorrect grid positions, resulting in failed crafting attempts. Always verify placement matches the exact pattern requirements.
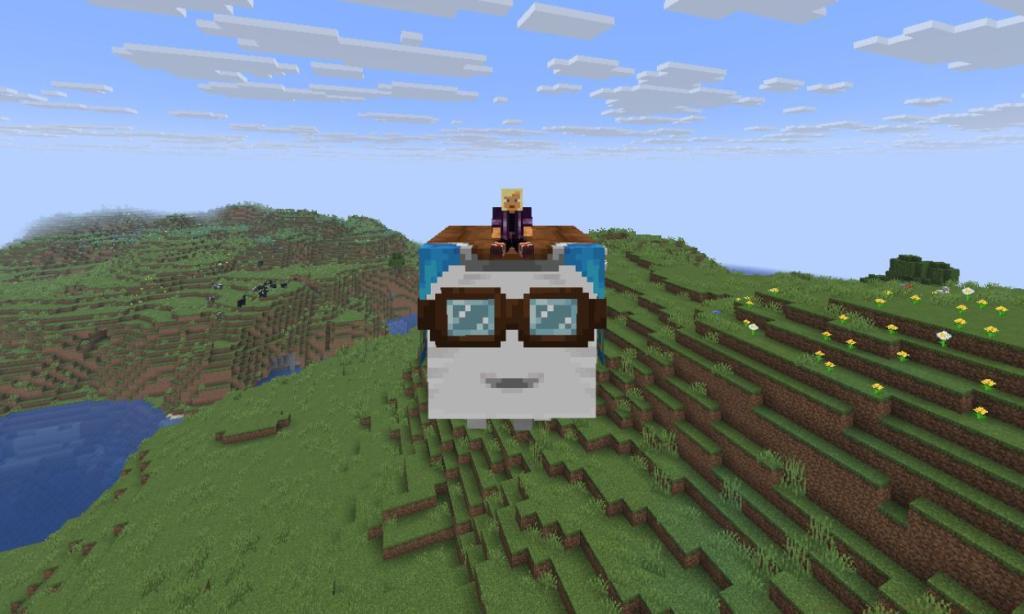
Following successful harness creation, the next phase involves practical application through happy ghast mounting. Begin by obtaining a happy ghast specimen, which requires progressing through the complete ghast developmental cycle starting with dried ghast blocks that mature into ghastlings before reaching full happy ghast status.
Once you’ve secured this amiable aerial companion, implement these riding protocols:
Advanced Technique: Coordinate with teammates using our Class Guide to establish specialized roles for maximum aerial efficiency during multiplayer sessions.
Action Checklist
- Gather 3 leather, 2 glass blocks, and 1 wool of preferred color
- Craft harness using precise 3×3 grid pattern on crafting table
- Obtain happy ghast through dried block to ghastling maturation process
- Mount and control happy ghast using harness mechanics
No reproduction without permission:Tsp Game Club » Minecraft Harness Guide: How to Ride Happy Ghast Master Minecraft's new harness crafting and happy ghast riding mechanics with expert tips and strategies