TL;DR
- Custom crosshairs significantly improve aiming accuracy and reaction times in CS2
- Professional players overwhelmingly prefer Classic Static or Dynamic styles over Default
- Console commands provide granular control for creating truly personalized aiming tools
- Workshop maps offer comprehensive testing environments for crosshair validation
- Import pro player configurations as starting points for your own optimization journey
Optimizing your crosshair in CS2 delivers measurable improvements to your gameplay performance and target acquisition speed. While universal settings don’t exist, understanding core principles helps you develop configurations that enhance your natural aiming style and visual tracking capabilities.
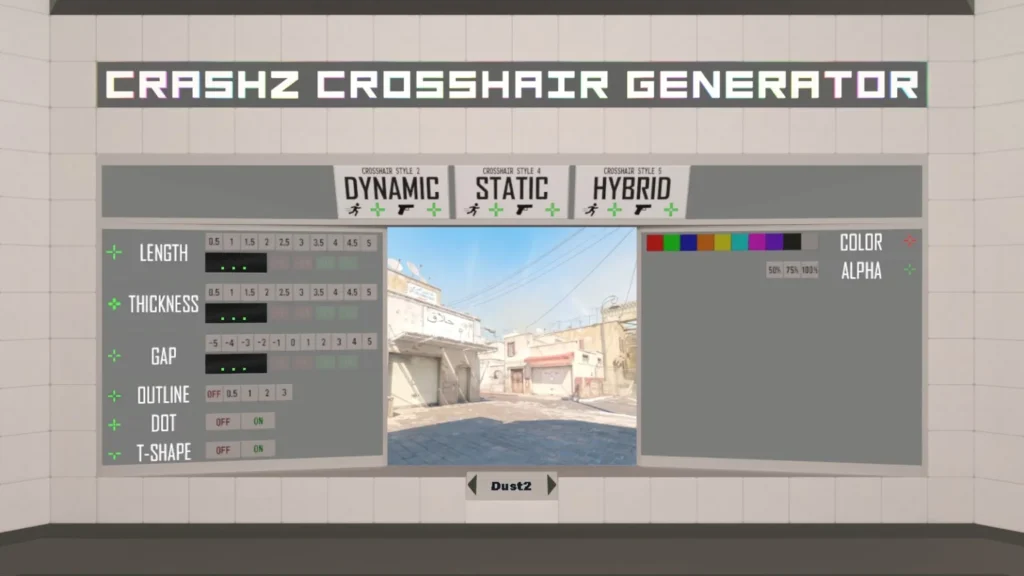
The game’s settings menu provides the most straightforward method for initial crosshair adjustments. This interface includes immediate visual feedback through a preview window, allowing you to assess changes before committing to them. The reset function quickly returns you to baseline when experiments don’t produce desired results.
Accessing crosshair customization requires navigating through specific menu layers:
- Launch CS2 and enter the Main Menu interface
- Select the Settings option from available menu choices
- Navigate to the Game Settings section and locate the Crosshair tab
The preview window displays real-time modifications, eliminating guesswork from the configuration process. This visual confirmation system prevents wasted time on settings that appear different in practice than anticipated.
Begin your customization journey by focusing on two fundamental parameters: visual style and color scheme. These elements form the foundation upon which you’ll build your personalized aiming system.
CS2 presents three distinct crosshair archetypes, each delivering unique visual feedback and aiming characteristics that influence player performance differently.
The available styles include:
- Default – The standard configuration most new players encounter initially
- Classic Static – Maintains consistent dimensions regardless of movement or firing
- Dynamic – Expands during movement and weapon discharge, then contracts during stillness
Competitive professionals demonstrate strong preference toward Classic Static or Dynamic configurations, as these promote superior precision targeting and minimal visual distraction. However, personal preference remains paramount – test each style extensively on training maps rather than during competitive matches to avoid performance penalties during evaluation.
Testing methodology should involve controlled environments where you can assess target acquisition speed, tracking consistency, and peripheral awareness. Avoid the common mistake of judging crosshairs based solely on stationary accuracy tests, as real combat involves constant movement and rapid transitions between targets.
Color selection represents one of the most critical decisions in creating an effective CS2 crosshair. The primary objective involves achieving optimal contrast against diverse map environments, ensuring your aiming reticle remains visible across bright, dark, and mid-tone backgrounds without blending into surroundings.
Strategic color psychology plays a significant role in crosshair effectiveness. Bright green typically delivers excellent visibility against most surfaces, while cyan provides strong contrast on darker maps. Red can be effective but may blend with blood splatter effects during intense firefights.
Transparency adjustments dramatically impact crosshair prominence during gameplay. Higher opacity values increase visibility but may obstruct target details, while lower values improve target clarity at the cost of crosshair visibility in hectic situations.

For players seeking truly personalized aiming systems, the developer console unlocks granular control beyond standard menu options. This advanced approach provides access to specialized commands that enable micro-adjustments tailored to individual visual preferences and gameplay styles.
Accessing the console requires pressing the tilde (~) key. If this action doesn’t trigger the console interface, verify activation through game settings by locating and enabling the “Enable Developer Console” option.
Essential crosshair configuration commands include:
cl_crosshairsize X – controls reticle dimensions with values ranging from 0 (minimal) to 10 (extended)
cl_crosshaircolor X – modifies color palette through numerical values 0-5 representing different hue variations
cl_crosshairdot X – toggles center dot visibility (0 disables, 1 enables)
cl_crosshair_t 1 – activates T-shaped crosshair configuration for improved horizontal alignment
cl_crosshairalpha X – adjusts transparency levels using values from 0 (fully transparent) to 255 (completely opaque)
cl_crosshairthickness – controls line width with available parameters from 0 (thinnest) to 6 (maximum thickness)
Advanced players often combine multiple commands to create hybrid crosshairs that provide both precision and situational awareness. The console enables configurations impossible through standard menus, such as ultra-thin outlines with bright centers for optimal target distinction.
The Steam Workshop hosts specialized maps designed specifically for crosshair optimization and performance testing. These environments provide controlled settings where you can evaluate visibility across different lighting conditions and background textures.
Crosshair Generator v4 represents one of the most comprehensive tools available, offering extensive customization options alongside professional player crosshair libraries for comparative analysis.
Crosshair import functionality provides another efficient method for acquiring professional configurations. Navigate to Settings → Game → Crosshair tabs, then select “Share/Import” to access the code input interface.
The import process involves:
- Paste the crosshair code into the designated field
- Click the Import button to apply the configuration
- Verify the imported settings match your expectations through the preview window

We’ve compiled comprehensive crosshair settings from elite CS2 competitors worldwide. These configurations provide excellent starting points for developing your own optimized aiming system. Remember that professional players often customize their crosshairs based on specific roles, playstyles, and visual preferences.
Top-tier professional crosshair codes include:
- NiKo: CSGO-dDHCn-2TLLt-FWcfa-ytnLx-WXvaL
- huNter: CSGO-jpVve-dULSD-cQvCz-BwtRE-hVaUN
- ZywOo: CSGO-Ki3rs-mS8Mv-zTqqc-mOyXo-uTaUN
- Spinx: CSGO-ASLLC-va7wc-zFpAe-JLOWT-7T8SA
- XANTARES: CSGO-xbpe2-E24RJ-YXNuO-pQvt8-ppNAK
- frozen: CSGO-CVN3f-b4o5k-5m9LT-45v9z-ZO88F
- device: CSGO-q6V25-QEBHr-ahOJi-bzYJO-PiKPJ
- s1mple: CSGO-6w2oa-mXOAB-oihKM-qmJqN-edK5O
- Twistzz: CSGO-AB2Qk-pxw4P-8wLvr-ErY8L-DtN6H
- ropz: CSGO-MMQuh-Hs3Sj-Qv9zd-VaCmc-3QqNO
- Jimpphat: CSGO-xCR9J-bh3rj-JHxJe-BM3oQ-7T8SA
NAVI team configurations demonstrate specific organizational preferences:
- b1t: CSGO-74q7o-bvpfG-mvA6s-6bAtd-OnMHA
- jL: CSGO-n2cuS-tVHYW-vkd2O-bQVhY-fxwPB
- w0nderful: CSGO-BLYGF-QNFOX-wjF7U-73syB-hSzfF
- Aleksib: CSGO-WWYXF-EUK4o-nr3dx-K3sZf-DbapG
- iM: CSGO-vdxX6-Gc6ZB-wSxpS-YDKAf-xsrBE
Ukrainian professional players showcase regional configuration trends:
- DemQQ: CSGO-adtst-jGpLm-tWh7N-UbYqB-naOUD
- sdy: CSGO-wooFa-mvQcA-ZQROw-mjvq7-SRsFF
- Woro2k: CSGO-D8whY-idYwo-7BjKF-O8GLB-7ktiB
- r1nkle: CSGO-yvqdH-fGrbw-QBwc6-dndfw-hLN2G
Professional crosshair data originates from ProSettings portal and reflects the most current configurations available at publication.
Specialized grenade crosshairs provide tactical advantages for executing complex utility throws. These configurations create expansive visual guides that assist with trajectory calculation and landing zone precision, particularly valuable for lineups requiring pixel-perfect accuracy.
Implementing grenade crosshair functionality requires specific console command sequences:
- alias «xhair» «cl_crosshairsize 1000000; bind l xxhair»
- alias «xxhair» «cl_crosshairsize 2.5; cl_crosshairgap -2.5; bind l xhair»
- bind Х «xhair»
Substitute the X placeholder with your preferred activation key binding. This creates a toggle system for switching between standard and grenade crosshair configurations instantly during matches.
A properly customized crosshair significantly enhances your target acquisition speed, tracking consistency, and overall combat effectiveness. For additional gaming optimization strategies, explore our Complete Guide to weapon handling and movement mechanics.
Optimized crosshair configurations work synergistically with quality peripherals. Superior Weapons Unlock techniques and Class Guide selections to maximize your competitive potential across different gaming titles.
With your personalized crosshair configuration established, you’ll experience noticeable improvements in reaction timing and accuracy consistency. We extend our best wishes for your competitive endeavors and continued improvement journey.
Action Checklist
- Navigate to Settings → Game → Crosshair tab and use preview window for initial adjustments
- Test all three crosshair styles on training maps to identify personal preference
- Experiment with color combinations and transparency levels across different map environments
- Enable developer console and practice using advanced commands for granular control
- Import professional player configurations as reference points for your own optimization
- Download and utilize Workshop maps for comprehensive crosshair testing and validation
No reproduction without permission:Tsp Game Club » A Guide to Customizing Crosshair in CS2 with Lorgar Master CS2 crosshair customization for improved accuracy and competitive edge