TL;DR
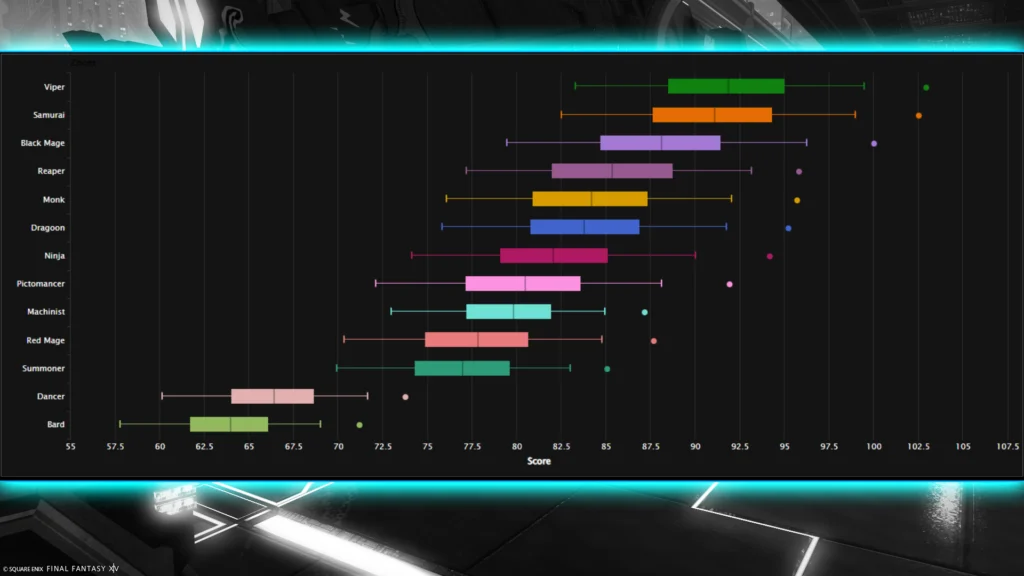
- S-Tier DPS: Black Mage, Samurai, Viper, and Pictomancer dominate Patch 7.2 with exceptional damage output
- A-Tier contenders like Monk and Dragoon offer strong balance between damage and utility
- Utility-focused jobs (Red Mage, Bard, Dancer) trade personal DPS for crucial raid support
- C-Tier jobs (Summoner, Machinist) struggle with damage output but remain viable with dedication
- Success depends on mastering job mechanics, optimizing gear, and coordinating party synergy
Diving into the AAC Cruiserweight Savage raid tier in FFXIV Patch 7.2? Discover which damage dealers currently dominate the competitive landscape. This comprehensive FFXIV DPS Tier List breaks down the top performers in Patch 7.2, analyzing each job’s raid performance through damage metrics and utility value. We’ve gathered extensive player feedback to provide real-world insights beyond raw numbers. Expect straightforward analysis with actionable advice—like having a veteran raider share their hard-won knowledge. By the conclusion, you’ll understand which DPS job excels at crushing Cruiserweight encounters and which might require extra effort to keep pace.

Methodology & Tier Definitions
Our tier evaluation combines quantitative data with qualitative player experiences, ensuring rankings reflect Week 2 Savage progression realities rather than initial impressions. Here’s our analytical framework:
-
Log Analysis
We examined pure DPS (pDPS) metrics to identify top performers in the AAC Cruiserweight Savage tier. By week two, most raid groups had completed encounters and refined strategies, revealing post-optimization performance trends. -
Community Opinions
Player experiences from forums and discords provide crucial context about each job’s actual raid performance. We tracked which jobs excelled during early progression due to utility value, and which secured spots in clearing groups through exceptional damage or synergy. -
Tier Criteria
Jobs received S, A, B, or C rankings based on comprehensive raiding effectiveness in Patch 7.2. Evaluation extends beyond maximum DPS potential to include consistency, buff contributions, synergy value, and integration within a Savage group composition.-
S Tier – Meta-defining excellence. These jobs either dominate parsing charts or significantly enhance raid success rates.
-
A Tier – Strong performers. Consistently valuable in successful raid compositions.
-
B Tier – Competent options. Capable of clearing content but may require additional effort or have specific limitations.
-
C Tier – Underperforming or specialized. Still functional but clearly less preferred by groups seeking optimal efficiency.
-
Understanding our ranking methodology provides context for the tier placements. Let’s examine where each job landed. Facing FFXIV’s ultimate challenge, The Final Raid Ultimate (FRU), can overwhelm even experienced players. If you’re struggling with progression, our FFXIV FRU Ultimate Boost ensures guaranteed completion, eliminating frustrating wipe cycles.
High-Level Tier Overview (S, A, B, C)

Here’s a concise breakdown before diving into detailed job examinations:
S Tier (Dominating the Meta)
-
Black Mage, Samurai, Viper, Pictomancer
These four jobs currently lead the pack. Black Mage boasts unparalleled damage potential in skilled hands. Samurai received significant buffs (approximately +2.5% overall damage) and reestablished itself as a premier melee choice. The new Viper excels at devastating multi-target phases with exceptional cleave damage while maintaining accessibility. Finally, Pictomancer combines high damage output with impressive party support capabilities, creating a caster with nearly unlimited potential. These jobs define Patch 7.2’s competitive landscape.
A Tier (Strong and Viable)
-
Monk, Dragoon, Reaper, Ninja
Each job in this category represents a solid raid choice. Monk benefited from substantial single-target and AoE damage improvements. Dragoon delivers consistent damage alongside valuable party buffs (Battle Litany and Dragon Sight). Reaper combines burst damage potential with an intuitive rotation and useful raid buff (Arcane Circle). Ninja may not top personal damage meters, but Trick Attack (via Mug) and exceptional mobility maintain high demand. These DPS options trail S-tier power slightly but remain frequent in synergy-focused groups.
B Tier (Average / Situational)
-
Red Mage, Bard, Dancer
Each job remains fully functional but trades personal damage for significant utility value. Red Mage provides rapid resurrection capabilities and additional mitigation (Magick Barrier), invaluable during progression phases. Bard and Dancer serve as physical ranged DPS delivering beneficial party-wide buffs, though their personal damage suffers. However, the synergy from these support roles often substantially increases overall raid output. They’re far from weak choices for players who prefer their playstyle.
C Tier (Struggling in 7.2)
-
Summoner, Machinist
These jobs face challenges in the current patch environment. Summoner lacks sufficient damage output or distinctive utility to stand out. Machinist suffers from subpar damage and minimal team support capabilities. Both remain capable of clearing content, but they’re less favored when alternatives offer superior damage or synergy. Dedicated players can succeed with these jobs, but expect additional hurdles.
Ready for detailed analysis? Let’s examine each job’s week-two Savage performance. The Omega Protocol (TOP) ranks among FFXIV’s most demanding raids, requiring perfect coordination and extensive practice. If you’re hitting progression walls, our FFXIV TOP Boost alleviates pressure, helping you secure exclusive rewards without frustration.
Essential Tips: Gear, Gil, and Party Synergy
Job performance depends on both player skill and preparation. Here are crucial optimization strategies:
-
Gear Up Efficiently
Prioritize weekly tomestone caps and gear upgrades. Weapons and high-stat pieces (chest, legs) typically provide the largest performance gains. Early crafted gear with materia melds can accelerate initial clears. Always meld appropriately—pentamelded crafted items often outperform higher item level pieces without materia. -
Use Food and Potions
Always enter Savage with appropriate food for your job. Stat bonuses frequently determine whether you meet enrage timers. Stock potions as well—these consumables may be expensive during early tier weeks but represent wise investments for damage optimization. -
Pentameld vs. Savage Gear
Pentamelded equipment can sustain performance until acquiring actual raid pieces. Overmelding may strain your gil reserves but often provides early progression advantages. As more players clear content, crafting material prices typically decrease, creating opportunities for cost-effective upgrades. -
Coordinate Party Synergy
Balance utility and personal DPS. For example, combining Dragoon (Battle Litany) and Ninja (Trick Attack) dramatically enhances selfish DPS like Samurai or Black Mage. Reaper pairs effectively with Dancer timing buffs for Enshroud windows. Ensure at least one raise-capable caster if mistakes are expected during progression. -
Align Raid Buffs
Coordinate with your party to establish burst window timing. Stacking Trick Attack, Battle Litany, Dancer’s Technical Finish, or Bard’s Radiant Finale simultaneously can devastate bosses. Avoid using major abilities immediately before Ninja’s Mug—wait briefly to execute during the 5% damage window for amplified results. -
Manage Gil Smartly
Beyond potions and food, purchase or craft appropriate melds for your job. If funds are limited, gather or craft items for sale. Treasure maps remain popular for quick gil generation. Treat consumables like potions and high-grade materia as investments rather than expenses. -
Balance the Party
Avoid stacking four selfish DPS or three heavy utility jobs. Prioritize synergy. If including Machinist (an underperformer), consider adding Bard or Dancer for additional buffs. If your group prefers double Viper, coordinate around their exceptional AoE potential. -
Choose a Job and Commit
Avoid splitting weekly raid tokens between multiple DPS jobs unless your group requires regular role switching. Focus gearing on one job for maximum impact. Use surplus resources for alts if necessary, but prioritize your main job’s equipment first. -
Leverage Team Buffs
Personal DPS increases significantly when aligning bursts with group buffs. As a Samurai, if Trick Approach is imminent, delay Midare Setsugekka briefly to land during the 5% damage window. This synergy may not appear on your personal parse as Trick Attack damage, but accelerates overall team kills. -
Stay Alive
Uptime determines fight success. Each death costs more DPS than any minor optimization. Utilize personal cooldowns (Second Wind, Manaward, Arcane Crest, etc.) for survival. Bring healing potions for emergency recovery. Remember: dead DPS deal zero damage.
Acquiring optimal gear in FFXIV often requires repetitive content grinding, which can quickly exhaust patience. Let our FFXIV Gear Boost handle the intensive work so you can enjoy top-tier equipment without endless repetition.
Pros & Cons Tables at a Glance
These tables summarize each job’s key strengths and weaknesses in Patch 7.2:
| Job | Pros | Cons |
|---|---|---|
| Black Mage | + Highest raw DPS potential. + Punishing bursts with Ley Lines and Triplecast. + Skilled players can top all parses. |
– No raid utility. – Very punishing if forced to move or if you die. – Demands team support (healer raises, etc.). |
| Samurai | + Extremely high personal damage (~+2.5% buff). + Straightforward burst (Midare, Ogi). + Now stronger in small AoE. |
– Provides no team buffs or mitigation. – Mistakes in rotation hurt DPS a lot. – Needs near-constant melee uptime. |
| Viper | + High damage and fantastic AoE cleave. + Very forgiving rotation. + Dominates multi-target phases in fights. |
– No raid buffs (pure self-focused). – New job subject to future tuning. – AoE advantage less relevant on purely single-target bosses. |
| Pictomancer | + Excellent DPS close to BLM levels. + Includes party buffs and mitigation options. + Mobile instant-cast gameplay. |
– Cannot raise like RDM/SMN. – Complex if you want to fully optimize support spells. – Could see balance changes if devs consider it too strong. |
| Monk | + Great sustained DPS, with new buffs to AoE. + High mobility with Thunderclap. + Brotherhood and Mantra bring moderate team support. |
– Heavy positional requirements. – Blitz rotation can be complicated. – No large group mitigation outside of healing buffs. |
| Dragoon | + Strong personal damage, especially in 2-target phases. + Battle Litany and Dragon Sight significantly boost allies. + Consistent contributor to overall party DPS. |
– Jumps can be clunky if timed poorly. – Has positionals on some combos. – No built-in resurrection or broad mitigation. |
| Ninja | + Trick Attack (via Mug) grants 5% partywide damage. + Good burst every minute. + Top-notch mobility for mechanics. |
– Personal DPS slightly lower due to a utility trade-off. – Mudra inputs can be error-prone. – Can feel squishy if you mistime your defensive. |
| Reaper | + Big burst windows (Enshroud) and decent sustained DPS. + No positionals, making it simpler in chaos. + Arcane Circle offers a 3% raid buff. |
– Doesn’t excel in one specific category. – Lacks strong group utility beyond Arcane Circle. – Missed burst phases or forced downtime hurt a lot. |
| Red Mage | + Amazing emergency utility: quick raises and minor heals. + Magick Barrier and Embolden for party support. + Easy to learn, less punishing in movement. |
– Low personal DPS (pays a “utility tax”). – Not as strong in raw damage as BLM or Pictomancer. – By week two, might get replaced once fights are mastered. |
| Summoner | + Full mobility (mostly instant casts). + Simple rotation that’s beginner-friendly. + Has a slower combat raise and a small party buff. |
– Damage is underwhelming this patch. – Overshadowed by Red Mage’s better utility and damage. – May need buffs to stay competitive in future. |
| Dancer | + Premier support DPS: buffs a partner significantly. + Excellent defensive utilities (Shield Samba, Curing Waltz). + Highly mobile, minimal downtime. |
– Lowest personal DPS by design. – Relies on pairing with a strong partner. – Party synergy dictates DNC’s overall effect (timing, alignment). |
| Bard | + Balanced support with consistent raid damage buffs (songs). + Battle Voice (crit rate) and Radiant Finale (damage buff). + Can cleanse a debuff via Warden’s Paean. |
– Personal DPS still mid-range. – RNG reliance on procs can feel erratic. – Lacks big burst windows compared to Dancer’s Tech Steps. |
| Machinist | + Potentially strong burst with Wildfire combos. + Easy ranged rotation in simpler content. + Straightforward “gunner” aesthetic. |
– Very low overall damage right now. – Zero raid buffs or synergy to offset subpar DPS. – Feels overshadowed by Bard or Dancer in group content. |
Step-by-Step: Choosing the Right DPS
Uncertain about job selection? Follow this systematic approach:
-
Clarify Your Goals
-
Do you prioritize maximum damage potential?
-
Do you prefer providing party-wide support?
-
Do you enjoy simple or complex rotations?
-
-
Check the 7.2 Meta Highlights
-
S-tier for raw performance (BLM, SAM, Viper, Pictomancer).
-
A-tier for strong choices (Monk, Dragoon, Ninja, Reaper).
-
B-tier for utility or consistent synergy (RDM, Bard, Dancer).
-
C-tier if you enjoy challenges or specific job aesthetics (Summoner, Machinist).
-
-
Consider Group Composition
-
Does your group need Trick Attack, raid buffs, or reliable raises?
-
Do you require more synergy or raw personal DPS?
-
-
Try a Test Run
-
Practice in Extreme trials or dungeons. Jobs feel different in practice than on paper.
-
Evaluate whether the rotation resonates with your playstyle.
-
-
Gear Up One Job
-
Once decided, focus tomestones and savage tokens on that job for optimal performance.
-
Meld your gear appropriately. Overmeld if gil permits.
-
-
Master the Rotation
-
Learn optimal openers for each encounter.
-
Align your bursts with party buffs.
-
Prioritize uptime and avoid deaths.
-
This method ensures you select a DPS job matching your playstyle and raid requirements. If you love Summoner but your group needs more synergy, consider Ninja or Red Mage. Conversely, if maximum damage is your priority, Samurai or Black Mage might be ideal.
Extreme Trials in FFXIV present serious challenges requiring precise teamwork and extensive practice. Skip the frustration and proceed directly to rewards using our FFXIV Extreme Trial Boost to clear these demanding encounters efficiently.
Conclusion
Patch 7.2’s AAC Cruiserweight raid tier provides DPS players with exciting new challenges. Jobs like Viper and Pictomancer entered the scene and immediately claimed top positions, while established favorites like Black Mage and Samurai maintain their dominance in raw damage output. A diverse range of jobs—Monk, Dragoon, Ninja, Reaper—offer compelling alternatives for players seeking varied rotations or balanced utility and burst potential. Meanwhile, Summoner and Machinist face challenges, though dedicated players can still achieve clears with sufficient effort.
Ultimately, the optimal job choice depends on your team’s objectives and personal playstyle preferences. Successful groups often combine top DPS performers with synergy-focused roles (like Ninja, Dancer, or Bard) while including a raise-capable caster for additional security. Once synergy is established, focus on gear progression, materia optimization, consumables, and encounter familiarity.
Stay prepared for potential balance adjustments that might shift the meta. Currently, the FFXIV DPS Tier List – AAC Cruiserweight Patch 7.2 serves as a guide to which jobs excel and which struggle. However, player skill and dedication often outweigh tier placements. If a particular job resonates with you, don’t let community rankings discourage you. All jobs can clear Savage content in capable hands. What truly matters is mastering your choice, maintaining survival, and maximizing party synergy.
Prepare your gear, join the battle, and pursue those coveted Savage clears. Whether you prefer the deadly precision of Samurai, the arcane power of Black Mage, or the supportive elegance of Dancer, multiple paths lead to victory. Good luck, and may your loot reserves overflow with treasures from every defeated boss!

Action Checklist
- Research and select your primary DPS job based on tier rankings and personal preference
- Practice job rotation in striking dummies until muscle memory develops
- Acquire appropriate food and potions for your job (stat-specific)
- Meld gear with optimal materia (crit, direct hit, determination based on job)
- Learn optimal openers for each Savage encounter
- Coordinate with party for buff alignment and synergy windows
- Study encounter mechanics to maximize uptime and minimize deaths
- Review FFLogs parses to identify improvement areas
No reproduction without permission:Tsp Game Club » FFXIV DPS Tier List – AAC Cruiserweight Patch 7.2 | SImpleboost Master Patch 7.2's meta with our comprehensive DPS tier analysis and optimization strategies