TL;DR
- The Recombinator merges two same-type items, transferring selected mods with varying success rates based on mod rarity
- Success chances drop dramatically with each additional mod – focus on 2-mod combinations for best results
- Magic items provide cleaner transfers since they have fewer affixes to interfere
- Base swapping lets you move powerful mods to superior item bases through strategic recombination
- Always calculate artifact costs vs potential value – high-level items require 20+ artifacts per attempt
Ready to revolutionize your gear creation in Path of Exile 2? The Dawn of the Hunt patch unleashed the Recombinator, a game-changing crafting device that transforms endgame itemization. This innovative system enables you to combine two items of the same item class into a single powerful piece, selectively transferring specific affixes from each component. While it can produce god-tier equipment, the high-stakes nature means failed attempts destroy both inputs entirely.
Veteran exiles often describe the Recombinator as Wraeclast’s ultimate gamble – like playing high-stakes dice where fortunes can be made or lost in seconds. This comprehensive guide dissects every aspect of Recombinator crafting, from fundamental mechanics to pro-level strategies honed through thousands of community experiments. You’ll discover practical applications, avoid costly errors, and learn advanced techniques that separate successful crafters from bankrupt ones. By the conclusion, you’ll possess the knowledge to transform mediocre items into legendary equipment.

What Is the Recombinator in PoE 2?
The Recombinator represents a paradigm shift in PoE 2’s crafting ecosystem. This specialized bench, introduced alongside the Dawn of the Hunt expansion, allows unprecedented control over item creation by letting you combine two items of the same item class – whether two bows, two rings, or two helmets. You handpick specific modifiers from each component, and successful recombination produces a Rare item featuring your chosen affixes.
This system fundamentally changes how players approach endgame gearing. Instead of relying solely on chaos orbs or exalted orbs for random outcomes, you can strategically target specific mod combinations. However, this power comes with substantial risk – failed attempts annihilate both input items without any compensation. This high-stakes mechanism creates intense moments of triumph or devastation, making each recombination attempt a calculated gamble.
Key Points:
-
Both items must be Magic (blue) or Rare (yellow) quality – Normal (white) items are incompatible
-
Items must share identical base types – you cannot combine different equipment categories
-
You must select at least one affix from each item – no skipping selections
-
Each attempt consumes Expedition Artifacts – costs scale with item level
-
Results are always Rare items, regardless of input rarity
Smart crafters integrate the Recombinator with traditional currency methods. Many first craft a single top-tier mod onto a Magic item using fossils or essences, then recombine it with another item containing a different premium mod. Others employ the Recombinator as a calculated gamble, merging two decent Rares hoping for spectacular synergies. The strategic possibilities are virtually limitless, but each attempt demands careful planning and risk assessment.
Overwhelmed by endless drops in Path of Exile 2? Our Path of Exile 2 Items service slashes the grind by delivering high-quality gear straight to you, letting you dive into tougher content without wasting time—grab your advantage now and dominate.
How Recombination Works: Risk vs. Reward
Recombinator crafting delivers either euphoric success or crushing failure. The system incorporates sophisticated randomness that determines whether your selected mods transfer successfully. When attempts fail, the psychological impact is severe – both valuable inputs vanish completely. Conversely, successful recombination can produce game-changing items worth fortunes.
Success Chance Depends on Mods Chosen
Each affix possesses an internal rarity weighting that dramatically influences success probability. Common modifiers like lower-tier Life or Mana enjoy higher transfer rates, while elite affixes such as Tier 1 Physical Damage or Tier 1 Attack Speed prove extremely difficult to preserve. Attempting to merge items bearing multiple ultra-rare mods can plummet success chances into single digits or even sub-1% territory. This deliberate design prevents economy flooding with easily obtainable god-tier items.
All-or-Nothing Outcome
Recombination offers no middle ground – you either receive a new Rare item with exactly your selected mods, or lose everything. Think of it as simultaneously rolling dice for all chosen affixes. This binary outcome preserves Path of Exile’s core risk-versus-reward identity while creating intense moments of anticipation.
Item Base and Outcome
The resulting item’s base type randomly selects between your two inputs (typically 50/50 probability). Fusing an Onyx Amulet with a Jade Amulet yields either an Onyx or Jade result. Savvy players exploit this mechanic to transfer desirable mods onto superior bases. Keep this strategy in mind when you discover powerful mods on suboptimal bases.
Retained Properties and Corruption
Special properties like enchantments and corruptions only persist if their originating base “wins” the random selection. This nuance enables strategic preservation of valuable enchants while adding new mods, but also creates frustration when preferred bases lose the coin flip.
Always Results in a Rare Item
Recombination exclusively produces Rare items, even when both inputs are Magic. This ensures the resulting item is ready for further enhancement through exalting, bench-crafting, or other methods. However, it also means you cannot apply chance orbs or similar rarity-changing currency to the final product.
Step-by-Step: How to Use the Recombinator
Ready to master the Recombinator? This detailed walkthrough covers every phase of recombination, from item selection to outcome evaluation, with pro tips for maximizing success.
1. Pick Two Items to Combine
Begin by selecting two compatible items sharing identical slot categories. Belt creation requires two belts, glove crafting needs two gloves. Experienced crafters specifically seek items featuring one or two strong mods that complement each other perfectly.
For example, you might discover:
-
Boots A: Exceptional +Life mod (Tier 1 or Tier 2)
-
Boots B: Superior Movement Speed (25-30%)
Each piece lacks the other’s strength, making their combination highly desirable. Boots featuring both substantial Life and Movement Speed consistently command premium prices in trade markets.
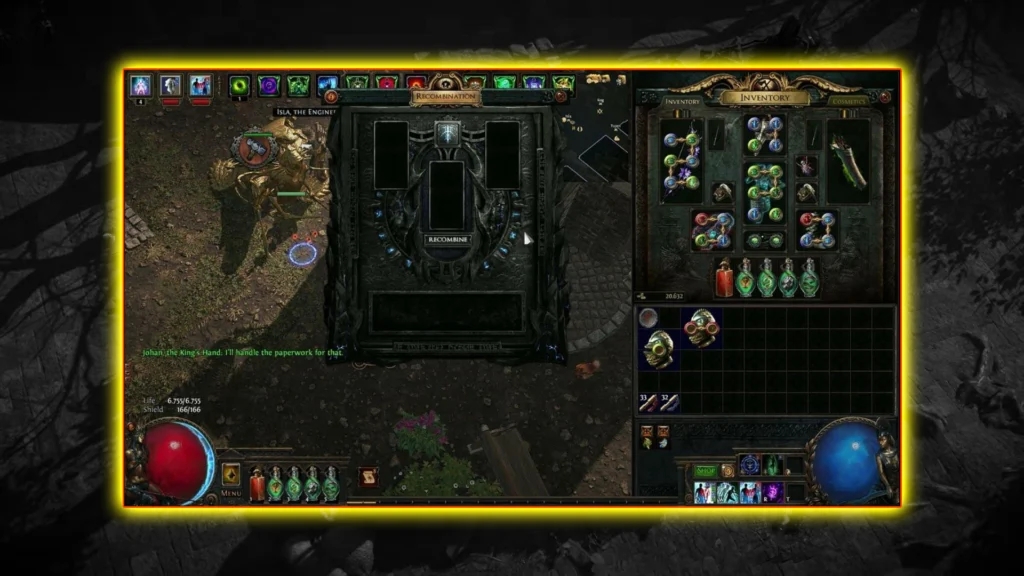
2. Open the Recombinator Bench
Navigate to your hideout or locate Expedition NPCs. The Recombinator bench typically appears near Rog or Gwennen following the Dawn of the Hunt implementation. Interact with the bench to open the recombination interface featuring two item slots.
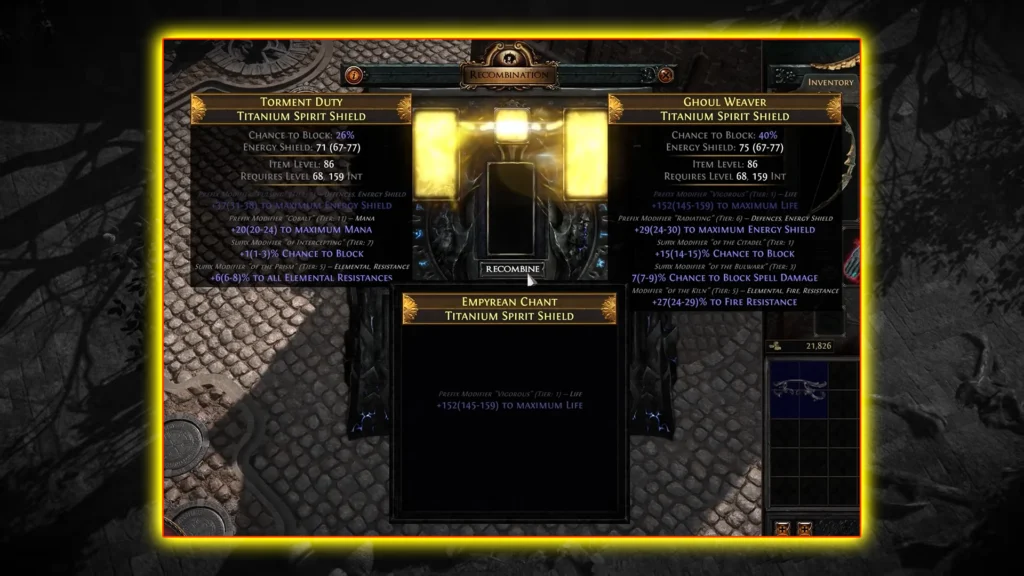
3. Place Items and Select Mods
Insert your chosen items into the left and right slots. The interface displays each item’s available affixes. Carefully select which mods to transfer from each item – you must choose at least one from each component. Strategic selection is crucial for maximizing success probability.
Pro Tip: Limit selections to two or three total mods maximum. Each additional affix exponentially reduces success chances, often making attempts practically impossible.
4. Pay the Artifact Cost
Recombination requires Expedition Artifacts as currency. Different artifact types correspond to various equipment categories (weapons, armor, jewelry). Required quantities scale with item level – pieces above level 80 may consume 20+ artifacts per attempt. Always verify your artifact reserves before committing to expensive recombination projects.
Sample Artifact Cost Table (Approximate values):
| Item Level Range | Artifact Cost (Approx.) |
|---|---|
| 60 – 70 | 12 – 15 |
| 71 – 75 | 15 – 18 |
| 76 – 79 | 18 – 20 |
| 80 – 84 | 20 – 22 |
| 85+ | 22+ |
(Note: These represent community-tested estimates and may vary based on league mechanics.)
Strategic crafters carefully evaluate artifact costs versus potential rewards. While combining two level 85+ items might yield exceptional results, using slightly lower-level items can significantly reduce expenses during practice attempts.
5. Click “Recombine” and Cross Your Fingers
After verifying all selections and costs, execute the recombination. The system attempts to merge your chosen mods into a new item. Possible outcomes include:
-
Success: Receive a Rare item containing your selected mods
-
Failure: Both input items are destroyed completely
Success produces a Rare item potentially featuring either input base. Always inspect the resulting affixes to confirm your desired mods transferred correctly.
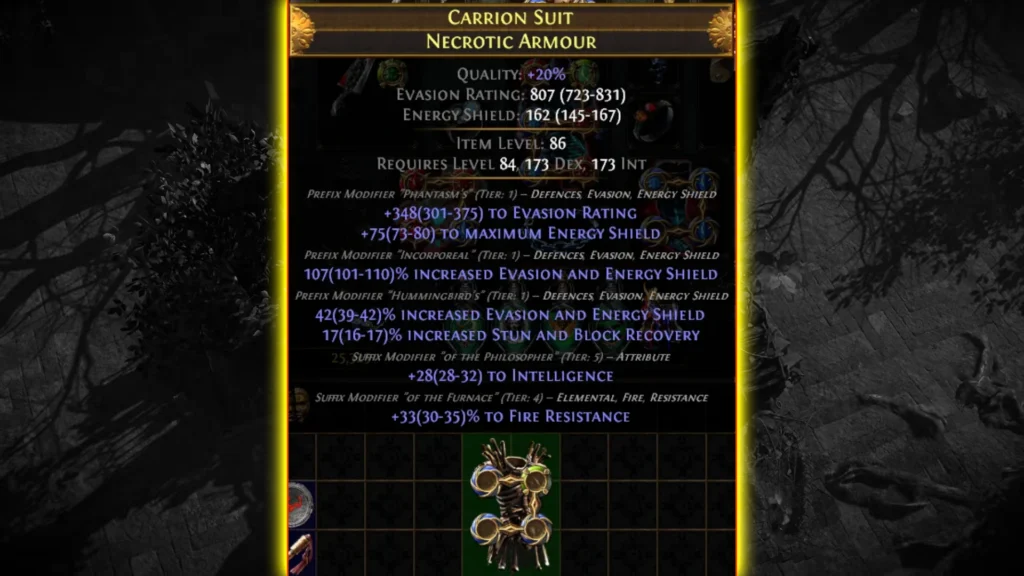
6. Evaluate and Finish Crafting
Successful recombination yields a Rare item typically containing 2-3 affixes. This piece often requires additional enhancement through:
-
Exalted Orbs to add random prefixes/suffixes
-
Bench-crafting for specific missing mods like resistances
-
Divine Orbs to perfect numeric values
Failed attempts require emotional resilience and strategic reassessment. The wisest approach accepts recombination’s gambling nature and potentially attempts less risky combinations.
Hunting for this legendary currency in Path of Exile 2 can feel like an endless quest. Our PoE 2 Mirror of Kalandra service shortcuts the grind by securing this elusive item quickly, letting you jump into top-tier crafting and conquer endgame challenges with ease.
Strategies for Effective Recombinator Crafting
Successful Recombinator crafting transcends pure luck. Elite crafters employ sophisticated strategies that maximize success probabilities while minimizing catastrophic losses. These battle-tested approaches can dramatically improve your crafting outcomes.
“Junk-to-Value” Strategy – Turn Trash into Treasure
The “Junk-to-Value” approach appeals to budget-conscious crafters seeking incremental improvements. This method combines two Rare items, each possessing exactly one valuable affix. While individually worthless, their fusion can create significantly upgraded equipment or tradeable commodities.
-
Example: Combine a ring offering +50 Life with another featuring +30% total elemental resistance. Each piece underperforms individually, but their merger creates a dual-stat ring highly sought after during league starts.
-
Advantages: Minimal financial risk, reduced emotional impact from failures, tangible improvements when successful
-
Limitations: Lower success rates when targeting high-tier mods
This strategy shines during fresh leagues when quality gear scarcity makes even modest upgrades valuable. Many players accumulate these “junk” items naturally through regular gameplay.
Magic Item Isolation – Focusing on One Mod at a Time
Magic item crafting excels when you want to guarantee one mod from each component without interference from unwanted affixes. Magic items’ limitation to one prefix and one suffix creates cleaner transfer conditions.
-
Example: Merge Magic Boots with +80 Life and Magic Boots with 30% Movement Speed. The resulting Rare boots feature both mods, providing an excellent foundation for further enhancement.
-
Effectiveness: Fewer competing affixes significantly increase transfer probability for targeted mods
-
Caution: Even with Magic items, combining two Tier 1 mods remains challenging but typically more achievable than with Rare items
Many crafters consider this the most reliable method for creating powerful two-mod foundations. Once established, additional affixes can be added through traditional crafting methods.
Base Swapping – Upgrade to a Better Base Item
Base swapping transfers powerful mods from inferior bases to superior ones. This technique proves invaluable when you discover exceptional mods on suboptimal item types or when new expansions introduce better implicit stats.
-
Execution: Pair the mod-bearing “donor” item with a “receiver” item featuring your desired base. Select the valuable mod from the donor plus at least one mod from the receiver. Success with the receiver base produces your target mod on the superior foundation.
-
Risk Factor: The 50% base selection chance means half your attempts will preserve the original inferior base, requiring additional attempts
-
Optimization: Enhance the receiver item with a decent mod to increase its selection probability. While not guaranteed, this tactic may influence base selection odds.
Base swapping becomes particularly powerful during content updates introducing superior item bases. Preserving valuable mods while upgrading foundations can transform mediocre builds into league-defining powerhouses.
When to Stop: Two Mods at a Time
The temptation to merge multiple mods simultaneously often proves disastrous. Success probability decreases exponentially with each additional affix. Experienced crafters universally recommend limiting attempts to just two mods for optimal results.
-
Rationale: The system heavily penalizes greed. Three-mod attempts frequently drop below 1% success rates, making them practically impossible
-
Methodology: Combine two crucial mods first, then use traditional crafting for additional affixes. Sequential recombination attempts, while still risky, offer better odds than simultaneous multi-mod transfers
-
Philosophy: Patience and discipline consistently outperform reckless gambling. Treat recombination as calculated risk management rather than lottery tickets
Understanding Success Rates (Why Mod Selection Matters)
Extensive community testing reveals that mod rarity directly determines recombination success probability. Ultra-rare affixes like Tier 1 Attack Speed present minimal transfer chances, while common mods like Tier 5 Life transfer relatively easily. Attempting to preserve multiple extremely rare mods can reduce success rates below 1%, making such attempts practically futile.
Approximate Success Rate Table (for combining exactly 2 mods):
| Mods Selected | Example | Estimated Chance |
|---|---|---|
| 2 very common mods | Low-tier Life + Low-tier Mana | ~40–50% |
| 2 average mods | High Life (Tier 2) + High Resist (Tier 2) | ~30% |
| 1 rare mod + 1 common mod | Tier 1 Chaos Resist + Tier 6 Life | ~10–15% |
| 2 extremely rare mods | Tier 1 Attack Speed + Tier 1 Critical Strike Chance | < 5%, sometimes < 1% |
| 3+ mods selected at once | Trying to pick 3 or more high mods | Near 0% |
These statistics emerge from thousands of community experiments. While the exact success formula remains undisclosed, the pattern is unmistakable: additional mods and increased rarity dramatically reduce transfer probabilities.
Advanced Strategy: When targeting a single top-tier affix, consider pairing it with an easily obtainable “throwaway” mod. This approach may yield higher success rates than combining two ultra-rare mods simultaneously. While still challenging, this method reduces the psychological and financial impact of failures.
Common Mistakes to Avoid
Recombinator crafting can rapidly deplete resources without proper preparation. Learn from these frequently encountered pitfalls to protect your investment and maximize success potential.
-
Attempting Fractured Mod Recombination
Fractured affixes remain locked and cannot be selected for transfer. Some crafters mistakenly believe they can move fractured mods to different bases, but this functionality doesn’t exist. If the fractured item’s base wins the random selection, the fracture persists unpredictably. -
Using Normal (White) Items
The Recombinator strictly requires Magic or Rare inputs. Normal items are automatically rejected. Use Orbs of Transmutation to upgrade white items to Magic quality if necessary. -
Selecting Duplicate Modifiers
The system prevents selecting identical mods from both items (e.g., +Strength from both sources). Always choose distinct, complementary modifiers that align with your build requirements. -
Excessive Mod Selection
Attempting to transfer three or more mods simultaneously reduces success rates to near-zero. This common mistake results from overconfidence or misunderstanding the probability mechanics. -
Ignoring Item Level Considerations
The resulting item’s level approximates the average of your inputs. Combining vastly different item levels can produce mid-range results that exclude high-tier mod possibilities. Additionally, higher-level items significantly increase artifact costs. -
Neglecting Base Type Preferences
Some crafters focus solely on mods while ignoring base type outcomes. If you require a specific base (armor vs. evasion), ensure the corresponding item has desirable mods to increase its selection probability. -
Overinvesting in Input Items
Purchasing expensive items assuming guaranteed success represents a critical error. Never invest more than you’re willing to lose completely, as failure remains always possible regardless of input quality. -
Forgetting Post-Recombination Enhancement
Successful recombination rarely produces perfect items immediately. Always plan for additional crafting steps like bench-crafting, exalting, or divine-orbing to complete your item optimization.
Crafting Goals and Examples by Character Class
Different archetypes prioritize specific stat combinations. Strategic recombination targeting class-appropriate affixes can dramatically accelerate progression and power development. Below are optimized approaches for each major playstyle.
| Class/Playstyle | Target Mods to Combine | Ideal Base |
|---|---|---|
| Marauder (Str Melee) | +% Increased Armour (prefix) & +# to Life (prefix) | High-armor chest (e.g., Astral Plate) |
| Ranger (Dex Bow) | +% Phys Weapon Damage (prefix) & +% Attack Speed (suffix) | High base damage bow (e.g., Harbinger Bow) |
| Witch (Int Caster) | +1 to Spell Gems (prefix) & +% Cast Speed (suffix) | Imbued Wand or a spell-focused staff |
| Templar (Str/Int) | +% to All Res (suffix) & +Life or +Strength (prefix) | Tower Shield with large defenses |
| Shadow (Crit Build) | +% Crit Multiplier (suffix) & +% Crit Chance (prefix) | Platinum Kris or similar dagger for crit synergy |
| Duelist (Dex/Str) | Flat Phys Damage (prefix) & +% Attack Speed (suffix) on gloves | Spiked Gloves for melee damage boost |
| Life-based (Any) | +Life (prefix) & +Resistances (suffix) | Two-Toned Boots or Ezomyte Burgonet for extra defense |
Practical Application: A Templar seeking maximum survivability might combine a shield with exceptional elemental resistances and another with substantial Life. The resulting shield could dramatically increase tankiness. This methodology applies universally – identify your build’s critical stats, locate them on separate items, then attempt strategic recombination for powerful synergies.
Stuck relying on luck for gear drops in Path of Exile 2? Our PoE 2 Leveling Gear service hands you reliable upgrades at every stage, bypassing tedious farming and letting you jump straight to the more challenging (and rewarding) parts of the game—secure your head start now.
Additional Tables: Affix Tiers, Artifact Costs, and More
These comprehensive reference tables provide essential data for planning successful recombination projects. Understanding mod rarity distributions and cost scaling helps optimize your crafting strategy and resource management.
Common vs. Rare Affix Tiers (Generic Example)
(Affix naming and tier numbering vary by item type. This chart illustrates general rarity patterns.)
| Affix Tier | Example Range | Rarity Weighting |
|---|---|---|
| Tier 1 | +91 to +100 Life, +21-25% Attack Speed | Very low (very rare) |
| Tier 2 | +81 to +90 Life, +17-20% Attack Speed | Low (rare) |
| Tier 3 | +71 to +80 Life, +14-16% Attack Speed | Moderate |
| Tier 4 | +61 to +70 Life, +11-13% Attack Speed | Common |
| Tier 5 | +51 to +60 Life, +8-10% Attack Speed | Common |
| Tier 6+ | < +50 Life, < 8% Attack Speed | Very common |
Tier 1 affixes represent the pinnacle of item power and prove extremely challenging to transfer. Even standard crafting struggles to produce these modifiers, making their preservation through recombination particularly impressive.
Expanded Artifact Cost by Slot Type (Example)
Different equipment categories require specific artifact types. This table demonstrates cost scaling across various item slots at different level thresholds.
| Item Slot | Artifact Type | Avg. Cost (Lvl 75) | Avg. Cost (Lvl 85) |
|---|---|---|---|
| Weapons | Type A (Broken Circle) | 18-19 | 21-23 |
| Armors | Type B (Order) | 18-20 | 22-24 |
| Jewelry | Type C (Black Scythe) | 15-18 | 20-22 |
(Values represent approximate costs. Verify exact requirements in your current league.)
These expenses accumulate rapidly during extensive recombination projects. Many dedicated crafters farm Expedition content intensively or trade for artifacts in bulk quantities. Calculate your total investment carefully, especially when planning ambitious multi-attempt projects targeting exceptional items.
Conclusion
The Recombinator stands as Path of Exile 2’s most innovative and dangerous crafting system. This Dawn of the Hunt feature opens unprecedented possibilities for creating dream equipment while maintaining the game’s core risk-versus-reward philosophy. Success demands strategic planning, calculated risk-taking, and emotional resilience.
Avoid relying solely on luck. Strategic mod selection, Magic item isolation techniques, and careful base swapping planning significantly improve your odds. Greedy multi-mod attempts typically end in disappointment and financial loss. Build expertise through practice with low-value items before attempting ambitious high-stakes projects.
May your recombinations succeed consistently, producing perfectly synergized equipment whether for boots, amulets, or dream weapons. Above all, embrace the journey. This revolutionary system has reinvigorated endgame crafting with discovery and excitement, where every attempt creates memorable stories. Good luck in your Wraeclast adventures!
Action Checklist
- Verify both items are Magic or Rare quality with identical base types
- Select maximum 2-3 complementary mods total (1-2 per item)
- Calculate artifact costs vs potential item value
- Execute recombination and prepare for either success or total loss
- If successful, plan additional crafting (exalt/bench-craft/divine)
- Document results for future strategy refinement
No reproduction without permission:Tsp Game Club » PoE 2 Crafting with Recombinator: Dawn of the Hunt Guide Master PoE 2's Recombinator: Advanced crafting strategies for endgame success