TL;DR
- S-Tier weapons like Electrocutioner Gun and Rifle provide maximum damage and versatility
- A-Tier weapons offer excellent performance with some requiring rare locations or Robux purchases
- B-Tier weapons excel in economic value and specific combat scenarios like night defense
- C-Tier weapons are single-use items best reserved for emergency situations
- Always consider weapon acquisition cost, damage output, and class compatibility for optimal survival
In the treacherous world of Dead Rails, your weapon selection can mean the difference between survival and becoming zombie fodder. The game features 20 distinct weapons that can be acquired through various methods: purchasing from shops, discovering in specific locations, or obtaining via game passes. Understanding this weapon ecosystem is crucial for developing effective survival strategies.
Weapon acquisition follows three primary paths: standard shop purchases, exploration discoveries in key locations like Fort Constitution and Sterling Mines, or class-specific starting gear. This tier list evaluates weapons based on damage output, versatility, acquisition difficulty, and economic value to help you make informed decisions.
The tier ranking system categorizes weapons from S-Tier (exceptional) to D-Tier (basic), with each category serving distinct purposes in your survival journey. S-Tier weapons provide unmatched combat effectiveness, while lower tiers offer situational advantages or economic benefits.
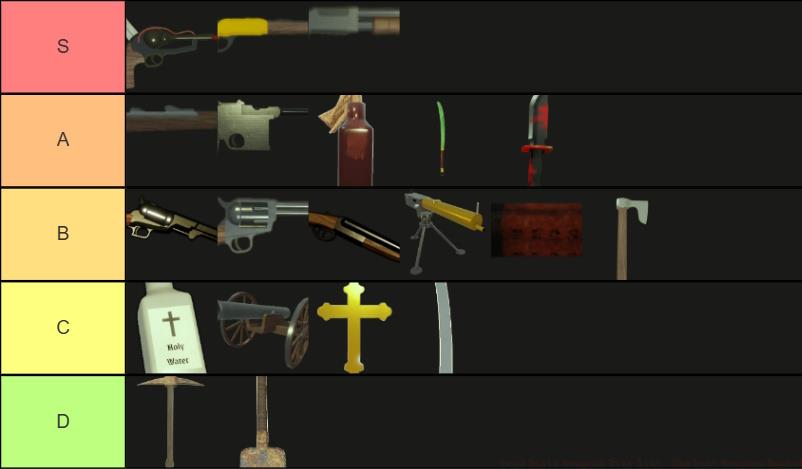
S-Tier represents the pinnacle of weaponry in Dead Rails, offering unparalleled damage output and combat versatility. These weapons should be your primary targets for acquisition as they provide the best chance of surviving the zombie apocalypse.
The Electrocutioner Gun stands as the most powerful weapon with its 100 damage capability, instantly eliminating most enemies except the formidable Nikola Tesla boss. Its unique lightning-based reload mechanism makes it exceptionally valuable during electrical storms.
| Weapon Name | Damage | Description | Cost |
|---|---|---|---|
| Electrocutioner Gun | 100 | Ammo: 20 Fire Rate: 1 sec Reload using Lightning strikes |
Found After Clearing the Tesla Lab |
| Rifle | 60/120 | Ammo: 6 Fire Rate: 0.5 sec Long Range Damage |
75 |
| Shotgun | 24×5/40×5 | Ammo: 6 Fire Rate: 0.5 sec Short Range Damage |
50 |
Strategic Insight: The Rifle and Shotgun combination provides the perfect balance for any combat scenario. The Rifle excels at long-range engagements with its 60/120 damage profile, while the Shotgun dominates close-quarters combat with its devastating 24×5/40×5 damage spread. For maximum effectiveness, pair the Rifle with classes that enhance accuracy and the Shotgun with mobility-focused classes.
Advanced Tip: When using the Electrocutioner Gun, position yourself near conductors during storms to maximize reload efficiency. This weapon becomes exponentially more valuable during nighttime raids when visibility is limited and quick eliminations are essential.
A-Tier weapons deliver exceptional performance with only minor drawbacks compared to their S-Tier counterparts. These firearms often feature unique acquisition requirements or specialized use cases that make them valuable additions to any survivor’s arsenal.
| Weapon Name | Damage | Description | Cost |
|---|---|---|---|
| Bolt-Action Rifle | 55/137.5 | Ammo: 5 Fire Rate: 0.5 sec Long Range Damage |
Can’t be Bought. Found at Fort Constitution |
| Mauser C96 | 40/60 | Ammo: 10 Fire Rate: 0.3-0.5 sec No Recoil on Shooting |
148 Robux Can be found better in Outlaws Camp |
| Molotov | 50/100 | The Arsonist Class spawns with 4 Molotovs | 35 |
| Jade Sword | 25 | 50% chance to reanimate enemies | Found at Sterling Mines Can’t be bought |
| Vampire Knife | 20 | Has Life Steal Passive The Vampire Class Spawns with a Vampire Knife |
Can’t be bought Found at Castle |
Economic Strategy: The Jade Sword and Vampire Knife offer significant resale value, making them excellent choices for players focused on economic progression. The Jade Sword’s 250 cash resale makes it particularly valuable for funding other essential equipment.
Location Planning: Fort Constitution should be prioritized early for Bolt-Action Rifle acquisition, while Castle raids become essential for obtaining the Vampire Knife’s life-steal capability.
Common Mistake: Avoid over-investing in Robux weapons like the Mauser C96 unless you specifically need its recoil-free performance for precise shooting scenarios.
B-Tier weapons serve as reliable workhorses with specific strengths that make them valuable in particular situations. While they may lack the raw power of higher-tier weapons, their accessibility and specialized capabilities provide excellent value for strategic players.
| Weapon Name | Damage | Description | Cost |
|---|---|---|---|
| Navy Revolver | 50/80 | Ammo: 6 Fire Rate: 0.5 sec Better damage output |
40 |
| Revolver | 35/50 | Ammo: 6 Fire Rate: 0.5 sec |
35 |
| Sawed-Off Shotgun | 24×5/40×5 | Ammo: 3 The range is short than a usual Shotgun |
148 Robux |
| Maxim Turret | 30/45 | Ammo: 100 Fire Rate: 0.2 sec Long Range and can fire continuously |
125 |
| Dynamite | 300-500 | Does huge AoE damage when lighted with Torch | 25 |
| Tomahawk | 25 | Highest damage among all melee weapons | 30 |
Defensive Excellence: The Maxim Turret proves invaluable for nighttime train defense, providing sustained firepower against zombie hordes. Its 100-round capacity and 0.2-second fire rate make it perfect for holding positions during resource gathering.
Economic Advantage: With the Jade Sword fetching 250 cash and Vampire Knife selling for 100, these weapons can fund your entire mid-game progression when used strategically.
Pro Tip: Deploy the Maxim Turret at choke points during town clearing operations to maximize its area denial capabilities while you focus on looting.
C-Tier weapons represent specialized tools with significant limitations that restrict their general usefulness. These items typically feature single-use mechanics, high acquisition costs, or situational applications that make them poor choices for primary weapon slots.
| Weapon Name | Damage | Description | Cost |
|---|---|---|---|
| Holy Water | 100-400 | Best for groups of enemies Inflicts multiple lightning strikes |
45 Found at Church |
| Cannon | 125 | Ammo: 12 Does huge AoE damage |
Can’t be bought Found at Fort Constitution |
| Crucifix | Infinite | Best for groups of enemies for instant kill | 75 Found at Church |
| Cavalry Sword | 25 | Slightly better than basic melee weapons | 30 |
Cost Analysis: The Crucifix and Holy Water represent significant investments at $75 and $45 respectively, with the critical limitation of being single-use weapons. This makes them economically inefficient for extended gameplay sessions.
Strategic Recommendation: Reserve C-Tier weapons for emergency situations where their specialized capabilities can provide crucial advantages.
Common Pitfall: Many players waste resources on multiple Crucifix purchases early game, not realizing that the funds could be better allocated toward permanent weapon acquisitions.
Optimization Strategy: Use the Cavalry Sword as a transitional melee weapon while saving for superior options. Its 25 damage output provides marginal improvement over basic tools but shouldn’t be considered a long-term solution.
D-Tier weapons serve as fundamental tools for early-game survival and resource gathering. While they lack the combat effectiveness of higher-tier weapons, their accessibility and utility make them essential starting points for every survivor’s journey.
| Weapon Name | Damage | Description | Cost |
|---|---|---|---|
| Pickaxe | 20 | Best for mining ores Stuns enemies |
20 |
| Shovel | 20 | Basic weapon for every class Stuns enemies |
20 |
Utility Focus: The Pickaxe and Shovel provide essential functionality beyond combat, enabling resource gathering and environmental interaction. Their stun capability offers defensive utility when facing immediate threats.
Early Game Strategy: Both weapons serve as reliable starting tools, with the Pickaxe excelling in mining operations and the Shovel providing versatile basic combat capability.
Advanced Technique: Use the stun effect from these tools to create distance from enemies, allowing time to switch to more powerful weapons or execute tactical retreats.
Progression Planning: Upgrade from D-Tier weapons as soon as economically feasible, but maintain them for their non-combat utilities throughout your gameplay.
Action Checklist
- Prioritize acquiring S-Tier weapons like the Rifle and Electrocutioner Gun for maximum combat effectiveness
- Complete Tesla Lab to obtain the Electrocutioner Gun – essential for boss encounters
- Explore Fort Constitution for Bolt-Action Rifle and Cannon acquisition
- Farm economic weapons like Jade Sword and Vampire Knife for cash generation
- Optimize class selection with weapon compatibility – Vampire Class with Vampire Knife, Arsonist with Molotovs
- Master defensive positioning with Maxim Turret for nighttime train protection
No reproduction without permission:Tsp Game Club » Dead Rails Weapons Tier List: The Best Weapons Ranked Master Dead Rails with our comprehensive weapon tier list and expert survival strategies for zombie apocalypse