TL;DR
- Equipment attachments permanently enhance Digimon capabilities beyond natural movesets
- Compatibility depends on personality types and attribute alignment for optimal performance
- Strategic attachment combinations can create specialized builds for competitive battles
- Credit management and vendor timing are crucial for efficient equipment acquisition
- Avoid common mistakes like ignoring compatibility and poor resource allocation
Transform your digital partners into elite combat units with this comprehensive equipment attachment system guide for Digimon Story: Time Stranger’s competitive scene.
Equipment attachments represent the pinnacle of customization in Digimon Story: Time Stranger, offering unprecedented control over your team’s combat capabilities. This revolutionary system transcends previous installment limitations by enabling complete strategic reconfiguration of your Digimon’s battle performance. Whether constructing a high-damage glass cannon Agumon or converting Angewomon into an impenetrable defensive fortress, attachment mastery distinguishes amateur tamers from elite strategists.
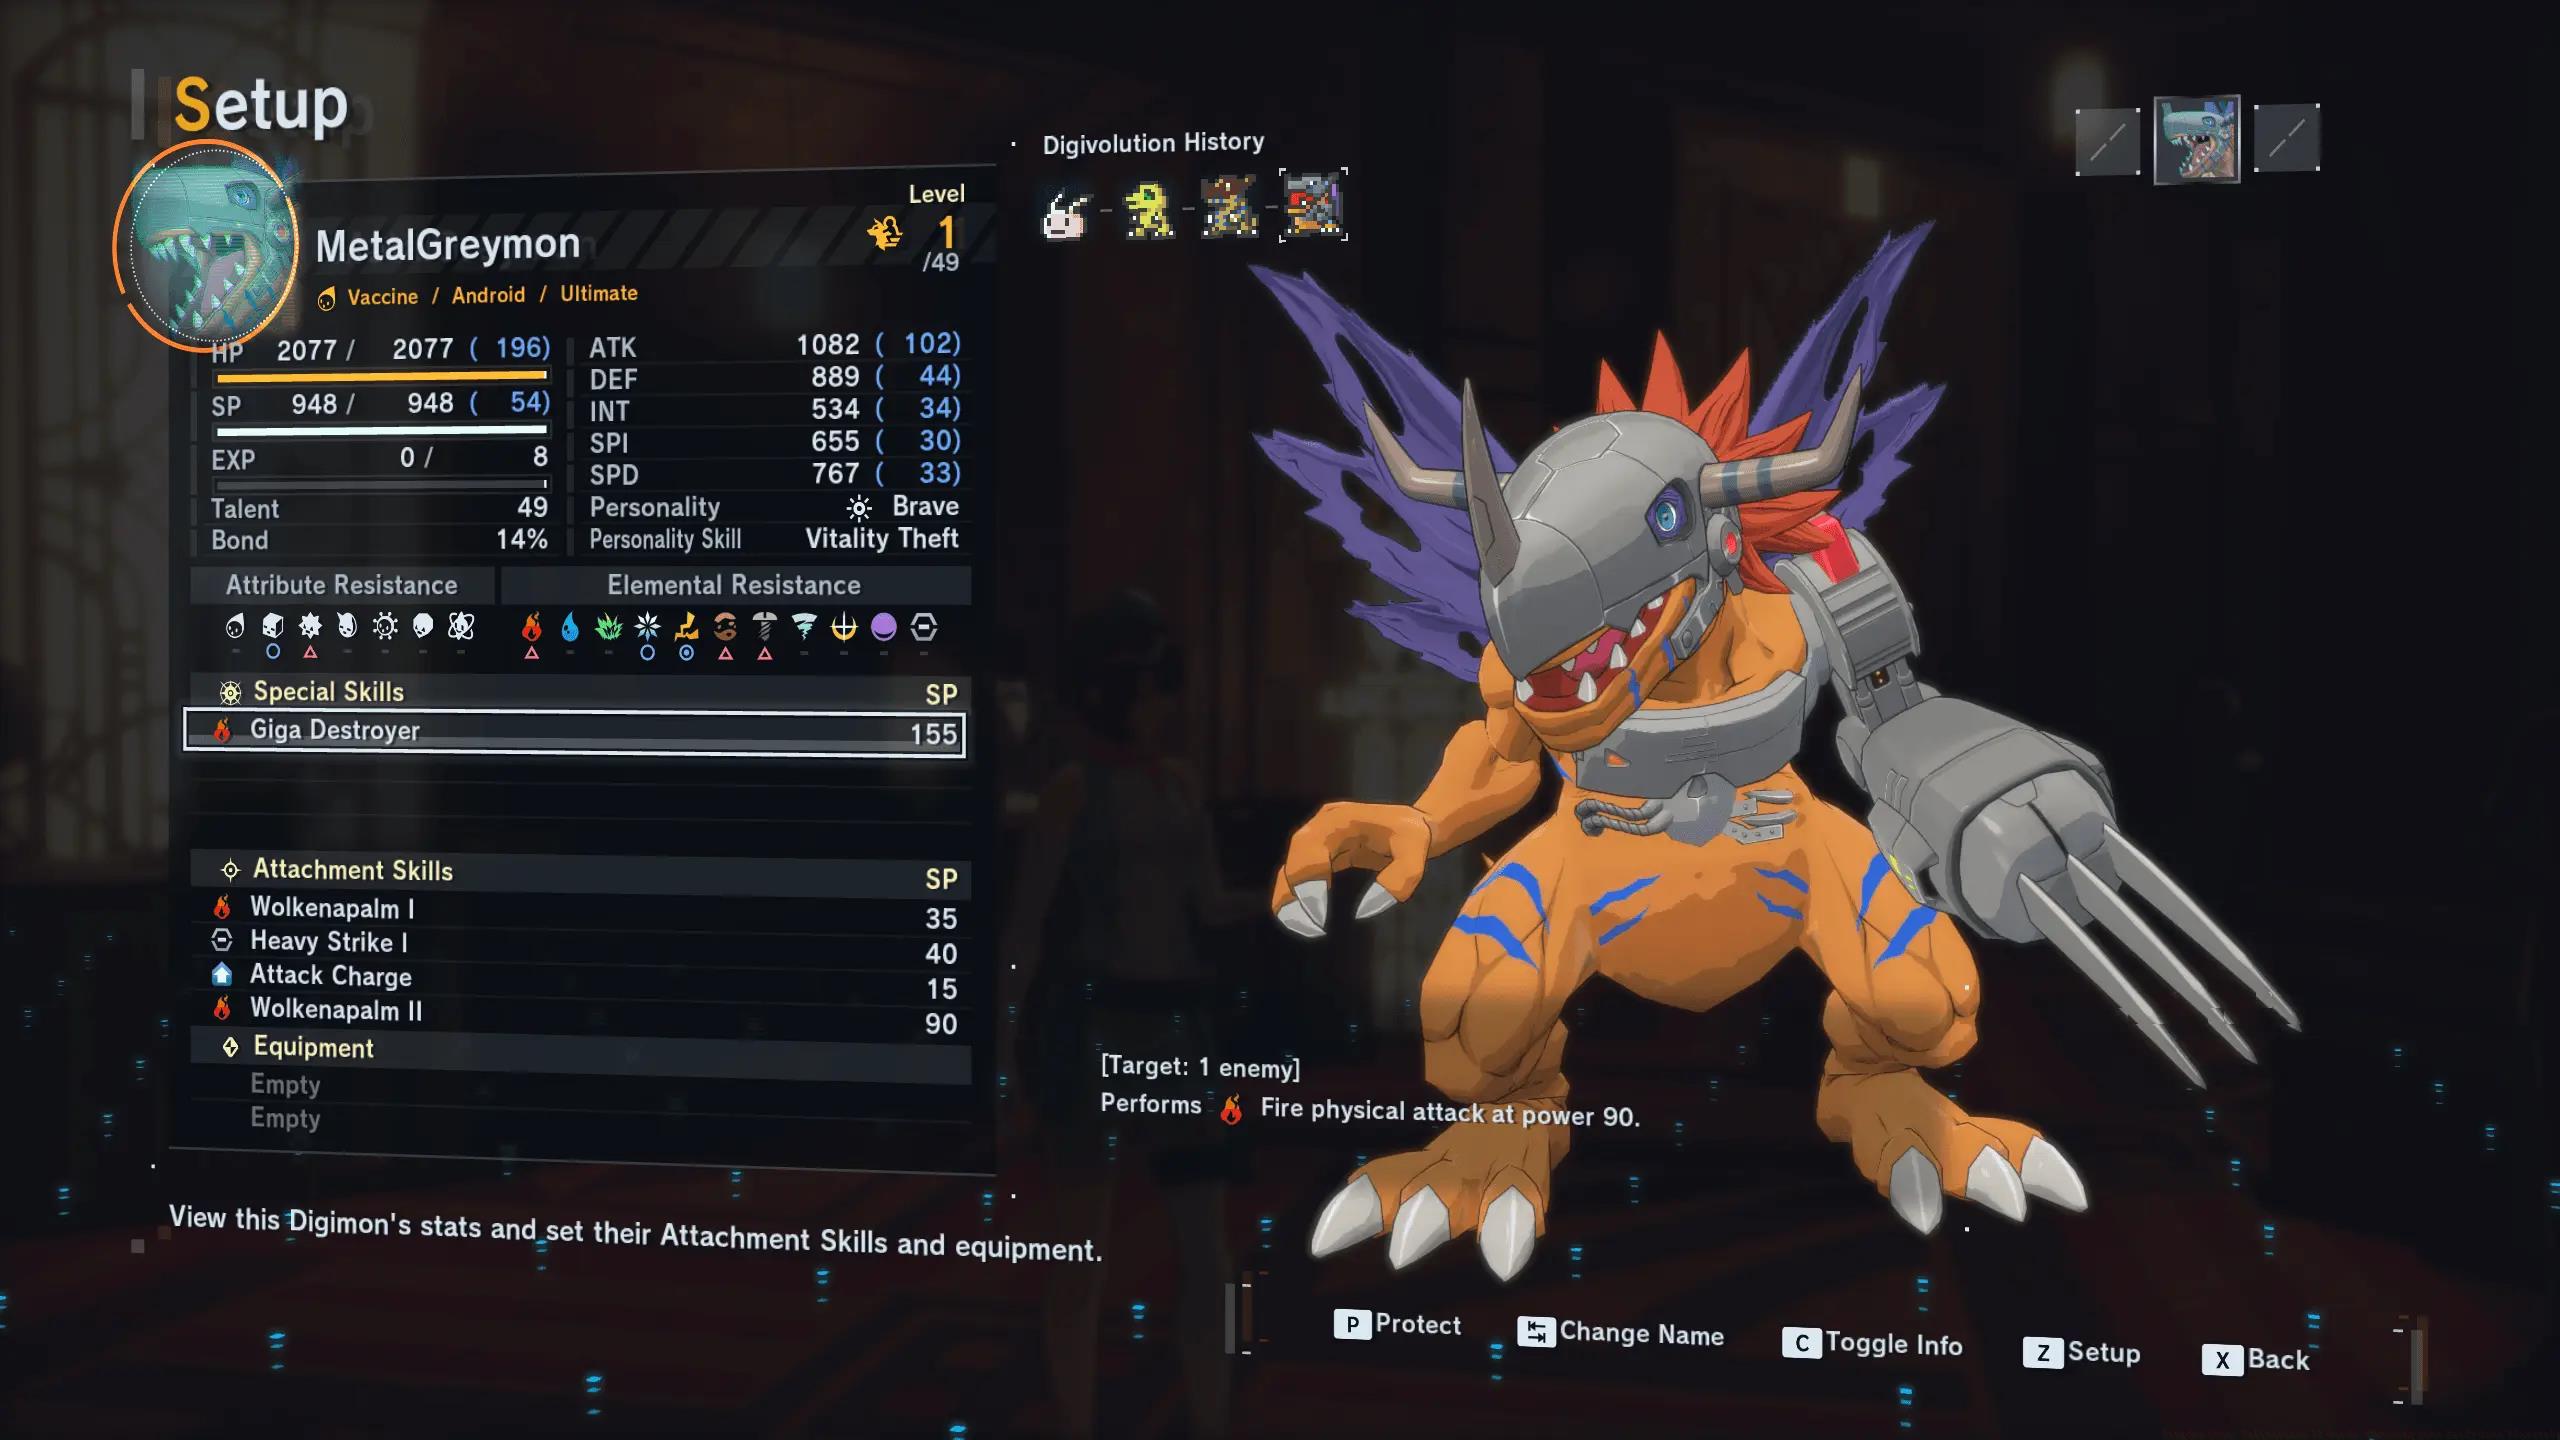
These specialized skill modules function as permanent augmentation discs that extend your Digimon’s abilities far beyond their innate skill sets. Consider them as digital DNA modifications that unlock capabilities your partners would never naturally develop. Acquisition occurs through vendors scattered across both Tokyo districts and the digital world Iliad, with pricing tiers spanning from affordable 500-credit basic enhancements to premium 5000-credit meta-defining equipment.
Digimon Story: Time Stranger Review …
The attachment framework operates on straightforward principles: each Digimon accommodates multiple simultaneous equipment installations, but operational efficiency hinges on personality compatibility and elemental alignment. A Virus-attribute MetalGarurumon typically excels with aggressive offensive modules, whereas Vaccine-type Angewomon achieves superior performance with defensive or restorative-focused equipment configurations.
Always verify compatibility indicators before committing to expensive attachment purchases. Non-compatible equipment remains non-functional, resulting in significant credit waste.
Elemental amplification modules constitute the foundation for most damage-oriented builds. These attachments imbue basic attacks with elemental properties or enhance existing elemental techniques:
Beyond elemental enhancements, defensive stabilizers provide crucial survivability for frontline Digimon. These modules reduce incoming damage or provide status resistance:
Utility modules offer strategic flexibility beyond raw statistical improvements. These attachments provide battlefield control and support capabilities:
Understanding attachment tier rankings helps prioritize resource investment for maximum competitive impact. This categorization reflects both individual power and synergistic potential.
S-Tier Game Changers: These attachments fundamentally alter battle dynamics and warrant immediate acquisition when available. Universal Compatibility modules that work across all Digimon types typically occupy this tier, along with percentage-based statistical boosts that scale into endgame content.
A-Tier Essentials: Highly effective attachments that form the core of most competitive builds. Elemental amplification modules typically reside here, providing consistent damage increases without excessive specialization requirements.
B-Tier Situational: Powerful in specific team compositions or against particular matchups. These attachments excel in niche scenarios but lack universal application. Include specialized defensive modules tailored against specific damage types.
C-Tier Early Game: Cost-effective options for early progression that get replaced by superior alternatives. Flat statistical increases rather than percentage bonuses typically occupy this tier.

Constructing optimized Digimon teams requires careful planning around attachment synergies and role specialization. Begin by identifying your core strategy: aggressive offense, resilient defense, or balanced versatility.
Team Role Distribution: Assign specific combat roles to each team member rather than generalized builds. Designate primary attackers with maximum damage attachments, tanks with defensive modules, and support Digimon with utility enhancements. This specialization creates stronger team synergy than individual power.
Attribute Complementarity: Ensure your team covers multiple elemental attributes to handle diverse enemy resistances. Avoid over-investing in single elemental types that could be neutralized by specific boss encounters or PVP opponents.
Progression Roadmap: Start with affordable C-tier attachments to establish basic functionality, then systematically upgrade to higher tiers as resources permit. Prioritize modules that provide immediate statistical improvements over situational enhancements during early and mid-game phases.
Endgame Optimization: Late-game content demands specialized builds with S-tier attachments and perfect attribute alignment. At this stage, respecification becomes costly, so plan final builds around available premium attachments and Digimon personality compatibility.
Mastering advanced attachment combinations unlocks the system’s true potential through multiplicative effect stacking and hidden interactions.
Damage Multiplication: Combine elemental amplifiers with critical hit boosters for exponential damage increases. A Fire Amplifier paired with Critical Focus creates devastating burst potential, especially on Digimon with innate critical chance bonuses.
Defensive Layering: Stack percentage-based damage reduction with evasion boosts for superior survivability. Barrier Matrix combined with Evasion Booster creates defensive redundancy that withstands both accurate and high-damage attacks.
Action Economy: Speed Accelerator attachments gain immense value when combined with SP Conservation modules, enabling more frequent ability usage without resource constraints. This combination particularly benefits support Digimon requiring consistent skill activation.
Hidden Mechanics: Certain attachment combinations trigger special interactions not documented in tooltips. Experiment with unusual pairings across different Digimon species to discover unique synergies that could define new meta strategies.
Efficient credit allocation separates successful tamers from those constantly struggling for resources. Implement these financial strategies to maximize attachment acquisition.
Farming Efficiency: Focus on repeatable content with high credit-to-time ratios. Story missions typically offer one-time rewards, while certain endgame dungeons provide sustainable credit farming opportunities. Target activities that match your current power level for optimal clear speed.
Investment Prioritization: Allocate credits to attachments with long-term viability rather than temporary upgrades. S-tier universal attachments typically retain value throughout the entire game, while specialized modules only benefit specific late-game builds.
Vendor Timing: Monitor vendor inventory rotations for discount periods and limited-time offerings. Certain vendors offer attachment sales during specific story progression points or seasonal events.
Resource Allocation: Maintain a credit reserve for unexpected opportunities while systematically investing in core attachments. Avoid spending your entire credit pool on single purchases unless they fundamentally transform your team’s capabilities.
Avoid these frequent errors that undermine attachment effectiveness and waste valuable resources.
Compatibility Neglect: The most common mistake involves purchasing attachments without verifying Digimon compatibility. Always check personality alignment and attribute requirements before acquisition. Incompatible equipment provides zero functionality regardless of purchase cost.
Over-Specialization: Focusing too heavily on single statistical categories creates exploitable weaknesses. Balance offensive and defensive attachments to handle diverse combat scenarios rather than maximizing one dimension.
Early Premium Purchases: Investing in expensive S-tier attachments during early game stages often backfires by draining credits needed for essential progression items. Delay premium purchases until your core team is established.
Synergy Ignorance: Selecting attachments in isolation without considering team-wide synergies reduces overall effectiveness. Plan equipment across your entire roster to create complementary capabilities rather than individual power.
Resource Mismanagement: Failing to maintain credit reserves for unexpected opportunities limits flexibility. Always preserve emergency funds for limited-time vendor offerings or newly discovered essential attachments.
Action Checklist
- Verify Digimon personality and attribute compatibility before attachment purchase
- Acquire core elemental amplification modules for your primary attackers
- Implement balanced attachment distribution across offensive, defensive, and utility roles
- Experiment with advanced attachment synergies for meta-defining combinations
- Optimize credit allocation strategy for long-term attachment acquisition
No reproduction without permission:Tsp Game Club » Digimon Story: Time Stranger Equipment Attachments Categories and Tier List Master Digimon equipment attachments to transform your team into competitive powerhouses with strategic optimization