TL;DR
- Limveld features 13 distinct locations requiring strategic three-day cycle planning
- Forts offer scarab clues and Stone Sword keys while Great Churches hide basement bosses
- Tunnel entrances provide Smithing Stone 2 but pose zone closure death risks
- Castle areas become prime rune farming spots on day 2 despite troll threats
- Evergaol bosses scale with player level, offering better rewards at higher difficulties
Elden Ring Nightreign presents players with an entirely fresh mapping system that demands strategic foresight. Success hinges on meticulous route planning across the three-day temporal cycle, making thorough knowledge of Limveld’s geography absolutely essential. The region contains 13 primary points of interest, not counting the dynamic Shifting Earth occurrences. This comprehensive guide will help you navigate every corner of Limveld while uncovering its concealed secrets and strategic advantages.
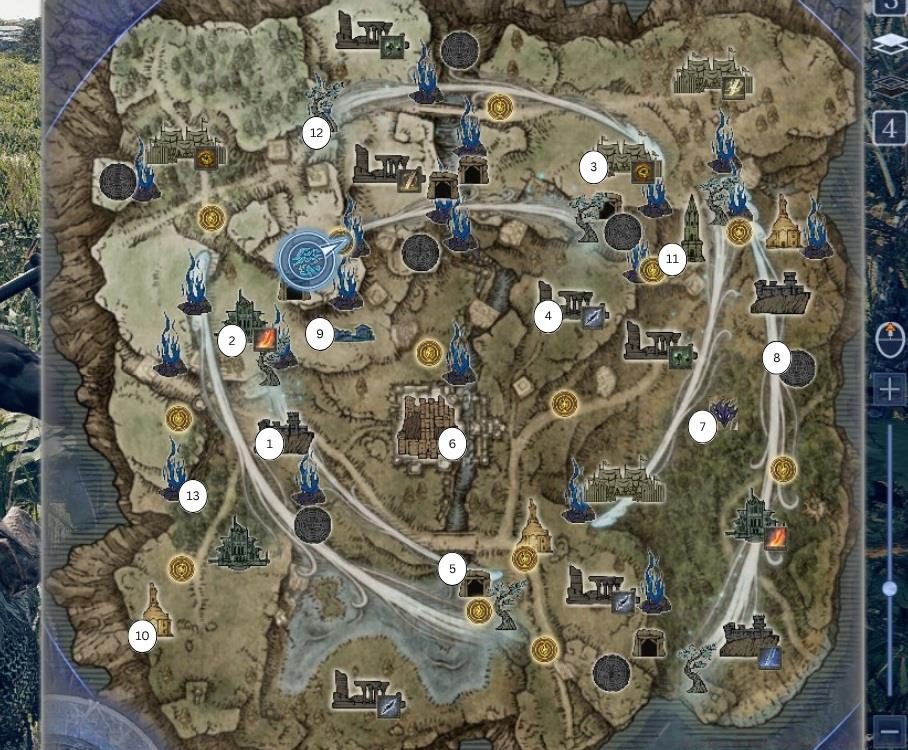
Displayed above is the complete Limveld terrain layout. Veteran Elden Ring adventurers will recognize many visual elements repurposed from the base game, though their functional purposes have been completely reimagined. To assist with icon interpretation, we’ve developed an exhaustive reference system. Every map marker includes numerical annotations with detailed explanations provided in subsequent sections.
Forts: These substantial fortified complexes consistently contain minor boss encounters and provide essential clues for locating all scarabs within the territory. Additionally, rooftop metal chests may yield Stone Sword keys, though the drop probability appears influenced by day cycle progression. Optimal fort raiding timing falls during day 1 when enemy patrols are less vigilant.
Great Churches: Expansive open zones teeming with hostile forces that may conceal subterranean levels. When basements are absent, bosses occupy the main sanctuary area. If underground chambers exist, bosses will invariably reside below ground level. Metal chests positioned behind elevated dais areas sometimes contain Stone Sword keys, making thorough exploration mandatory.
Main Encampments: Open battlefield zones populated by enemies that serve as excellent rune acquisition sites during early gameplay phases. These locations typically host Godric soldiers, demi-human tribes, or destructive flame chariots. Smithing materials frequently appear within encampment boundaries, particularly near command tents or supply caches.
Ruins: These dilapidated structures conceal extensive underground passage networks containing numerous treasure chests with valuable equipment and resources. Enemy compositions demonstrate significant variation throughout ruins, requiring caution against ambush scenarios where multiple foes attack simultaneously from concealed positions.
Tunnel Entrances: Primary access points to mining networks where Smithing Stone 2 resources can be acquired. These subterranean complexes feature multiple entry and exit points, enabling tactical ingress and egress. Critical warning: avoid mine entrapment during zone contraction events, as underground confinement frequently results in unavoidable fatalities.
The Castle: This central landmark maintains fixed positioning within the map’s middle sector. Merchant spawns consistently occur in proximity to castle grounds, though the area remains saturated with powerful adversaries. The Crucible Knight castle emergence represents one of the most efficient rune farming locations during day 2 cycles. Exercise extreme caution, as this territory occasionally spawns four troll units that relentlessly bombard players with magical projectiles.
Field Bosses: These formidable opponents emerge during surface exploration of Limveld. Difficulty levels fluctuate dramatically between encounters, and engaging inappropriate field bosses at inopportune moments can critically compromise your entire campaign progression.
Evergaols: Specialized arenas where players can summon bosses using Stone Sword keys. Enemy health scaling dynamically adjusts according to character level progression. Confronting Evergaol guardians at elevated levels increases combat complexity but correspondingly enhances reward quality and quantity.
Strategic navigation demands understanding zone closure mechanics, particularly when exploring tunnel systems. Always monitor the temporal meter and establish evacuation routes before descending into mines. Getting trapped underground during map contraction results in certain death, wasting accumulated resources and progress. For optimal safety, begin mine excavations during early day cycles when closure risks are minimal.
Enemy encounter management requires adaptive tactics based on location type. Ruins necessitate careful advancement to avoid multi-enemy ambushes, while encampments benefit from ranged engagement before close-quarters combat. Field boss assessments should include reconnaissance before commitment—retreat remains preferable to catastrophic failure against overpowered adversaries.
Reward optimization involves strategic timing across the three-day cycle. Fort exploration yields maximum returns during day 1, while castle areas become prime farming zones on day 2. Evergaol challenges offer superior loot at higher levels but demand thoroughly prepared loadouts and consumables.
Common navigation errors include underestimating zone closure speed, overcommitting to field boss encounters, and neglecting evacuation routes in mines. These mistakes frequently result in unnecessary character deaths and lost progression. Always maintain situational awareness and have escape strategies prepared for sudden environmental changes.
Action Checklist
- Study map during day 1 to identify fort locations for early scarab clues
- Clear main encampments for rune farming and smithing materials
- Explore ruins thoroughly for underground chests while watching for ambushes
- Secure Stone Sword keys from forts and churches for Evergaol access
- Farm castle area on day 2 for maximum rune yield while avoiding troll projectiles
- Complete tunnel mining before zone closure with established evacuation routes
No reproduction without permission:Tsp Game Club » Elden Ring Nightreign Map and Locations Master Elden Ring Nightreign's Limveld map with expert strategies, location guides, and optimization tips