TL;DR
- Custom crosshairs significantly improve target acquisition speed and aiming precision
- Console commands offer granular control but require more technical knowledge than visual settings
- Workshop maps like Crashz’ Generator provide the fastest way to test and implement configurations
- Professional players typically use small, static crosshairs with minimal visual clutter
- Frequent crosshair changes can negatively impact muscle memory development
Optimizing your crosshair configuration represents one of the most impactful yet often overlooked aspects of improving your CS:GO performance. A properly tuned crosshair enables faster target acquisition, reduces visual distraction, and provides consistent reference points for precise aiming. This comprehensive guide explores multiple configuration methods, from beginner-friendly visual interfaces to advanced console commands used by professional players.
Track your improvement progress with SCOPE.GG CS2 Stats Tools to measure how crosshair changes affect your gameplay statistics.
The visual reticle you use for aiming directly influences your reaction time and shot accuracy. Many players underestimate how much their performance suffers from poorly configured crosshairs that blend into map environments or create unnecessary visual noise during critical engagements.
CS:GO provides two primary methods for crosshair configuration: the user-friendly visual settings interface and the more granular console command system. The visual approach allows immediate adjustment through intuitive sliders controlling multiple parameters simultaneously.
Within the settings menu, you can modify eight core attributes including color selection, line thickness, outline visibility, transparency opacity, overall size, movement style, center dot presence, and T-shaped variants. This method proves ideal for players seeking quick adjustments without technical complexity.
An often underutilized feature is the crosshair link generation capability. This allows you to create shareable URLs containing your complete configuration, perfect for distributing settings to teammates or creating backups of your preferred setups.
For players seeking precise control over every crosshair parameter, console commands deliver unparalleled customization depth. While this approach demands more technical understanding, it enables micro-adjustments unavailable through standard settings.
Color and Style Configuration
Selecting optimal color and style combinations forms the foundation of effective crosshair configuration. The primary command cl_crosshaircolor accepts values from 0 to 5, each representing different color presets:
- cl_crosshaircolor 0 – bright red for high visibility
- cl_crosshaircolor 1 – classic green, the most commonly used color
- cl_crosshaircolor 2 – yellow for contrast against dark surfaces
- cl_crosshaircolor 3 – blue for distinctive appearance
- cl_crosshaircolor 4 – teal for unique visual signature
- cl_crosshaircolor 5 – custom RGB color configuration
Creating personalized colors requires three additional commands with intensity values ranging from 0 to 255:
- cl_crosshaircolor_r – controls red component intensity
- cl_crosshaircolor_g – manages green component strength
- cl_crosshaircolor_b – adjusts blue element prominence
Crosshair style selection dramatically impacts how your reticle behaves during movement. The cl_crosshairstyle command offers five distinct behavioral patterns:
- cl_crosshairstyle 0 – default dynamic crosshair that expands when moving
- cl_crosshairstyle 1 – default static version maintaining fixed size
- cl_crosshairstyle 2 – classic crosshair with traditional behavior
- cl_crosshairstyle 3 – classic dynamic variant
- cl_crosshairstyle 4 – classic static, preferred by most professional players
Center dot inclusion remains highly subjective among players. While some appreciate the precise center reference point, others find it obstructs target visibility during long-range engagements.
- cl_crosshairdot 0 – eliminates the central dot for cleaner sight picture
- cl_crosshairdot 1 – activates the center reference point
Crosshair Outline and Visibility
The outline feature prevents your crosshair from disappearing against similarly colored backgrounds and textures. This becomes particularly important on maps with varied lighting conditions and color palettes.
- cl_crosshair_drawoutline 0 – removes the contrasting border
- cl_crosshair_drawoutline 1 – adds visibility-enhancing outline
Outline thickness adjustment uses the cl_crosshair_outlinethickness command with values from 0 to 3:
- cl_crosshair_outlinethickness 0 – minimal border thickness
- cl_crosshair_outlinethickness 2 – standard visibility enhancement
Size, Spacing, and Thickness Parameters
Crosshair dimensions significantly influence target acquisition speed and precision. The cl_crosshairsize command controls overall dimensions with higher values creating larger reticles.
- cl_crosshairsize 0 – minimal crosshair size
- cl_crosshairsize 5 – medium dimensions
- cl_crosshairsize 10 – larger visual reference
Gap adjustment between crosshair lines uses cl_crosshairgap. Optimal settings typically frame enemy heads within the negative space between reticle arms.
- cl_crosshairgap -5 – overlapping lines creating compact reticle
- cl_crosshairgap 0 – standard spacing with minimal gap
- cl_crosshairgap 5 – increased separation between crosshair elements
Line thickness customization employs the cl_crosshairthickness command. Higher values produce thicker, more visible lines that may improve quick target acquisition but potentially obscure precise aiming points.
- cl_crosshairthickness 0 – minimal line width
- cl_crosshairthickness 3 – substantially thicker visual elements
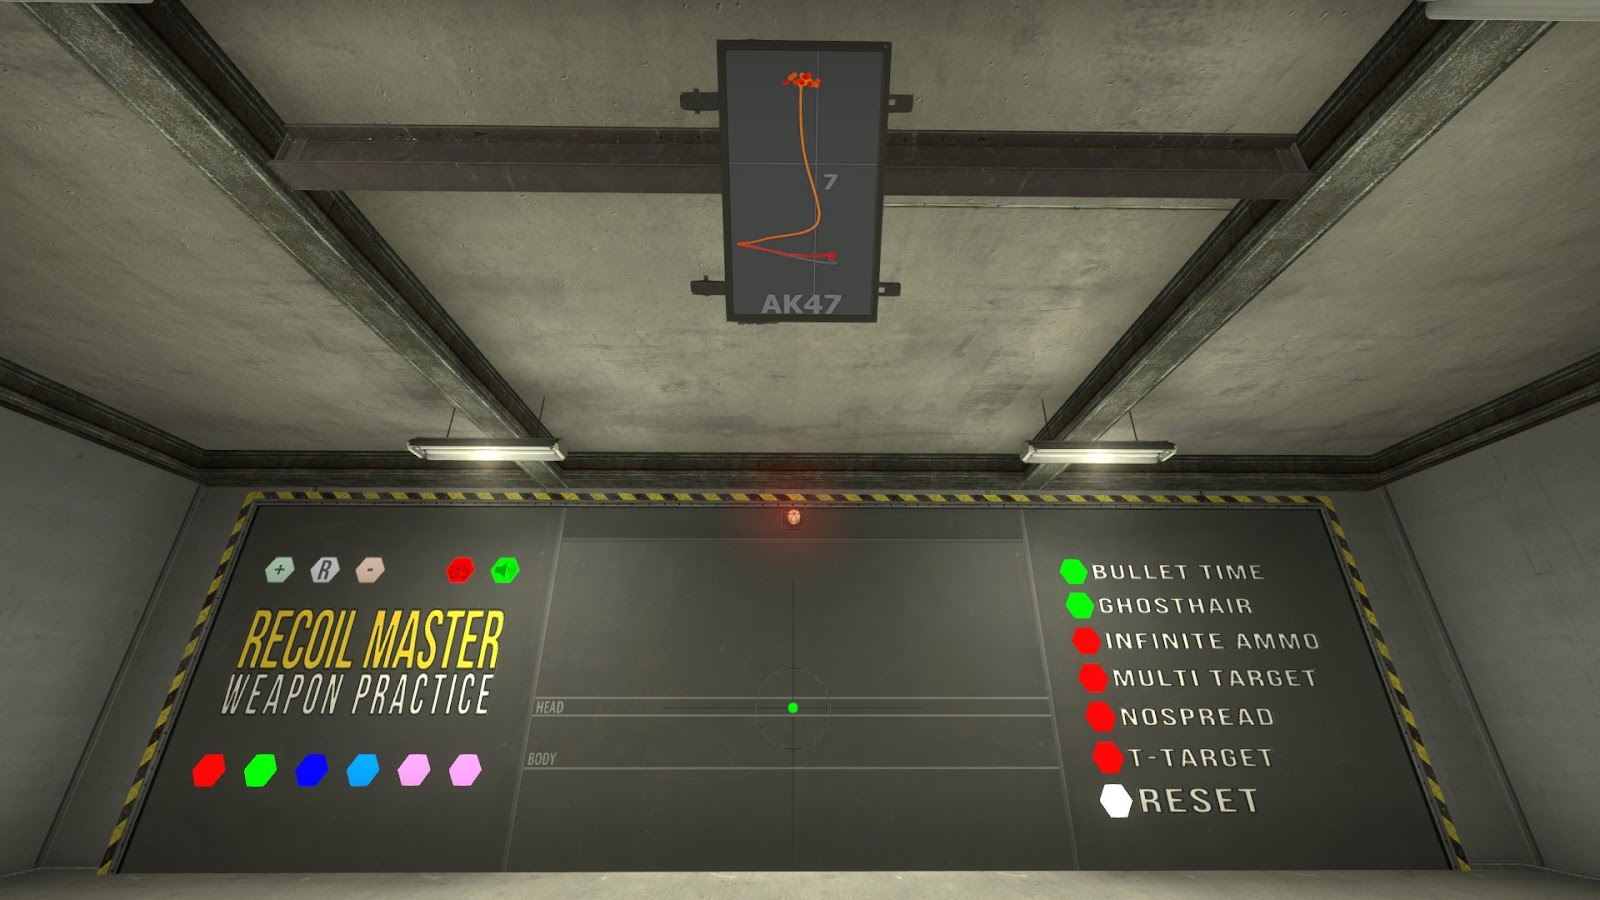
For players seeking the most efficient crosshair configuration workflow, Steam Workshop maps provide unparalleled convenience and functionality. The renowned Crashz’ Crosshair Generator stands as the definitive tool for rapid experimentation and implementation.
This specialized environment delivers four core functionalities that streamline the customization process:
- Comprehensive exploration of all available parameters through intuitive visual interfaces
- Real-time tweaking capabilities with immediate visual feedback on all adjustments
- Professional configuration replication with one-click import of top player settings
- Practical testing arena featuring bot opponents to evaluate new configurations under combat conditions
Examining professional player configurations reveals valuable insights into optimal crosshair design principles. Top competitors consistently favor configurations that minimize visual obstruction while providing clear reference points.
ZywOo Configuration
cl_crosshairalpha “250”;cl_crosshaircolor “1”;cl_crosshaircolor_b “50”;cl_crosshaircolor_r “250”;cl_crosshaircolor_g “250”;cl_crosshairdot “0”;cl_crosshair_t “0”;cl_crosshairgap “-3”;
cl_crosshairsize “2”;cl_crosshairstyle “4”;cl_crosshairusealpha “1”;cl_crosshairthickness “1”;cl_fixedcrosshairgap “-3”;cl_crosshair_outlinethickness “0”;cl_crosshair_drawoutline “0”;
s1mple Configuration
cl_crosshairalpha “255”;cl_crosshaircolor “2”;cl_crosshaircolor_b “50”;cl_crosshaircolor_r “250”;cl_crosshaircolor_g “250”;cl_crosshairdot “0”;cl_crosshair_t “0”;cl_crosshairgap “-3”;
cl_crosshairsize “1”;cl_crosshairstyle “4”;cl_crosshairusealpha “1”;cl_crosshairthickness “1”;cl_fixedcrosshairgap “-3”;cl_crosshair_outlinethickness “0”;cl_crosshair_drawoutline “0”;
NiKo Configuration
cl_crosshairalpha “1”;cl_crosshaircolor “5”;cl_crosshaircolor_b “144”;cl_crosshaircolor_r “195”;cl_crosshaircolor_g “195”;cl_crosshairdot “0”;cl_crosshair_t “0”;cl_crosshairgap “-3”;
cl_crosshairsize “1.5”;cl_crosshairstyle “4”;cl_crosshairusealpha “1”;cl_crosshairthickness “1”;cl_fixedcrosshairgap “-3”;cl_crosshair_outlinethickness “0”;cl_crosshair_drawoutline “0”;
Developing an optimal crosshair configuration requires strategic experimentation balanced with consistency. While testing different settings helps identify personal preferences, excessive changes can disrupt muscle memory development and aiming consistency.
Strategic crosshair configuration represents an ongoing process rather than a one-time setup. Finding the ideal parameter combination that maximizes both comfort and performance often requires substantial time investment in controlled testing environments.
Avoid the common mistake of constantly switching configurations based on temporary performance fluctuations. Each adjustment necessitates an adaptation period where your brain recalibrates to the new visual reference points.
Remember that your crosshair should enhance positioning awareness without creating visual distraction. Proper crosshair placement techniques work synergistically with well-configured reticles to improve overall aiming proficiency. For comprehensive guidance on developing fundamental aiming skills, explore our Complete Guide to core gameplay mechanics.
Good luck with your customization journey!
Action Checklist
- Start with basic in-game settings to establish initial preferences
- Experiment with console commands for granular parameter control
- Use Crashz’ Crosshair Generator for rapid testing and pro configuration copying
- Test new configurations against bots before competitive matches
- Monitor performance metrics using stat tracking tools
No reproduction without permission:Tsp Game Club » Setting up a crosshair in CS:GO. Guide by SCOPE.GG Master CS:GO crosshair customization with pro settings, console commands, and workshop tools for improved accuracy