TL;DR
- Defeat Leader enemies with colored icons to collect Demonic Essence for permanent upgrades
- Blue icons boost health, green icons increase shield capacity, yellow icons expand ammo reserves
- Check Chapter Details menu to preview available upgrades before entering levels
- Leaders appear both on main paths and hidden areas – explore thoroughly for maximum upgrades
- Upgrade collection is automatic – no manual activation required after defeating Leaders
Doom The Dark Ages represents a significant evolution in the franchise’s core gameplay mechanics. The Slayer has undergone a tactical transformation from nimble combatant to heavily armored assault unit, requiring players to adopt new survival strategies. This shift demands a deeper understanding of resource management and defensive capabilities.
The foundation of character progression revolves around hunting specialized Leader and Elite enemies scattered throughout each level. These enhanced adversaries serve as the primary source of Demonic Essence, the crucial resource needed for permanent stat enhancements. Unlike traditional boss encounters that serve as narrative milestones, Leaders function as optional but highly rewarding combat challenges that directly impact your survivability.
Critical distinction: Leaders and Elite enemies are not named bosses but rather souped-up versions of standard foes like Mancubus and Hell Knights. Understanding this difference prevents wasted effort chasing the wrong targets and ensures efficient upgrade progression.
Successfully locating Leader enemies requires mastering both visual cues and exploration techniques. The most immediate identification method involves scanning for the prominent health bar that appears at the top of your screen when these special enemies are nearby. This UI element serves as an early warning system, allowing you to prepare for the upcoming engagement.
While following primary mission objectives will naturally lead you to most Leader encounters, the most rewarding approach involves thorough environmental investigation. Many Leaders occupy hidden areas or optional paths that require deliberate exploration to discover. This design encourages players to venture beyond the critical path for maximum upgrade benefits.

Before engaging any Leader, conduct quick reconnaissance of the combat arena. Identify cover positions, ammunition caches, and potential escape routes. Proper preparation significantly increases your chances of success against these enhanced opponents, especially when playing on higher difficulty settings where every tactical advantage matters.
The upgrade system employs a straightforward color-coding mechanism that instantly communicates reward types. Floating directly above each Leader enemy, you’ll notice one of three distinct colored icons that indicate exactly which stat enhancement you’ll receive upon victory.
Blue icons signify health capacity upgrades. Defeating these Leaders provides a permanent increase to your maximum health, allowing you to withstand more damage before succumbing to demonic assaults. This upgrade path becomes increasingly valuable as you progress to later stages with more aggressive enemy compositions.
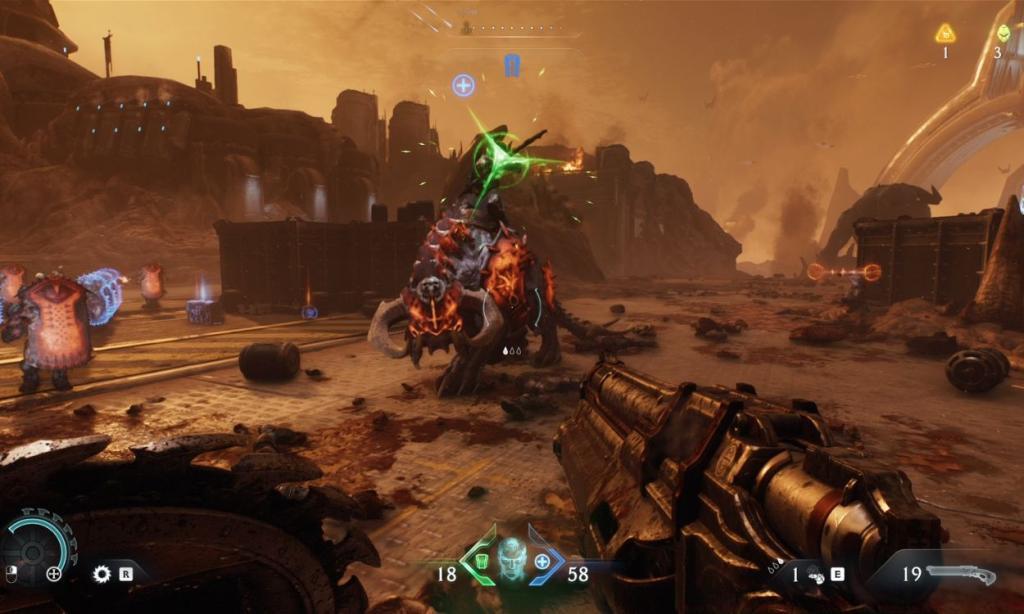
Leaders marked with Green icons offer shield capacity enhancements. Collecting their Demonic Essence bolsters your defensive capabilities, enabling the Slayer to endure sustained punishment during intense firefights. Shield upgrades work synergistically with health improvements to create a more resilient combatant.

Enemies displaying Yellow icons provide ammunition capacity increases. These upgrades apply to randomly selected weapons from your arsenal, with the specific beneficiary only revealed after you collect the Demonic Essence. This element of surprise encourages players to maintain balanced weapon usage rather than relying on a single favorite firearm.

Pro tip: Always consult the Chapter Details screen accessible from the main menu before starting a level. This interface explicitly lists which upgrade types are available in that specific chapter, allowing for targeted hunting rather than random exploration. This strategic approach saves significant time and ensures you don’t miss critical enhancements.
For players seeking to maximize their upgrade efficiency, several advanced techniques can dramatically improve your progression rate. Create mental maps of Leader spawn locations during initial playthroughs, noting which paths yield the highest concentration of targets. This knowledge becomes invaluable during subsequent runs or when attempting higher difficulty levels.
Common mistake: Many players underestimate the importance of shield upgrades early in the game. While health improvements provide immediate survivability benefits, shield capacity becomes increasingly crucial as enemy damage output escalates in later chapters. Balance your upgrade focus rather than specializing in a single stat category.
Combat optimization: When facing Leaders, prioritize eliminating supporting enemies first whenever possible. Leader enemies typically have substantial health pools, making prolonged engagements dangerous if you’re simultaneously dealing with lesser demons. Use area-of-effect weapons to clear crowds before focusing your full attention on the primary target.
Time investment: A complete upgrade run typically requires 2-3 hours of dedicated hunting across all chapters, though this varies based on difficulty setting and player skill level. Allocate exploration time proportionally – some chapters contain significantly more Leaders than others.
Progression planning: If you’re struggling with a particular chapter, consider revisiting earlier levels to collect missed upgrades. There’s no level-locking mechanism preventing you from strengthening your character before tackling difficult sections. This flexibility allows for strategic difficulty management through preparation.
Remember that while the Battlefield 6 Complete Guide focuses on different tactical approaches, the core principle of systematic progression remains consistent across modern shooter titles. Applying similar methodology to your Doom The Dark Ages playthrough will yield significantly better results than haphazard exploration.
Action Checklist
- Check Chapter Details menu before each level to identify available upgrades
- Scan for prominent health bars and colored icons to identify Leader enemies
- Clear supporting enemies before engaging Leaders to avoid being overwhelmed
- Explore off-path areas thoroughly to find hidden Leader encounters
- Balance upgrade focus across health, shield, and ammo rather than specializing
No reproduction without permission:Tsp Game Club » How to Upgrade Health, Shield and Ammo in Doom The Dark Ages Master Doom The Dark Ages upgrade system with expert strategies for health, shield, and ammo capacity boosts